Mitch Richling: Electronics FAQ
| Author: | Mitch Richling |
| Updated: | 2023-04-09 |
I regularly receive inquiries about putting together a good electronics workbench or equipment purchases. I usually provide the same answers, so I figured I would write some of them down and post them. Keep in mind that I'm not an expert – I have almost no formal training in electronics. In fact, most of what you will find here is me documenting things I have done wrong. ;)
Obviously can I accept no responsibility for any trouble or damages that might result from you using this information.
All that said, I sincerely hope someone finds my rantings useful. If not useful, then perhaps entertaining. ;)
Table of Contents
- 1. The bench
- 2. Bench IT
- 3. Power
- 4. Meters
- 5. Probe Positioning Equipment
- 6. Temperature
- 7. Oscilloscopes
- 8. Test Automation
- 9. Analog Discovery 2
- 10. Digital Discovery
- 11. Signal Generators
- 12. A-Brand vs. B-Brand Vendors
- 13. The Other Bench
- 14. Soldering & Assembly
- 14.1. The Dirty Bench (Soldering Station)!
- 14.2. Do I need a microscope for soldering?
- 14.3. Hand Tools
- 14.3.1. You have two tool drawers labeled "Scalpel"? What's up?
- 14.3.2. Really? You never use precision/hobby/X-Acto knives?
- 14.3.3. You have 5 tool drawers labeled "tweezers"? That's a lot of tweezers! What's up?
- 14.3.4. Tweezers advice?
- 14.3.5. Tweezers hacks!
- 14.3.6. Electronics Pliers & Cutters
- 14.3.7. Wire Strippers
- 14.3.8. Needle Nose Pliers & Hemostats
- 14.3.9. Hemostat Advice?
- 14.4. PCB Support
- 14.5. Helping Hands
- 15. Math Nerds interested in chaos circuits.
- 15.1. What do I need to get started?
- 15.2. Do I need fancy/expensive operational amplifiers?
- 15.3. Should I get an analog oscilloscope?
- 15.4. Should I get a high end multimeter?
- 15.5. Why do you recommend the Analog Discovery 2?
- 15.6. How do I measure a non-ground referenced voltage with a regular oscilloscope?
- 16. Stupid Bench Tricks
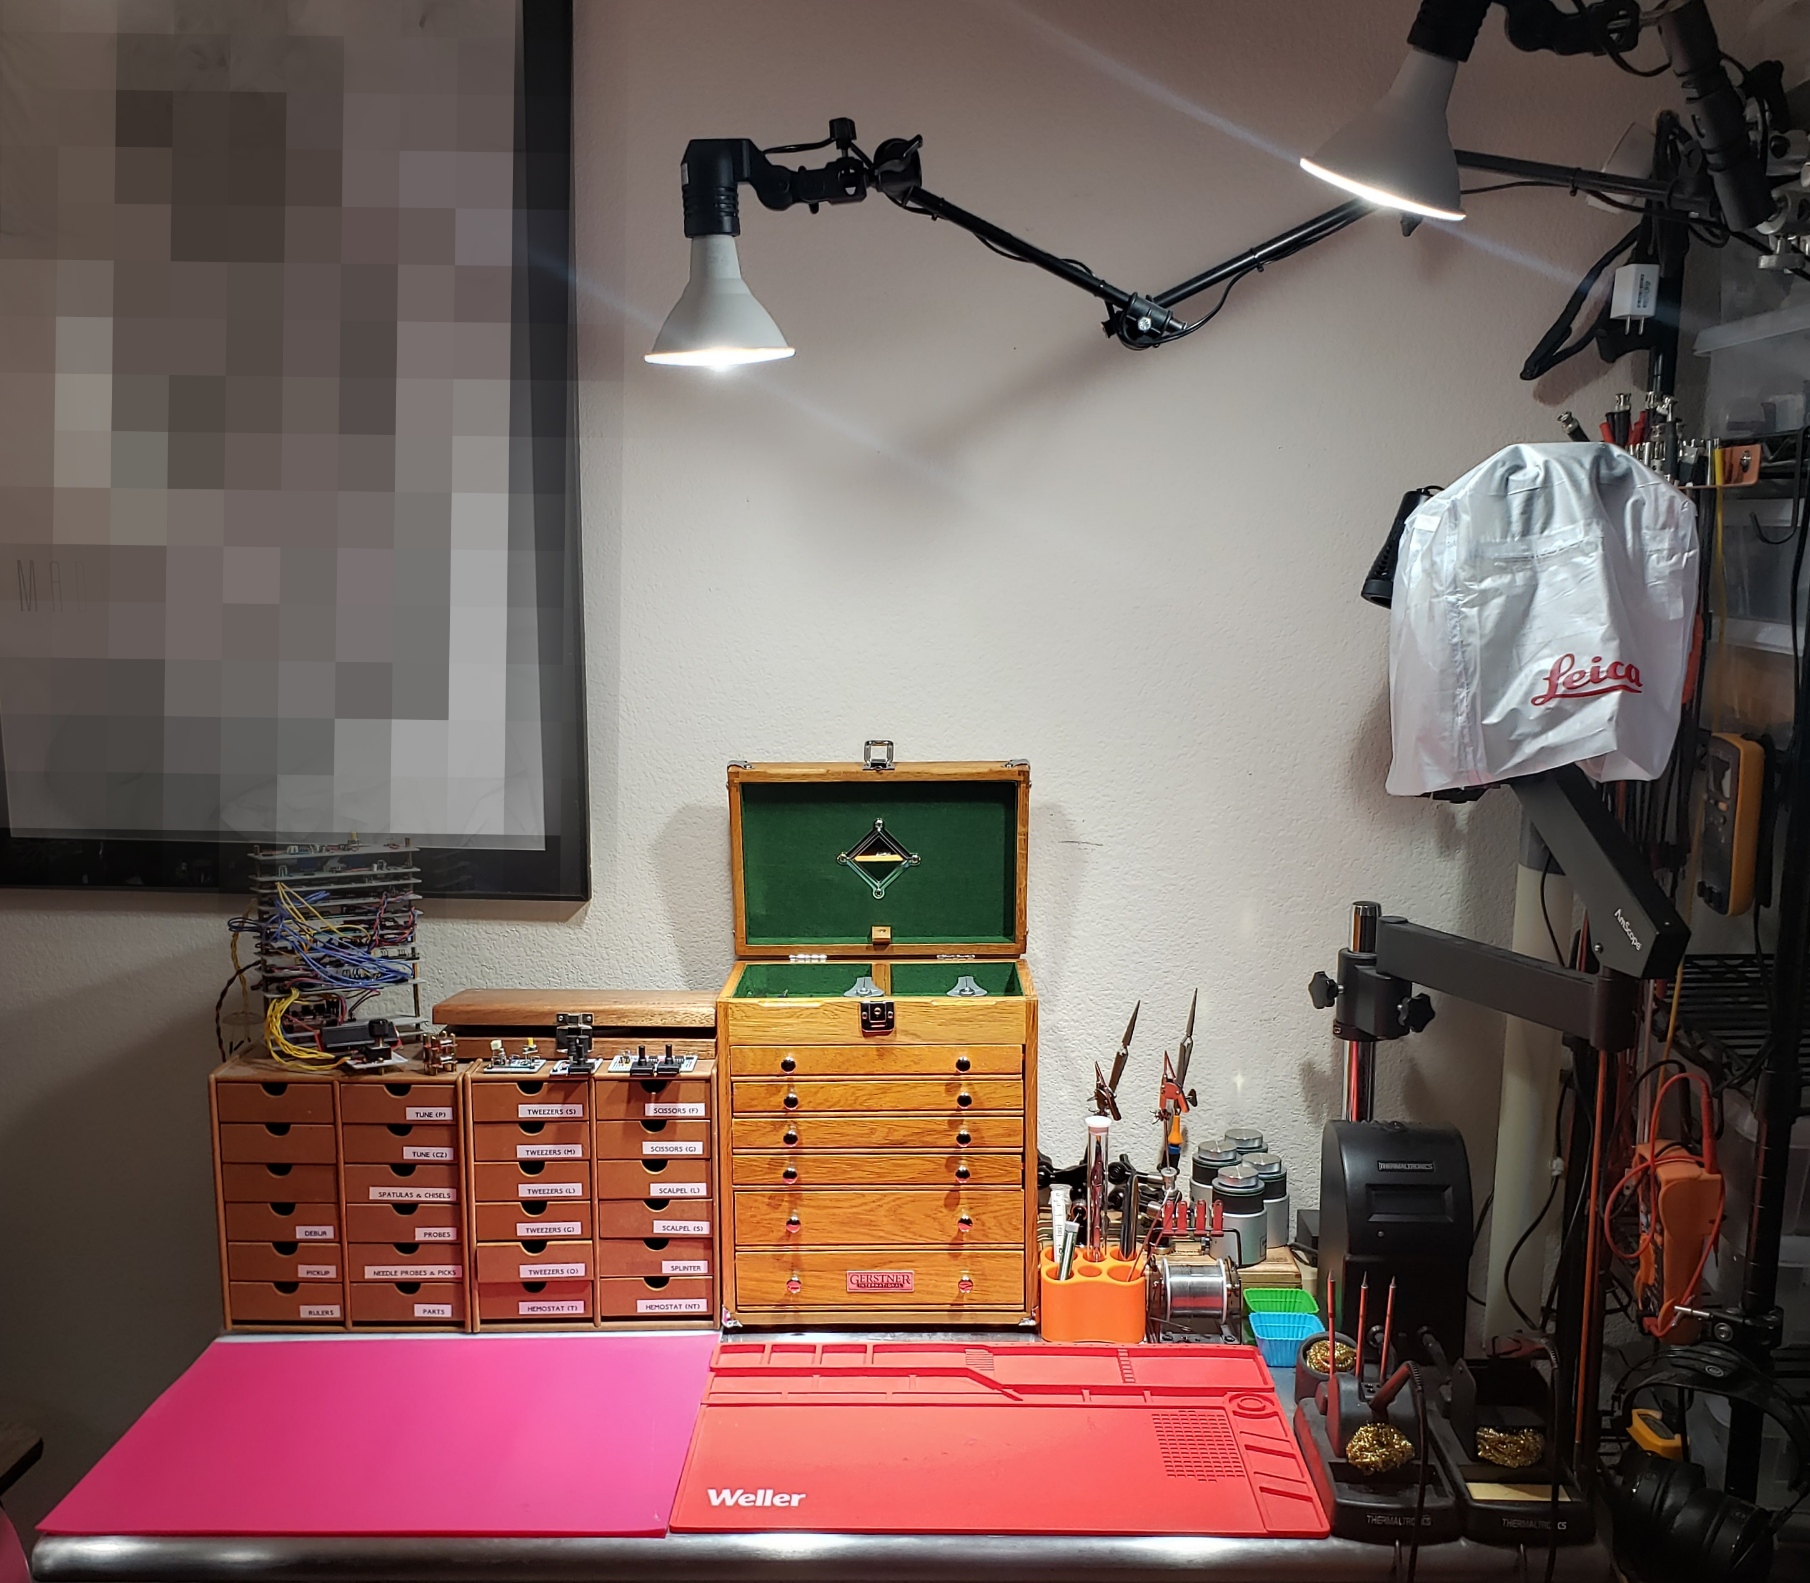
1. The bench
1.1. Dedicated vs Non-Dedicated Space
For me, a dedicated space is a must, but it can be pretty small.
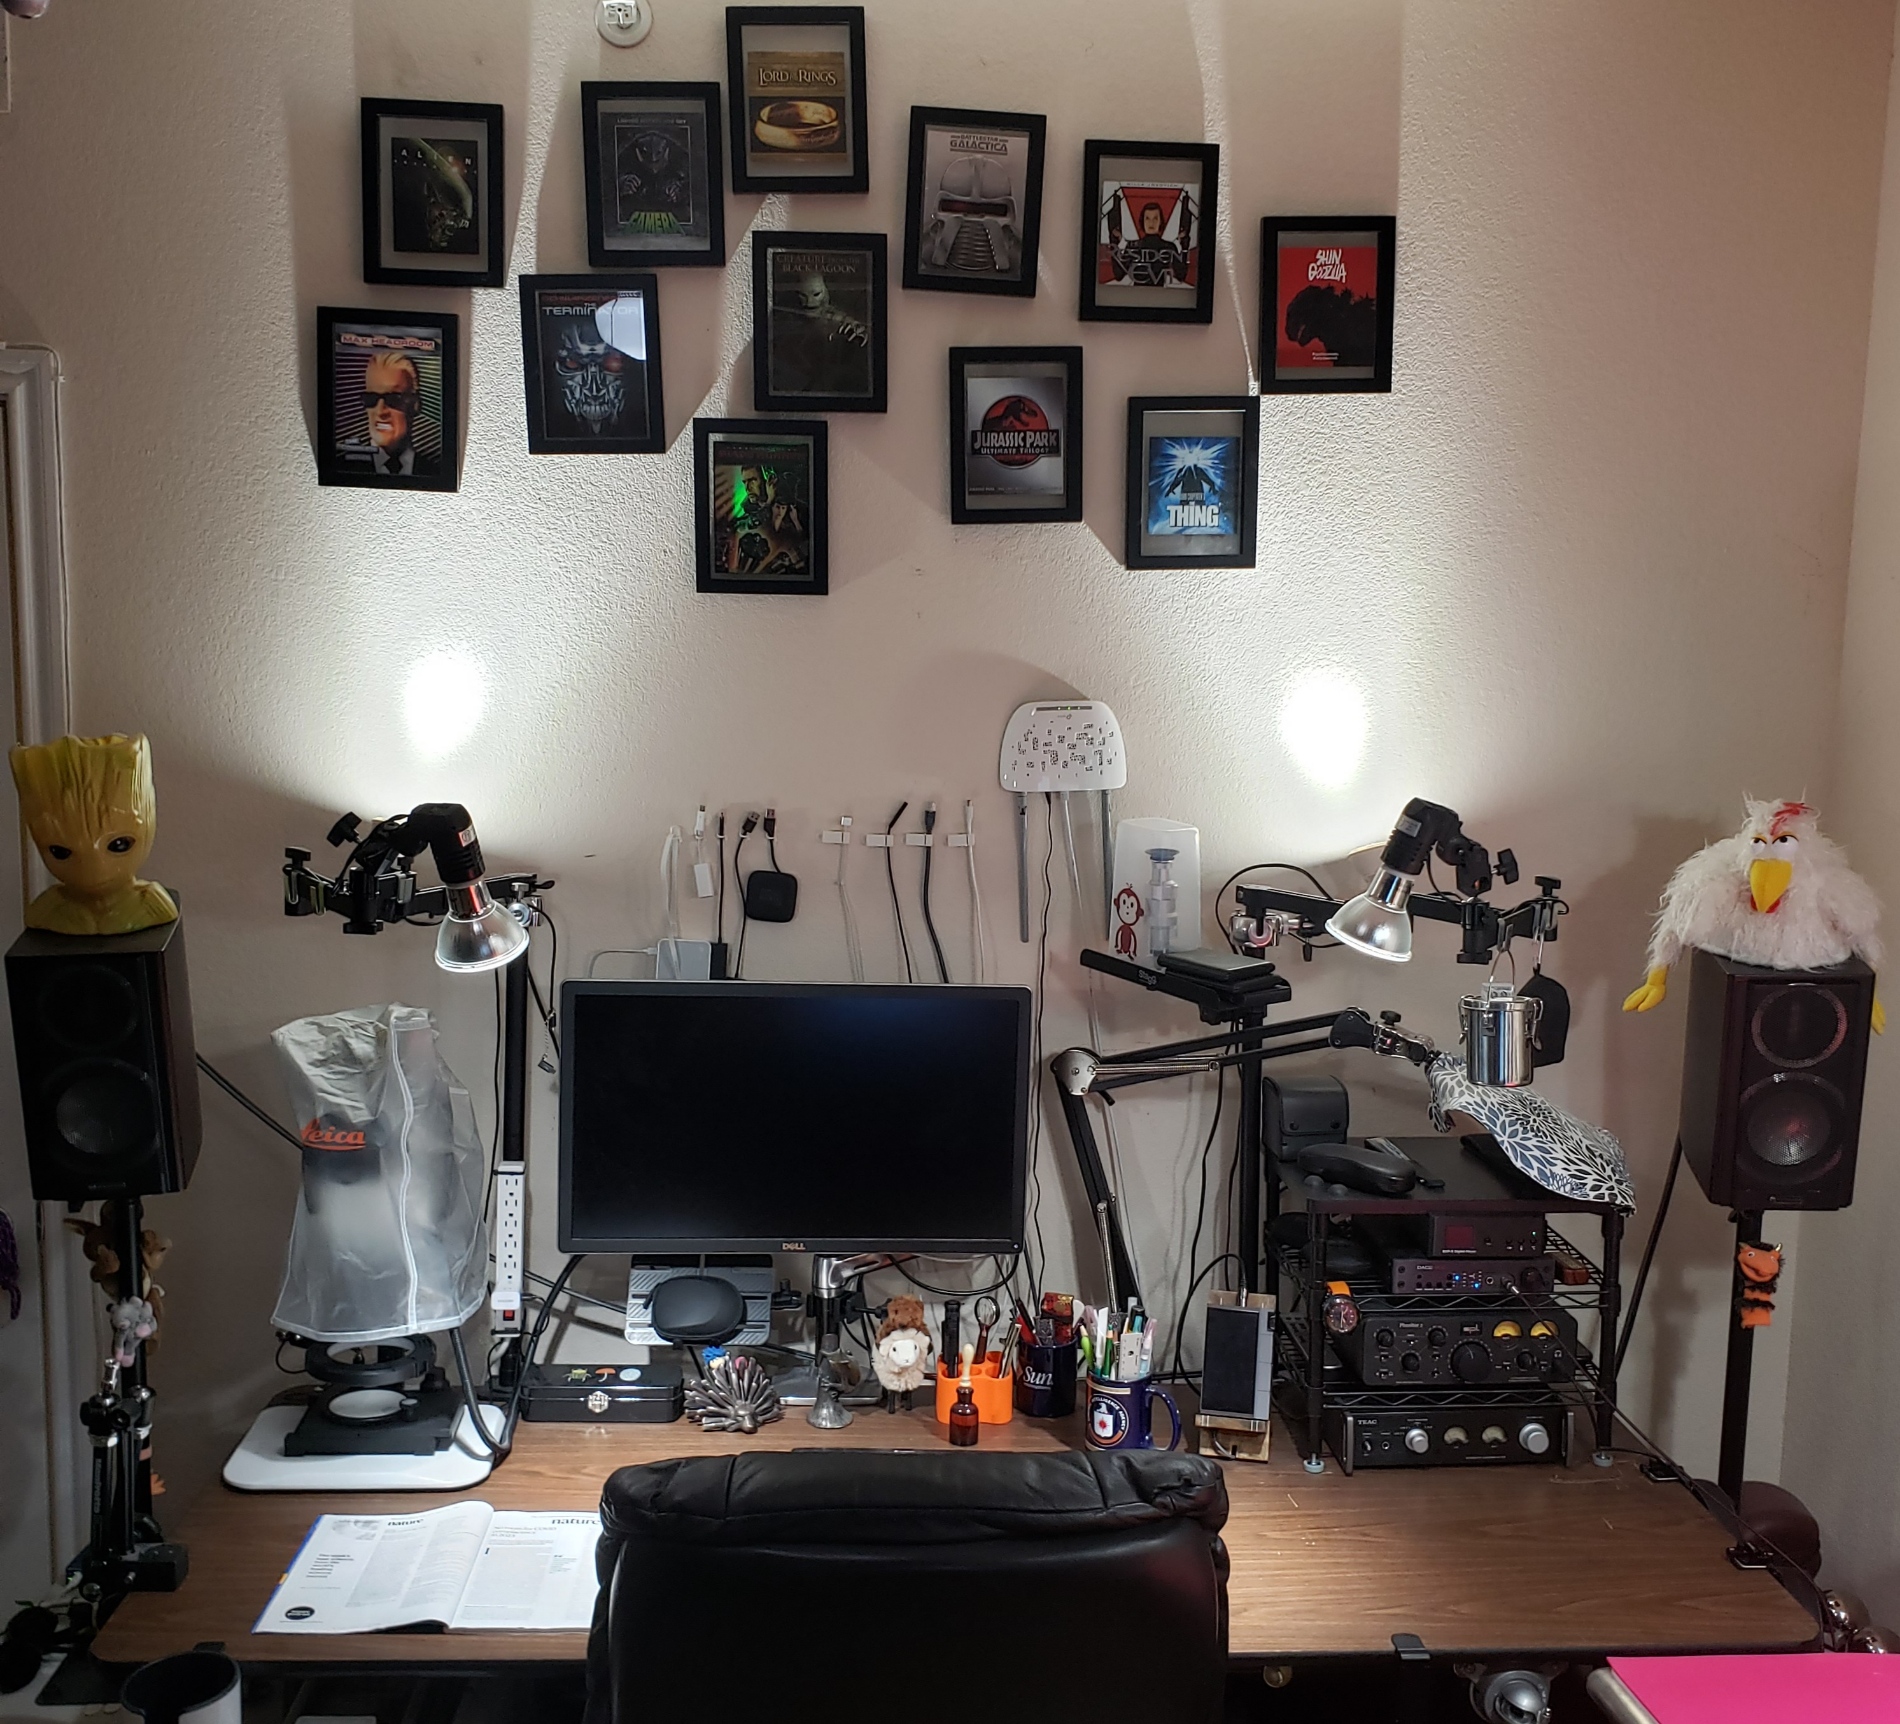
For years I had a dedicated electronics workbench with enough rack space to provide all my equipment a permanent home. It was nice to have all the test equipment at the ready, but it chewed up more than 10 feet of wall space. I found myself wanting to reuse that space for things fundamentally incompatible with delicate test equipment – painting, grinding, etc. When I moved into a new place I decided to switch things up. The idea was a much smaller bench with a shifting set of test equipment suited to whatever I was working on at the moment.
How did it work out? The new bench takes up 4 feet of wall space, and I don't miss the larger space one bit! I was initially concerned I would waste a lot
of time shifting equipment on and off the bench, but it turns out I tend to use the same equipment most of the time. In theory I can put everything on the
shelves and completely clear the workspace, but I have so much free non-bench space at the ready that I rarely do. So in the end I pretty much ended up with
dedicated bench space. ;)
1.2. Any suggestions on bench setup?
1.2.1. Think About Equipment Depth
Bench gear is frequently designed to be rack mounted, and thus can be much deeper than you might expect. My main bench DMM needs 17 inches with cables attached. Vintage equipment, like old oscilloscopes, can chew up even more space. This means typical 1 foot shelves are not deep enough for test equipment, and 3 foot deep tables will feel pretty cramped. One trick is to place a shelving unit behind a standard table with one of the shelves at table height – thus extending the table surface. You can then put really deep gear on the shelf/table surface, and shorter gear on higher shelves. Commercial wire shelving units come in 24 & 30" depths, and do a great job dissipating heat from test equipment.
1.2.2. Ergonomics: Bench Surface & Shelves
Using test equipment elevated high above the work surface can lead to arm and back fatigue after long hours. It is also annoying switching focus from close up work on the bench surface to equipment on a shelf. On my bench the most used test gear is directly on the bench surface, and I have elevated the entire work surface quite a bit higher than my computer desk. This works really well for me. My advice is to experiment, and figure out what works best for you. Adjustable height workbenches are a bit more expensive, but they are super nice.
1.2.3. Ergonomics: Chairs!
Don't underestimate the value of a good, ergonomic chair!
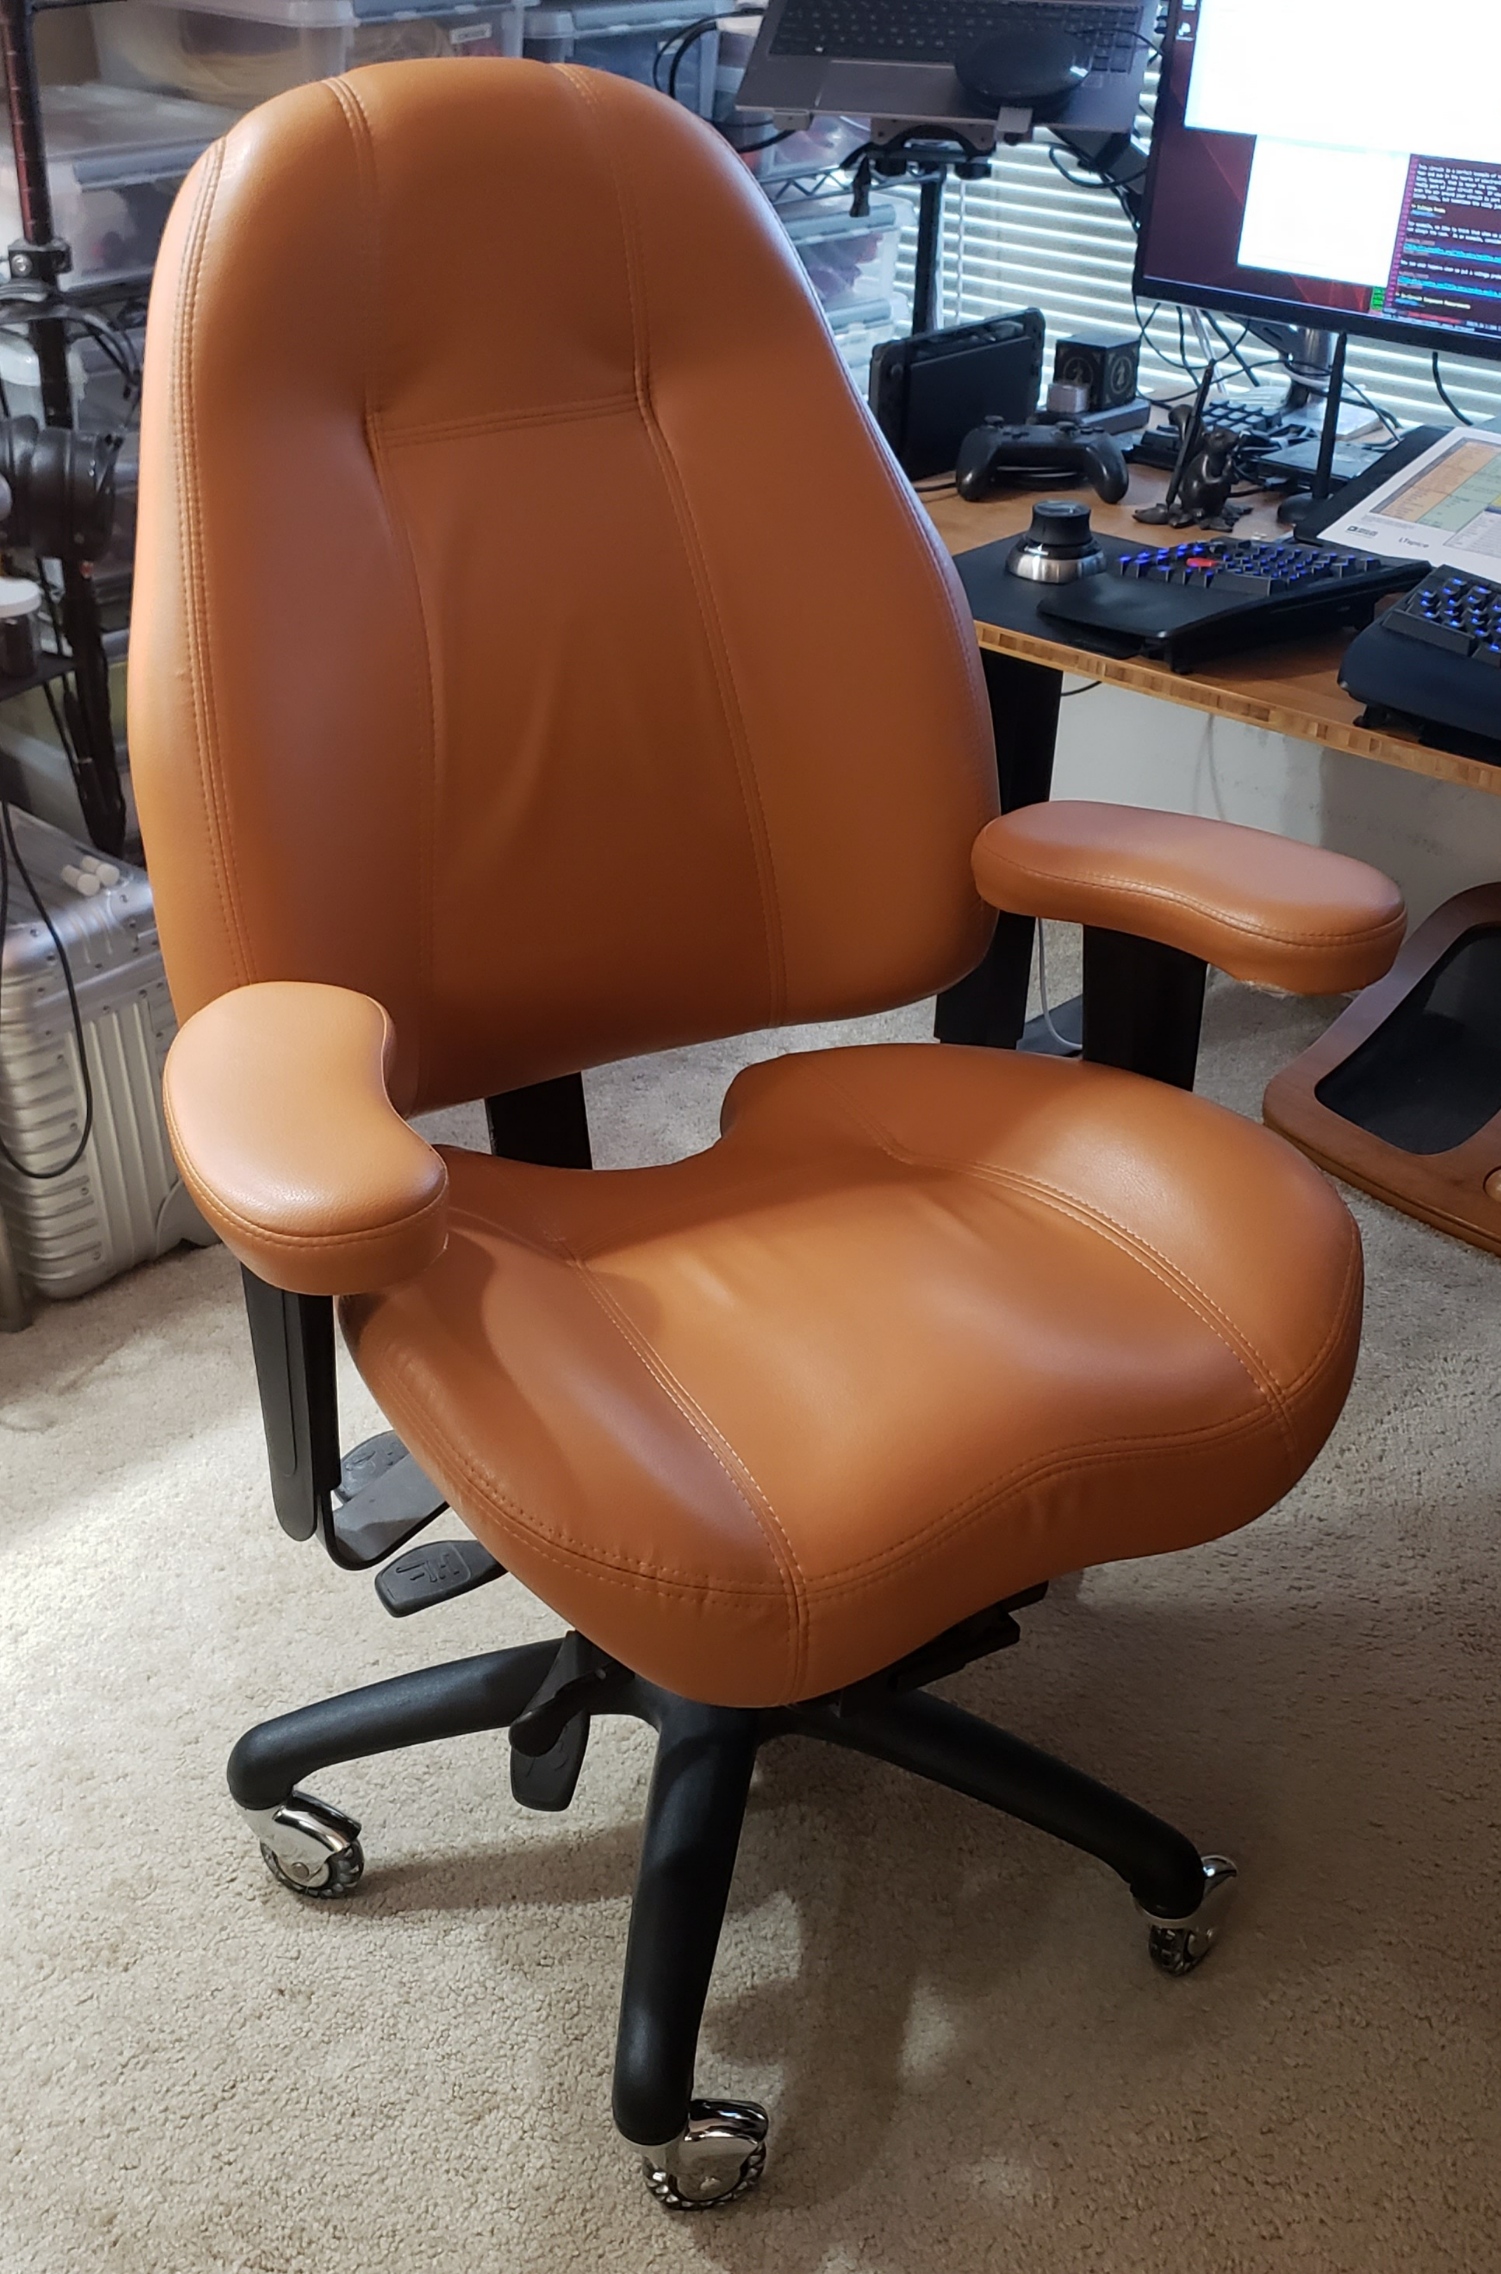
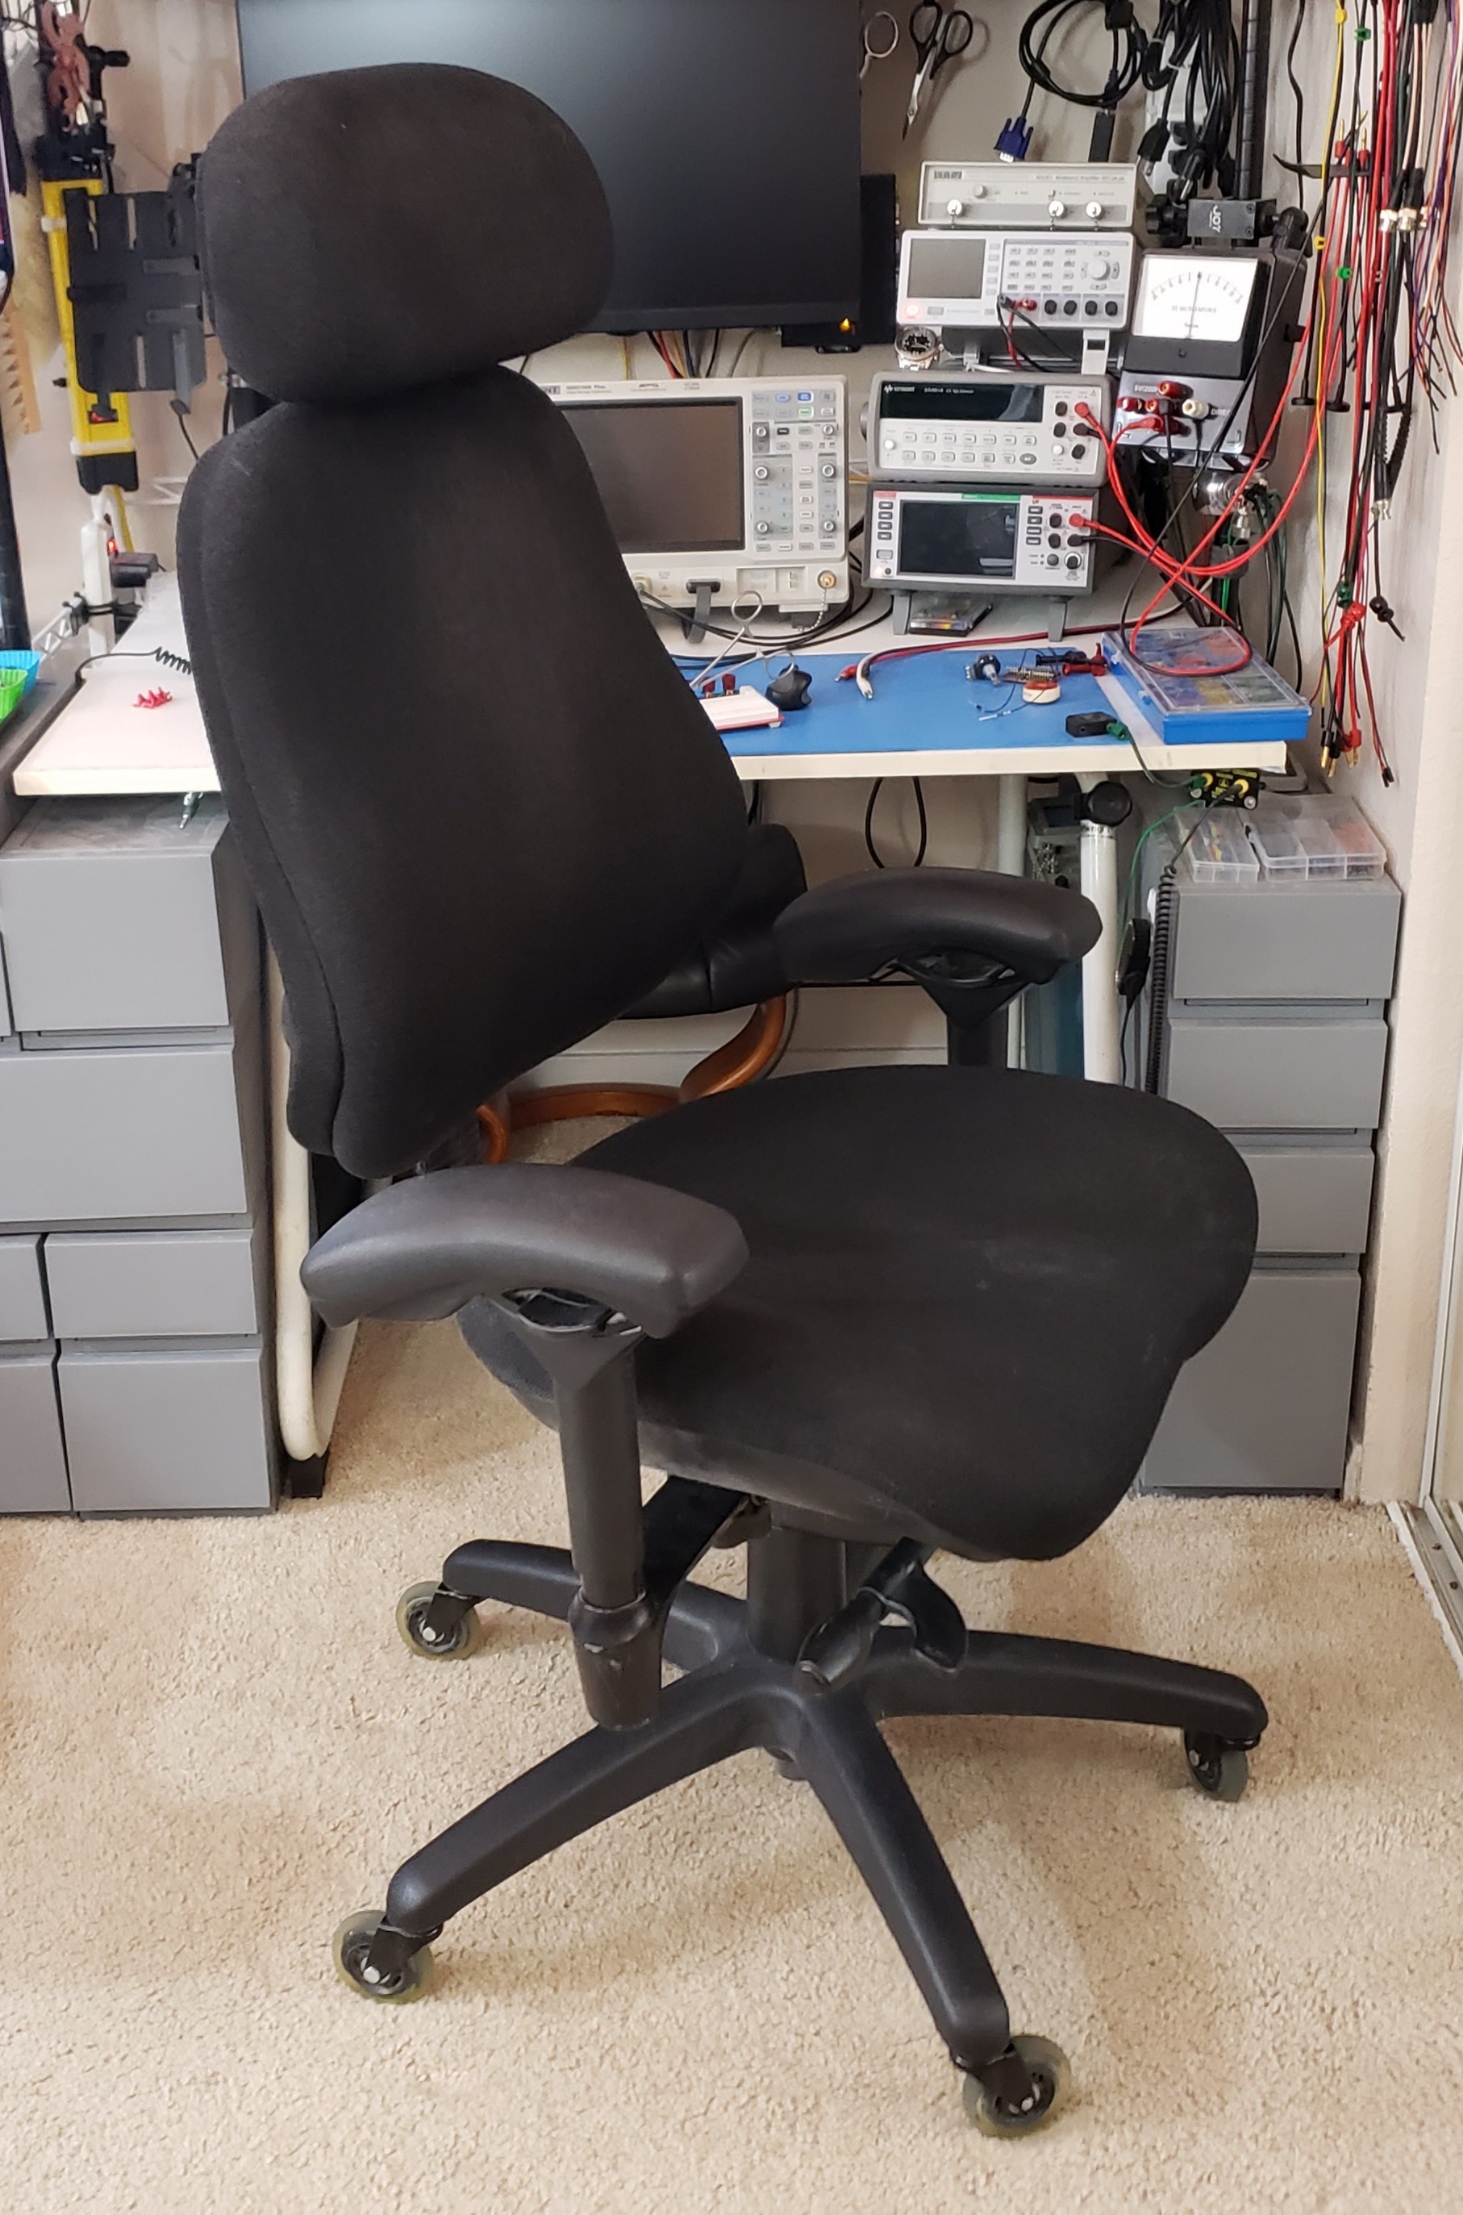
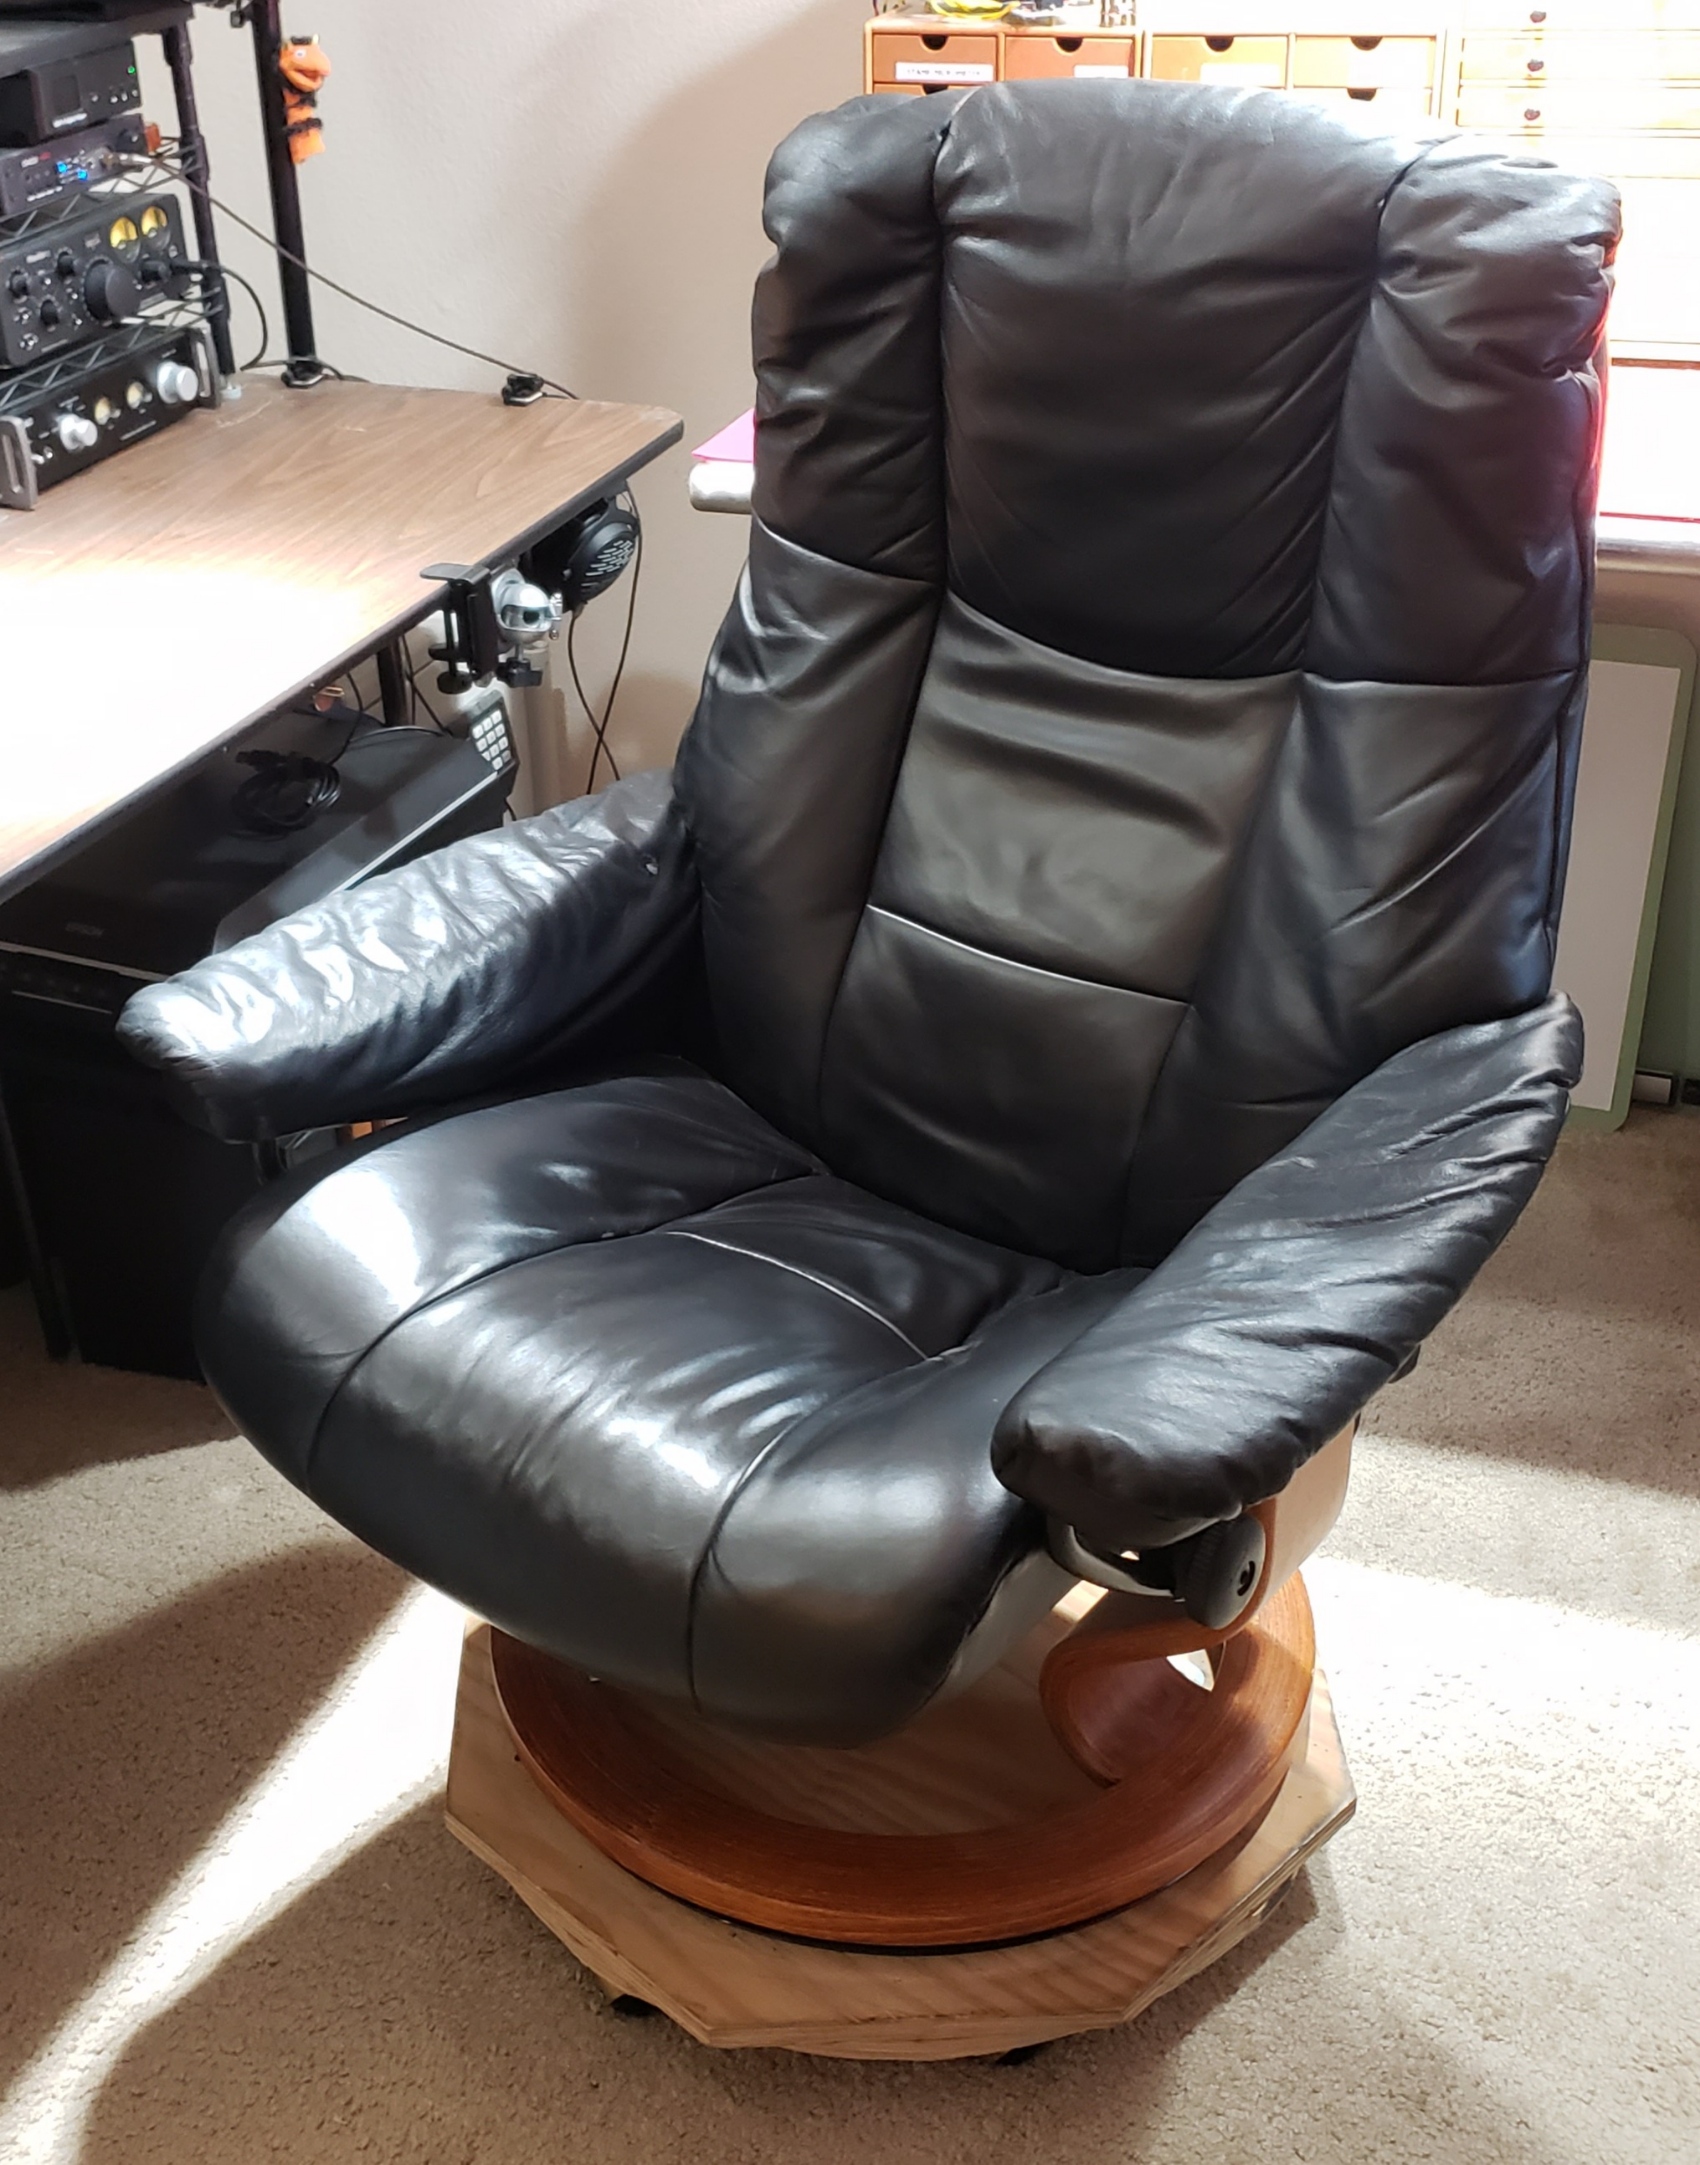
I have two very nice ergonomic office chairs – one for the bench and one for my computer desk. The one on the left is an executive office chair by Lifeform. They make great chairs. The one in the middle is a very old Bodybilt – I have had some bad luck with more recent Bodybilt products, so I have a hard time recommending them. Lastly, the one on the right isn't an ergo chair at all. It's a Stressless Chair made in Norway. They are upholstered in buttery soft leather, have fantastic back support, and recline. Mine rides on top of an ugly, homemade caster platform turning the whole thing into a rolling chair. Stressless makes office chairs, but I originally purchased this one for the living room and later adapted it to the lab. It's a great chair for working at the desk, or for reclining back and playing some video games. I love these chairs.
1.2.4. ESD & Grounding
Just spend the money and spring for a good ESD work surface that can live permanently on the bench. Find an ESD wrist/foot strap that is actually comfortable. If you have harry arms, then be careful about the expanding metal wrist bands! Put the band someplace out of the way, but easy to access so you will actually use it!
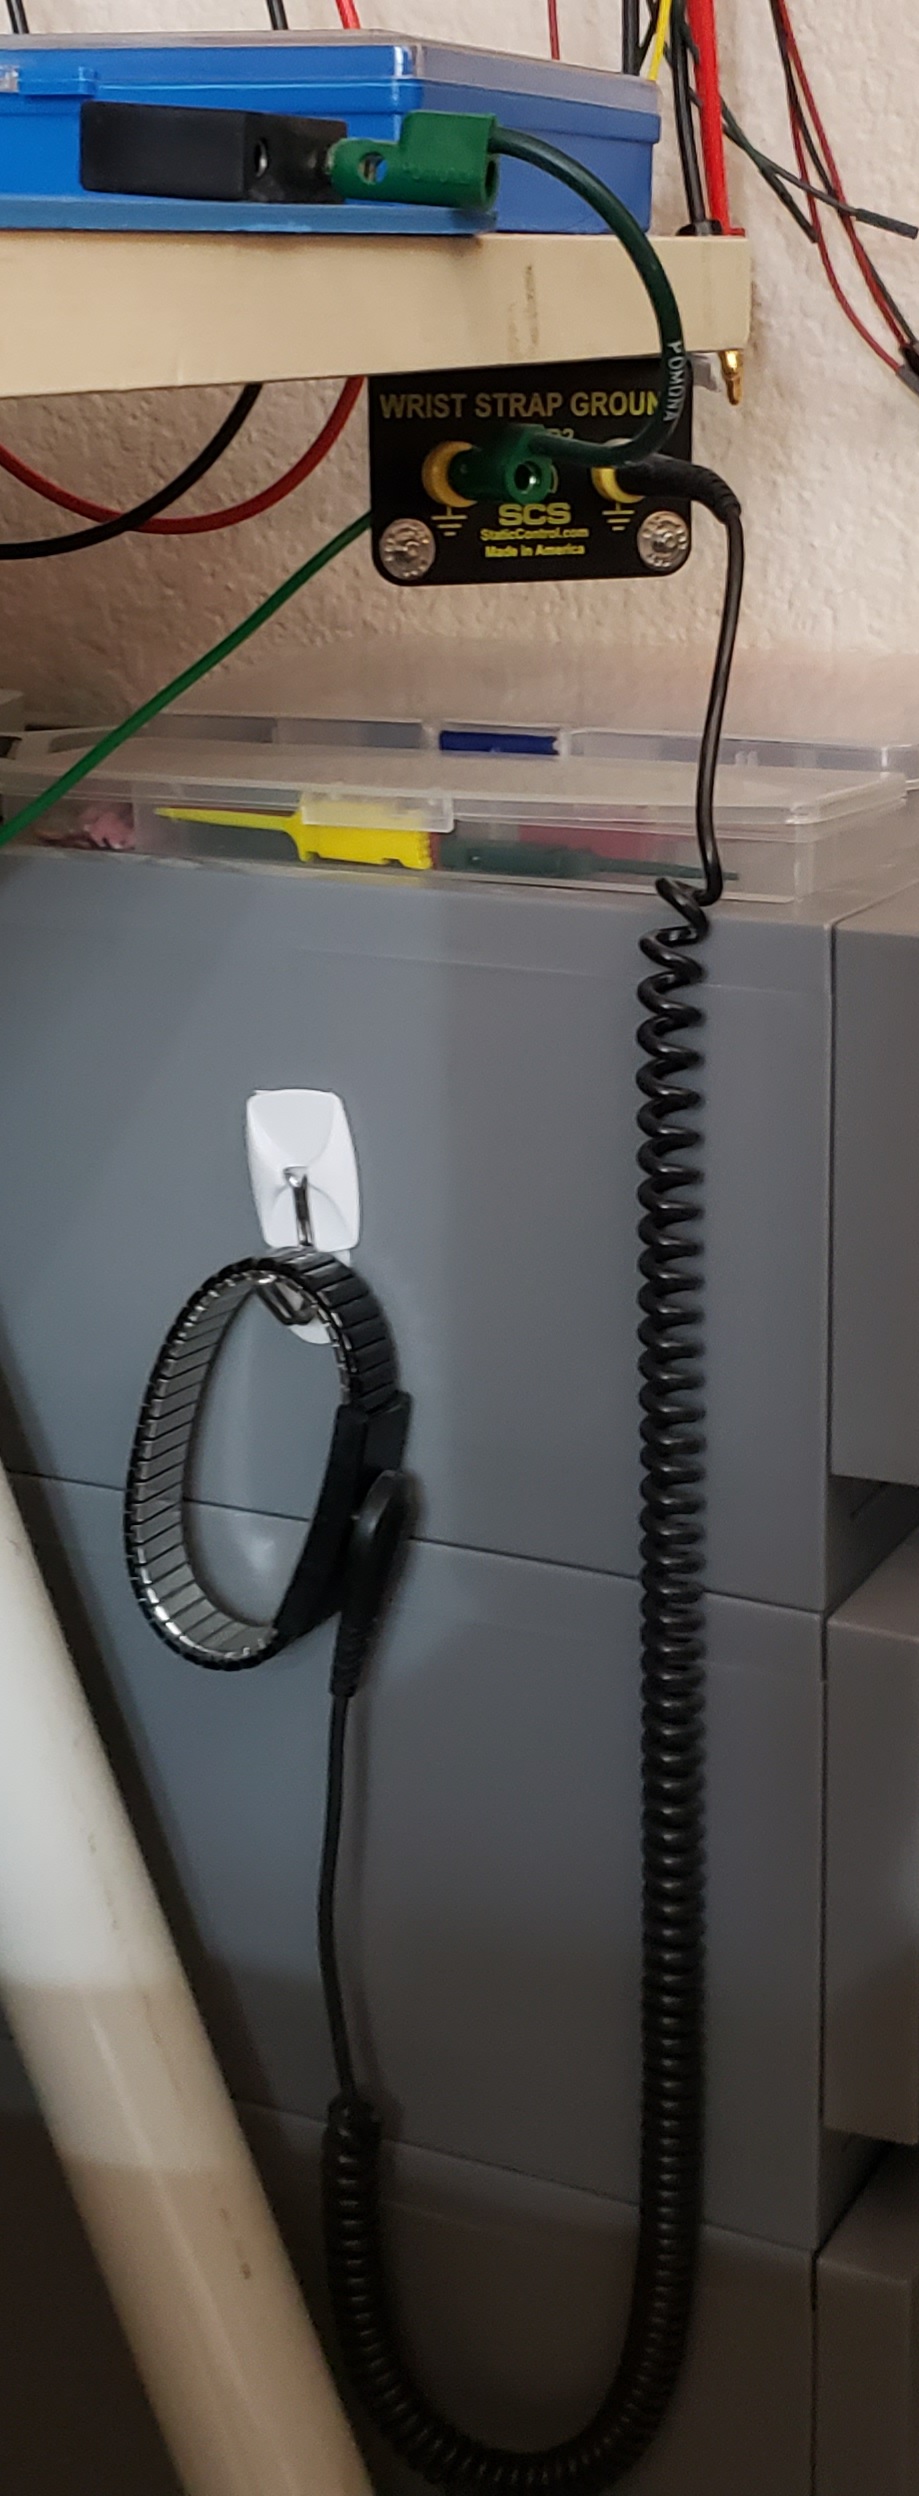
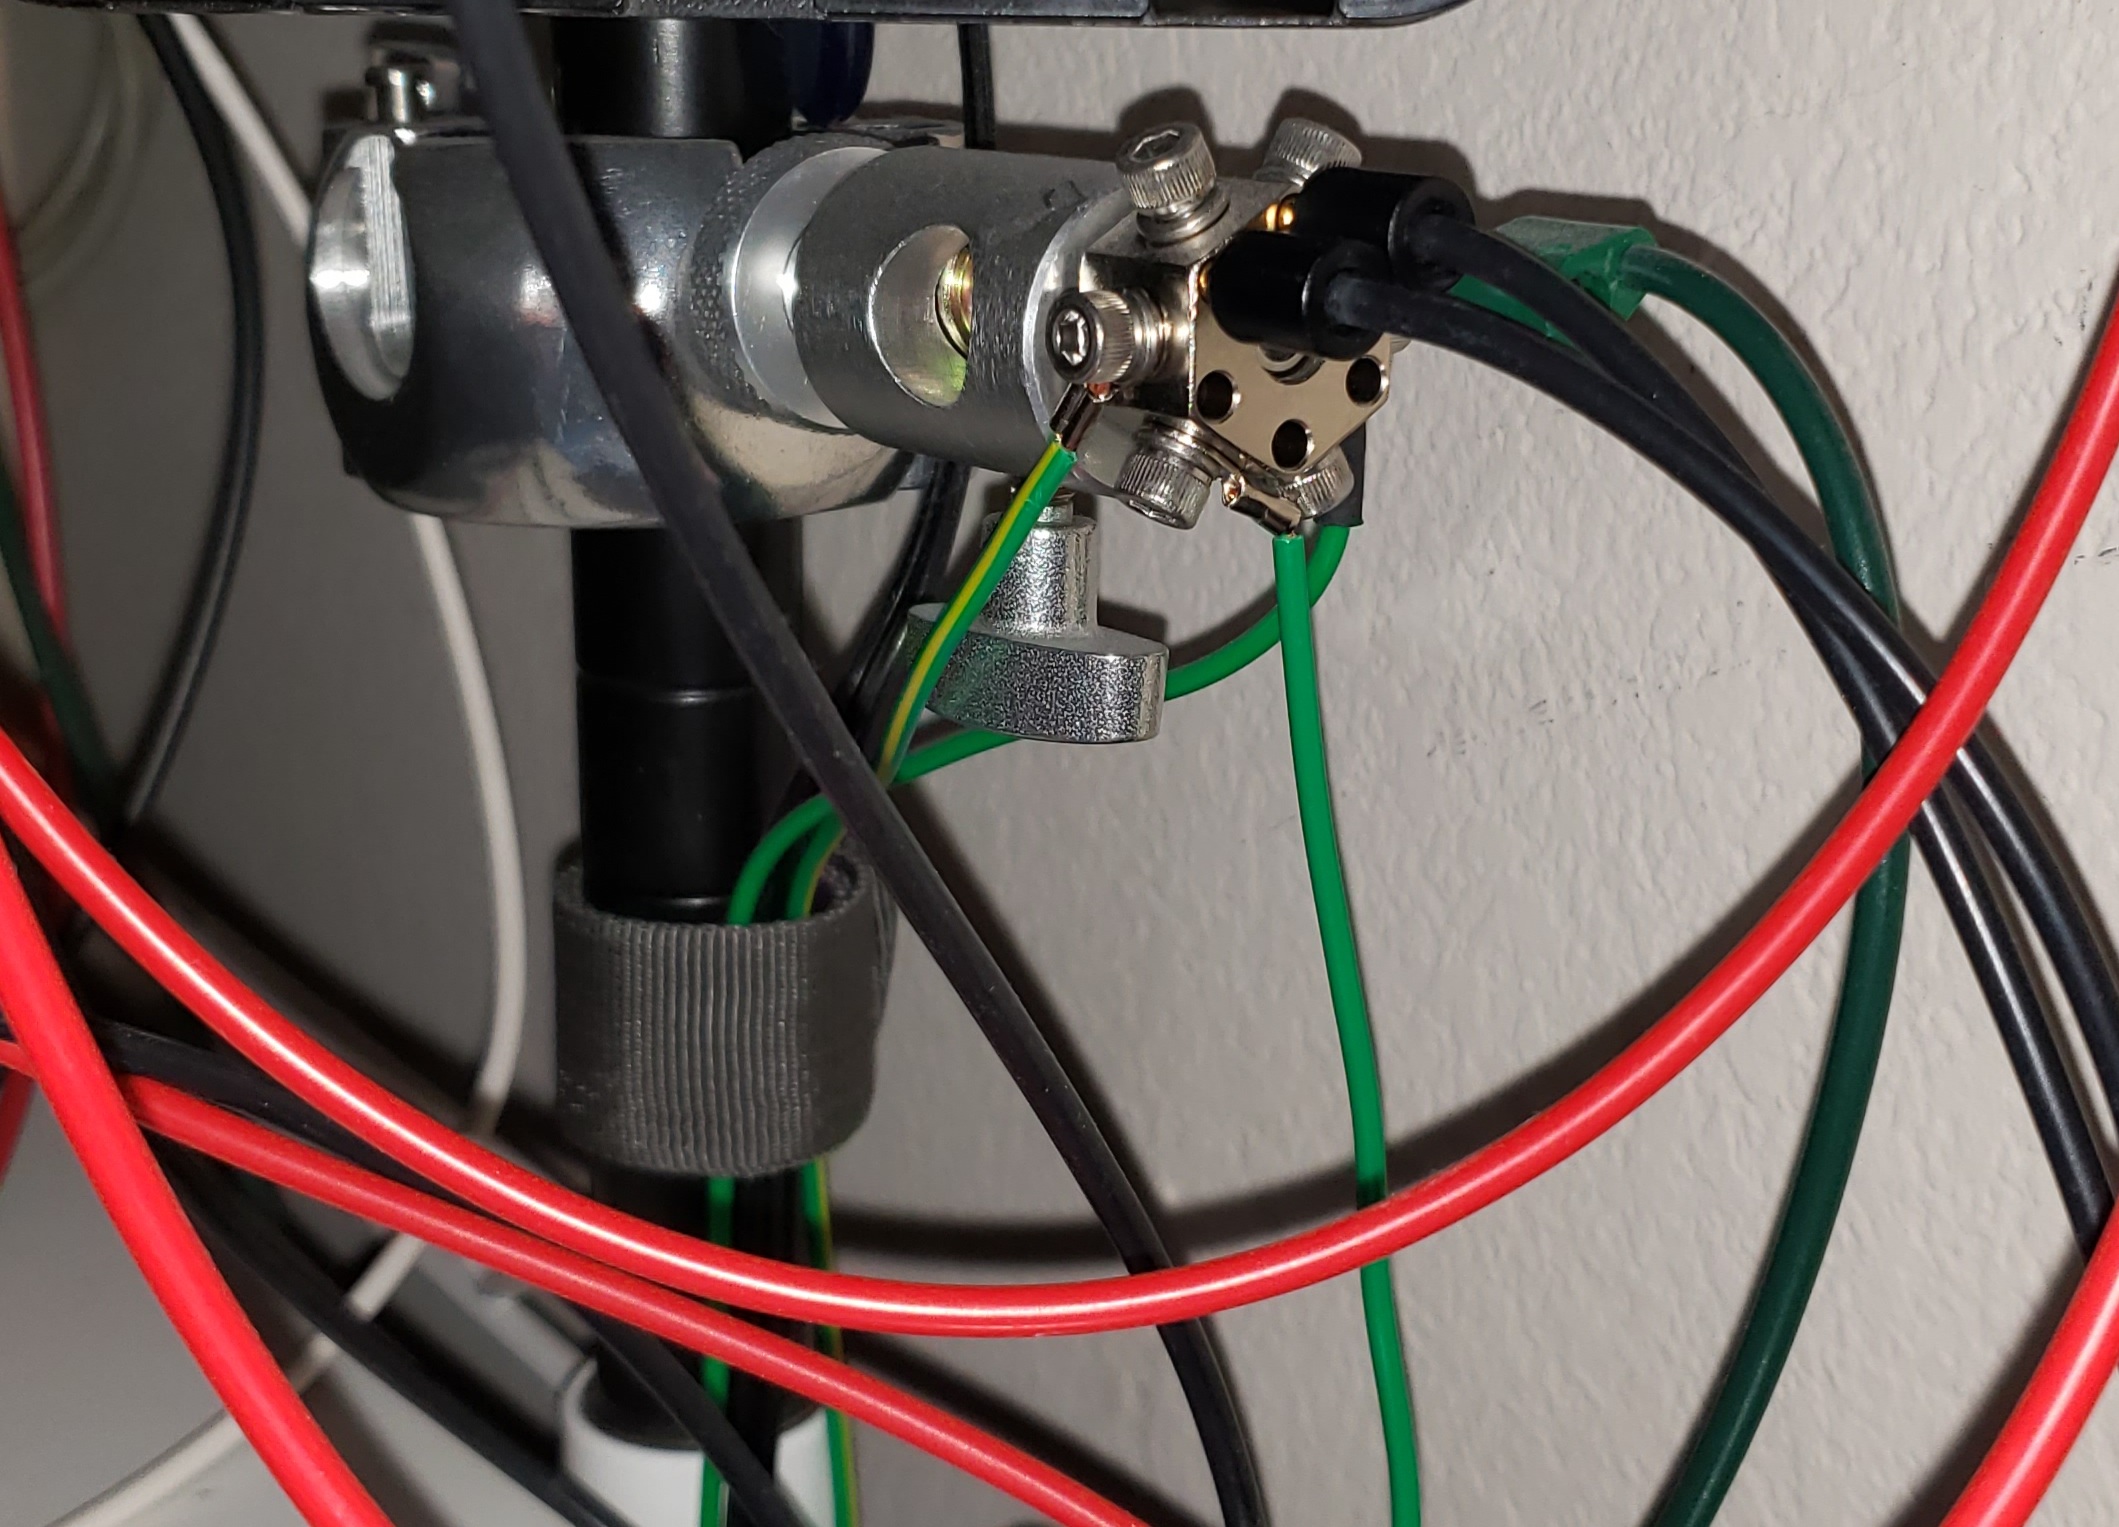
Install a multi-jack grounding point on the bench so everything can be connected to the same ground. Get one with 4mm banana jacks and screw terminals. TEST your ground!!!
1.2.5. Swing Arms!
Swing arms are a great way to get things off the surface of your bench, and place them where they can be of best use. Computer monitors, lighting, and magnifiers are obvious things to put on an arm, but don't limit yourself. For example, I have a swing arm equipped with a tablet tray attached to a shelf above my bench which I use for small equipment like a VOM or thermocouple driver.
1.2.6. Fumes
Spring for a fume extractor. Extractors with articulated intake vents don't even take up bench space. Your nose will thank you.
2. Bench IT
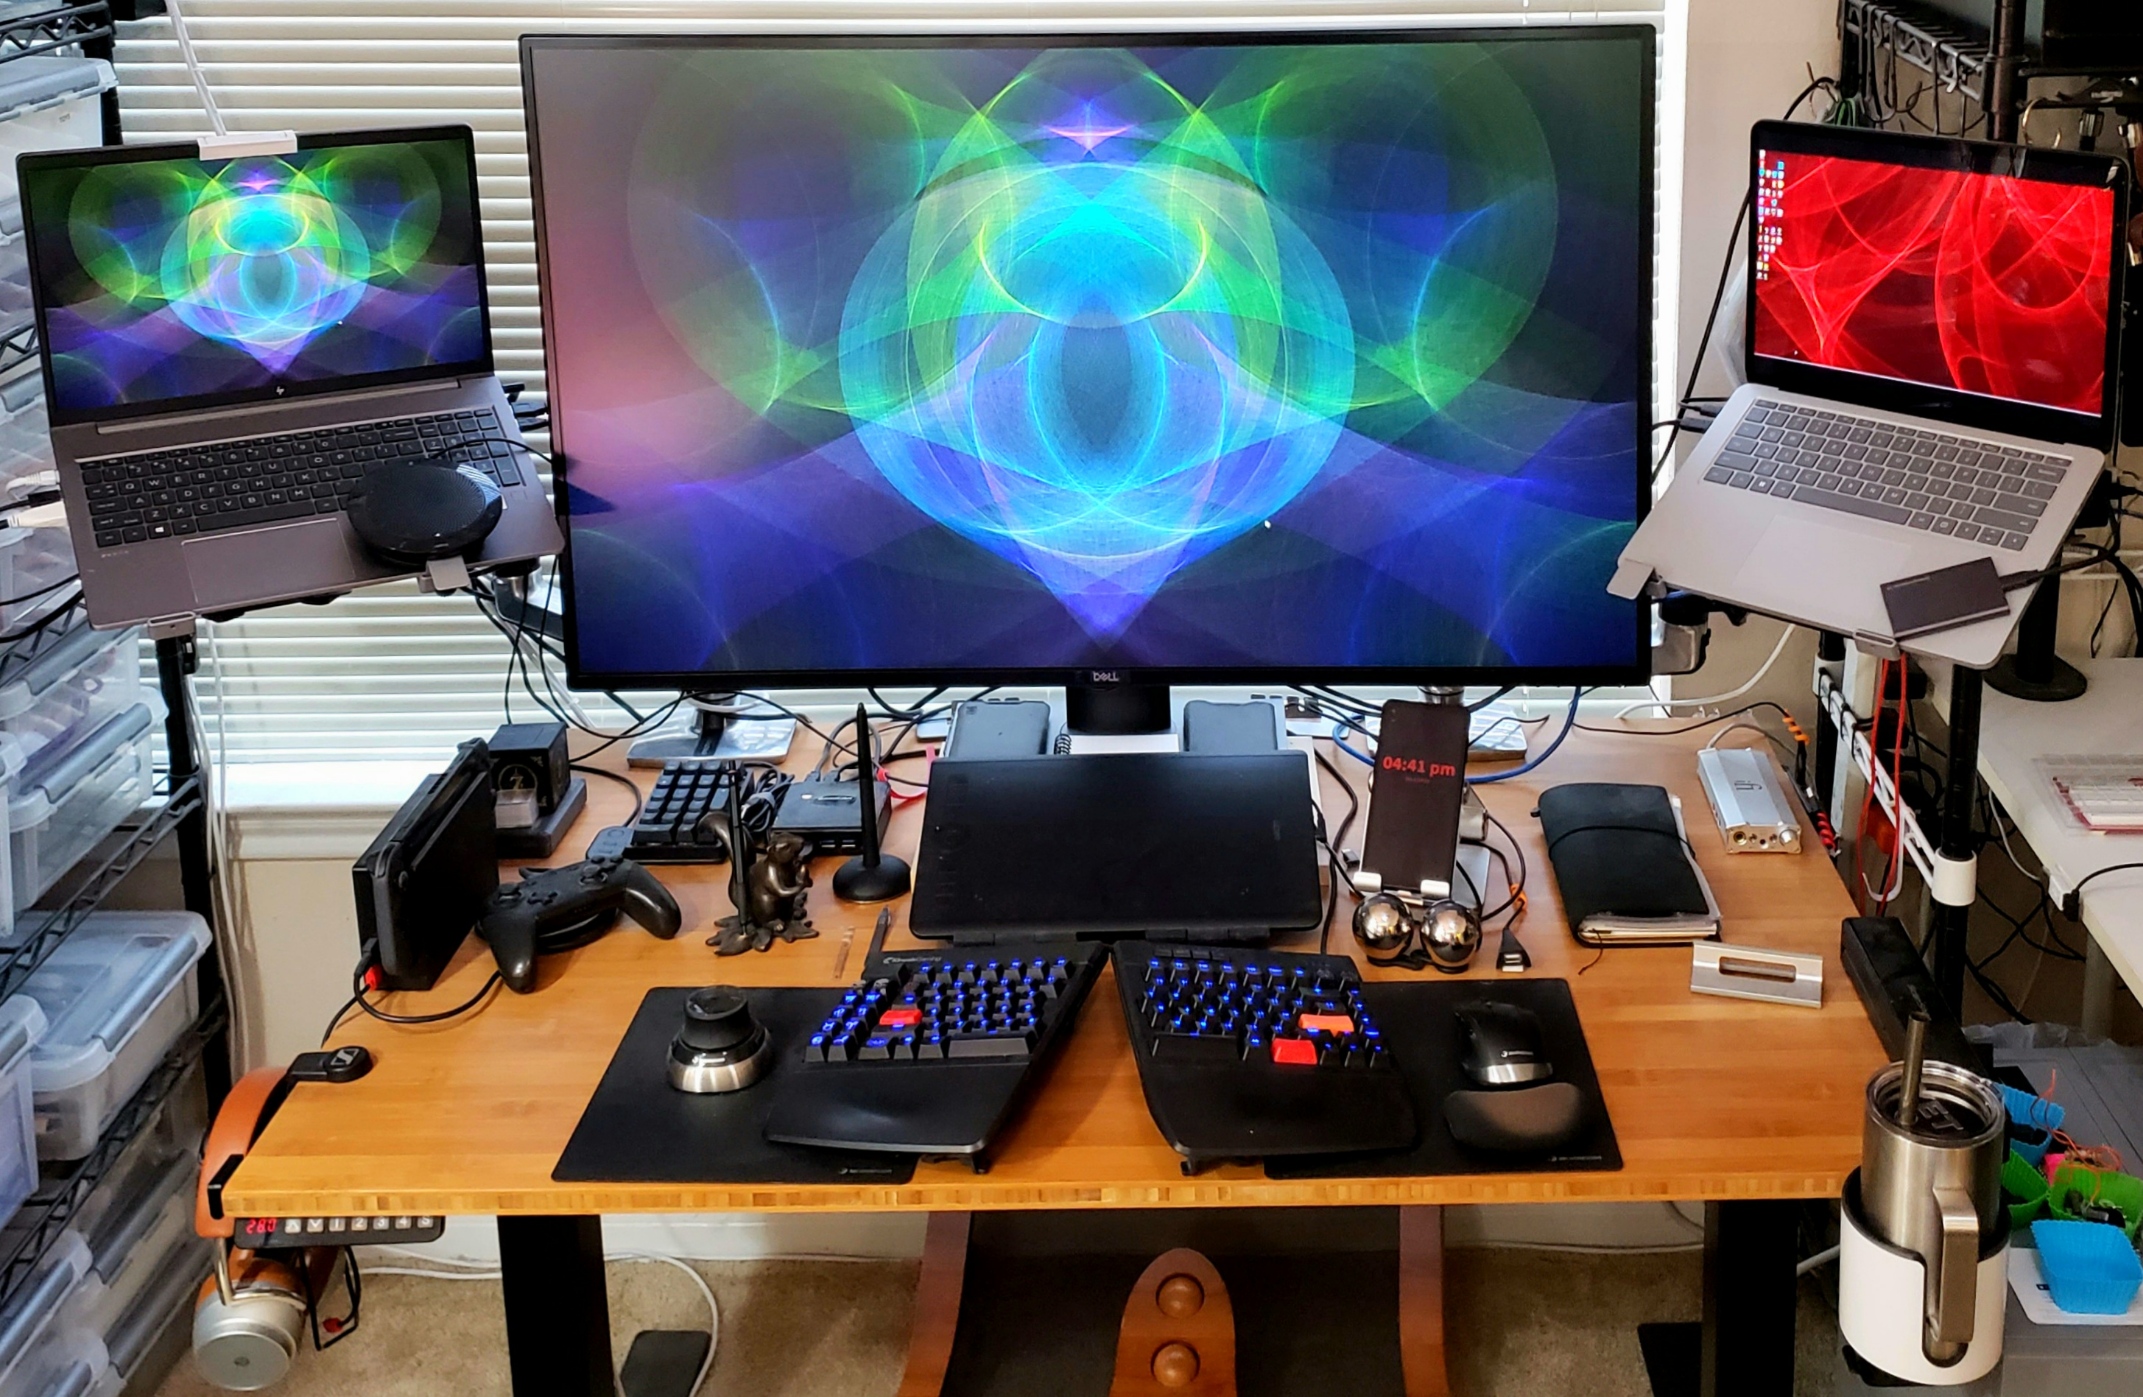
2.1. Bench Computer
This is going to sound dumb, but…
One of the biggest improvements I ever made to my bench was adding a dedicated bench computer. Having a computer dedicated to driving bench equipment, and showing the occasional data sheet, has really boosted my bench productivity. Four things have really made the difference:
- The computer requires minimal space when in use and zero bench space when not in use
- I have a 28 inch 4K display on an arm over the bench so it is out of the way. The computer itself takes zero bench space by being mounted to the display arm with a pipe clamp – it's a Raspberry Pi 4. The keyboard is a small, mechanical tenkeyless that rests to the side of my bench on an articulating arm. The mouse is a tiny Swiftpoint GT that hangs off the keyboard on a magnetic charger when not in use. So both are completely off the the bench when not in use. When on the bench the keyboard is just about as wide as my bench DMM – I can actually tuck it under the DMM when the meter handle is at 90 degrees.
- The computer is always on and ready to use
- It's a Raspberry Pi, so it uses almost no power when sleeping. Because the bench computer is on an isolated network and houses zero personal information, I don't even have a screensaver password. It's just a key press away from being used.
- The computer is dedicated to driving test equipment
- No embedded development. No device programming. Just test automation. The entire software environment is customized to make it fast and easy to bring up automation scripts & tools. I use my regular computer for other computing needs at the bench (circuit simulation, embedded development, device programming, etc…).
- My test equipment is all connected
- All of my traditional, programmable test equipment is on the same isolated network as the computer. One of the USB ports on the computer is semi-permanently connected to an Analog Discovery 2. So the equipment I use the most is always ready to be controlled by the bench computer.
Having a dedicated "always on and ready" bench computer has transformed the way I work. Now I reach for the bench computer for even trivial tasks like setting up my oscilloscope for a particular kind of measurement. It's just so easy. I use it all the time. All those little efficiencies really add up.
2.2. Bench KVM
If your scope can take a keyboard & mouse, then a KVM switch can be a good productivity boost allowing you to switch your input devices easily between oscilloscope & bench computer. If you use a laptop or tablet at your bench, then the KVM switch can be used to for this too.
2.3. Bench Software
Everyhting is on a Raspberry Pi.
mrSCPImrSCPIis a SCPI programming tool. It has a Ruby API for traditional SCPI programming as well as a scripting language designed for SCPI. It is fully integrated with Emacs & org-mode.- Digilent Waveforms
- The only way to use the Analog Discovery 2 & Digital Discovery is via the Waveforms software. I have had pretty good luck with it.
- sigrok
- I really like the broad protocol support in the logic analyzer.
- Iceweasel/Firefox
- Because the web server in the Tektronix TDS3052B won't work with other browsers!
- curl
- For scripting & scraping test equipment web servers
- gnuplot
- For quick plots of data pulled from instruments.
- Development (GCC, ruby, SBCL, & bash mostly)
- Most of what I do is scripted up with ruby & bash. Higher performance stuff is SBCL or C++.
- Octave
- I have several Octave/Matlab scripts I use with oscilloscope data, so it's nice to have Octave available.
- Emacs & SLIME
- My laboratory notebook consists of org-mode documents, so Emacs is a must on the bench. Emacs is also an essential part of integrating various tools
together like
mrSCPI, SBCL, maxima, Octave, gnuplot, etc….
2.4. Bench Networking
Embedded Ethernet stacks and associated software stacks are often junk. Security is a barely considered factor. Robustness and fault tolerance are mostly ignored. I remember crashing my first Ethernet equipped oscilloscope by sending an SCPI command with a newline instead of a carriage return character – and when I say "crashed" I mean so locked up I had to kick the plug out of the wall to recover. Fact is, that kind of thing happens even with high end gear. I have seen million dollar equipment at work lock up because a laptop sent a few malformed Ethernet packets over the network. Then we have bad actors. I don't want someone hacking a device on my bench capable of delivering 30 amps of power!
At the end of the day, test equipment is best isolated. I have a high end, three port layer 3 firewall/router mounted to the wall above my bench. One port is connected to my internal network through a hard, cutoff switch – i.e. a physical switch that cuts off the network. One port is a subnet, TE-net, connected to a Gigabit Ethernet switch to which all the test equipment is connected. This switch also has a Lantronix serial console server on it. This TE-net is completely blocked from the upstream network – nothing goes in or out. The third port is for a second subnet, the BC-net, for the bench computer. Traffic is allowed from BC-NET to TE-net, and established connections are allowed in the other direction. SSH is allowed from my regular home network into the BC-NET, and HTTP routed directly to my internet router is allowed out – so I can get OS/firmware updates and download datasheets.
After isolating the test equipment, I have noticed higher reliability. For example, my signal generator has not needed a reboot once after making this change – it had a problem every week or two before.
2.5. Computer (the other one) Desk
I spend very long hours, both on and off the clock, in front of a computer. So I have a nicely equipped, ergonomically correct office setup. In my previous home the computer desk was some distance from my electronics workbench, so I was always trying to find a place to put my laptop on the bench. When I setup my current workspace, I was careful to place my computer desk just a few inches to the left of my electronics bench. So now I can leave my workstation in place, and easily plug into an EVM on the bench for programming.

3. Power
3.1. Any advice for adjustable voltage DC power supplies?
I can't even tell you how many hours I have wasted tracking down problems and mysterious glitches because of dirty power. Some things to look for:
- Regulation, Ripple, & Noise: For sensitive analog work I generally look for a supply with <1mV specifications for all three.
- Voltage adjustment: The voltage level should be easily settable to the nearest 10th or 100th of a volt. It should also be easy to set the voltage to any point in the entire range – you shouldn't have to turn a knob 10 times! For analog units, look for a coarse and fine adjustment knob. For digital units, look for direct keypad entry and/or a variable rate encoder knob.
- Current adjustment: I consider constant current & current limiting essential features for a bench supply. This is an important safety factor on the bench, and the savings in burned out components and fuses will easily pay for the feature over time.
- Voltage and current readouts: Each output should have both voltage and current readouts that directly MEASURE the values in question. The display should be easy to read – large and illuminated (LED or back-lit LCD for example). You should be able to make out the voltage to the nearest 10th of a volt, and the current to the nearest mA. It should be easy to calibrate the meters yourself.
- Voltage and current ranges: Be sure to get enough! Just double whatever you think you need.
;) - Connection terminals: Big, well insulated, banana jack outputs. Avoid units with little, spring wire clips.
- Floating & isolated: The unit should be able to be combined with other power supplies to archive greater current output, voltage output, or positive/negative rails for circuits requiring them.
- Some things to check carefully on multiple output supplies:
- Are you really getting as many useful channels as advertised? Many units have multiple channels, but one or more of the channels is hobbled compared to the headline specifications of the meter – for example a 3 channel 0-30V supply might have a 3rd channel that is fixed at 5V and have no current limiting capability. Prefer supplies with fully symmetric channels all supporting the same capabilities – including safety features, current limiting, electronic fusing, etc…
- Sometimes channels are tied together. For example two channels might share a ground with the intent of providing the positive and negative voltages for opamp circuits – so called bipolar supplies. In some supplies all outputs have the negative terminals tied to physical ground, but they still may have multiple negative jacks on the front panel. Prefer supplies that have fully independent, isolated, and floating outputs.
3.2. High Current 12V Power Supplies
R/C components like brush-less motors and battery chargers may require 10V at 30A or more, and automotive equipment may require 13V at 40A or more. Meeting such high current requirements with a variable voltage bench supply is not cost effective. For such special applications, a high current, fixed output supply is a better option.
Inexpensive bench supplies with high current capability at a fixed 13V for automotive electronics troubleshooting are pretty common. Look for units with safety features like short circuit protection, over voltage protection, current limiting, and resettable breakers instead of fuses. While these supplies frequently have an output voltage slightly different than a the advertised 12V or 13V, they are generally quite stable over time at whatever output voltage they do produce. Some of these supplies have much higher noise and ripple than you might expect, so look for units that actually have specifications for noise and ripple! Some units have annoyingly loud cooling fans.
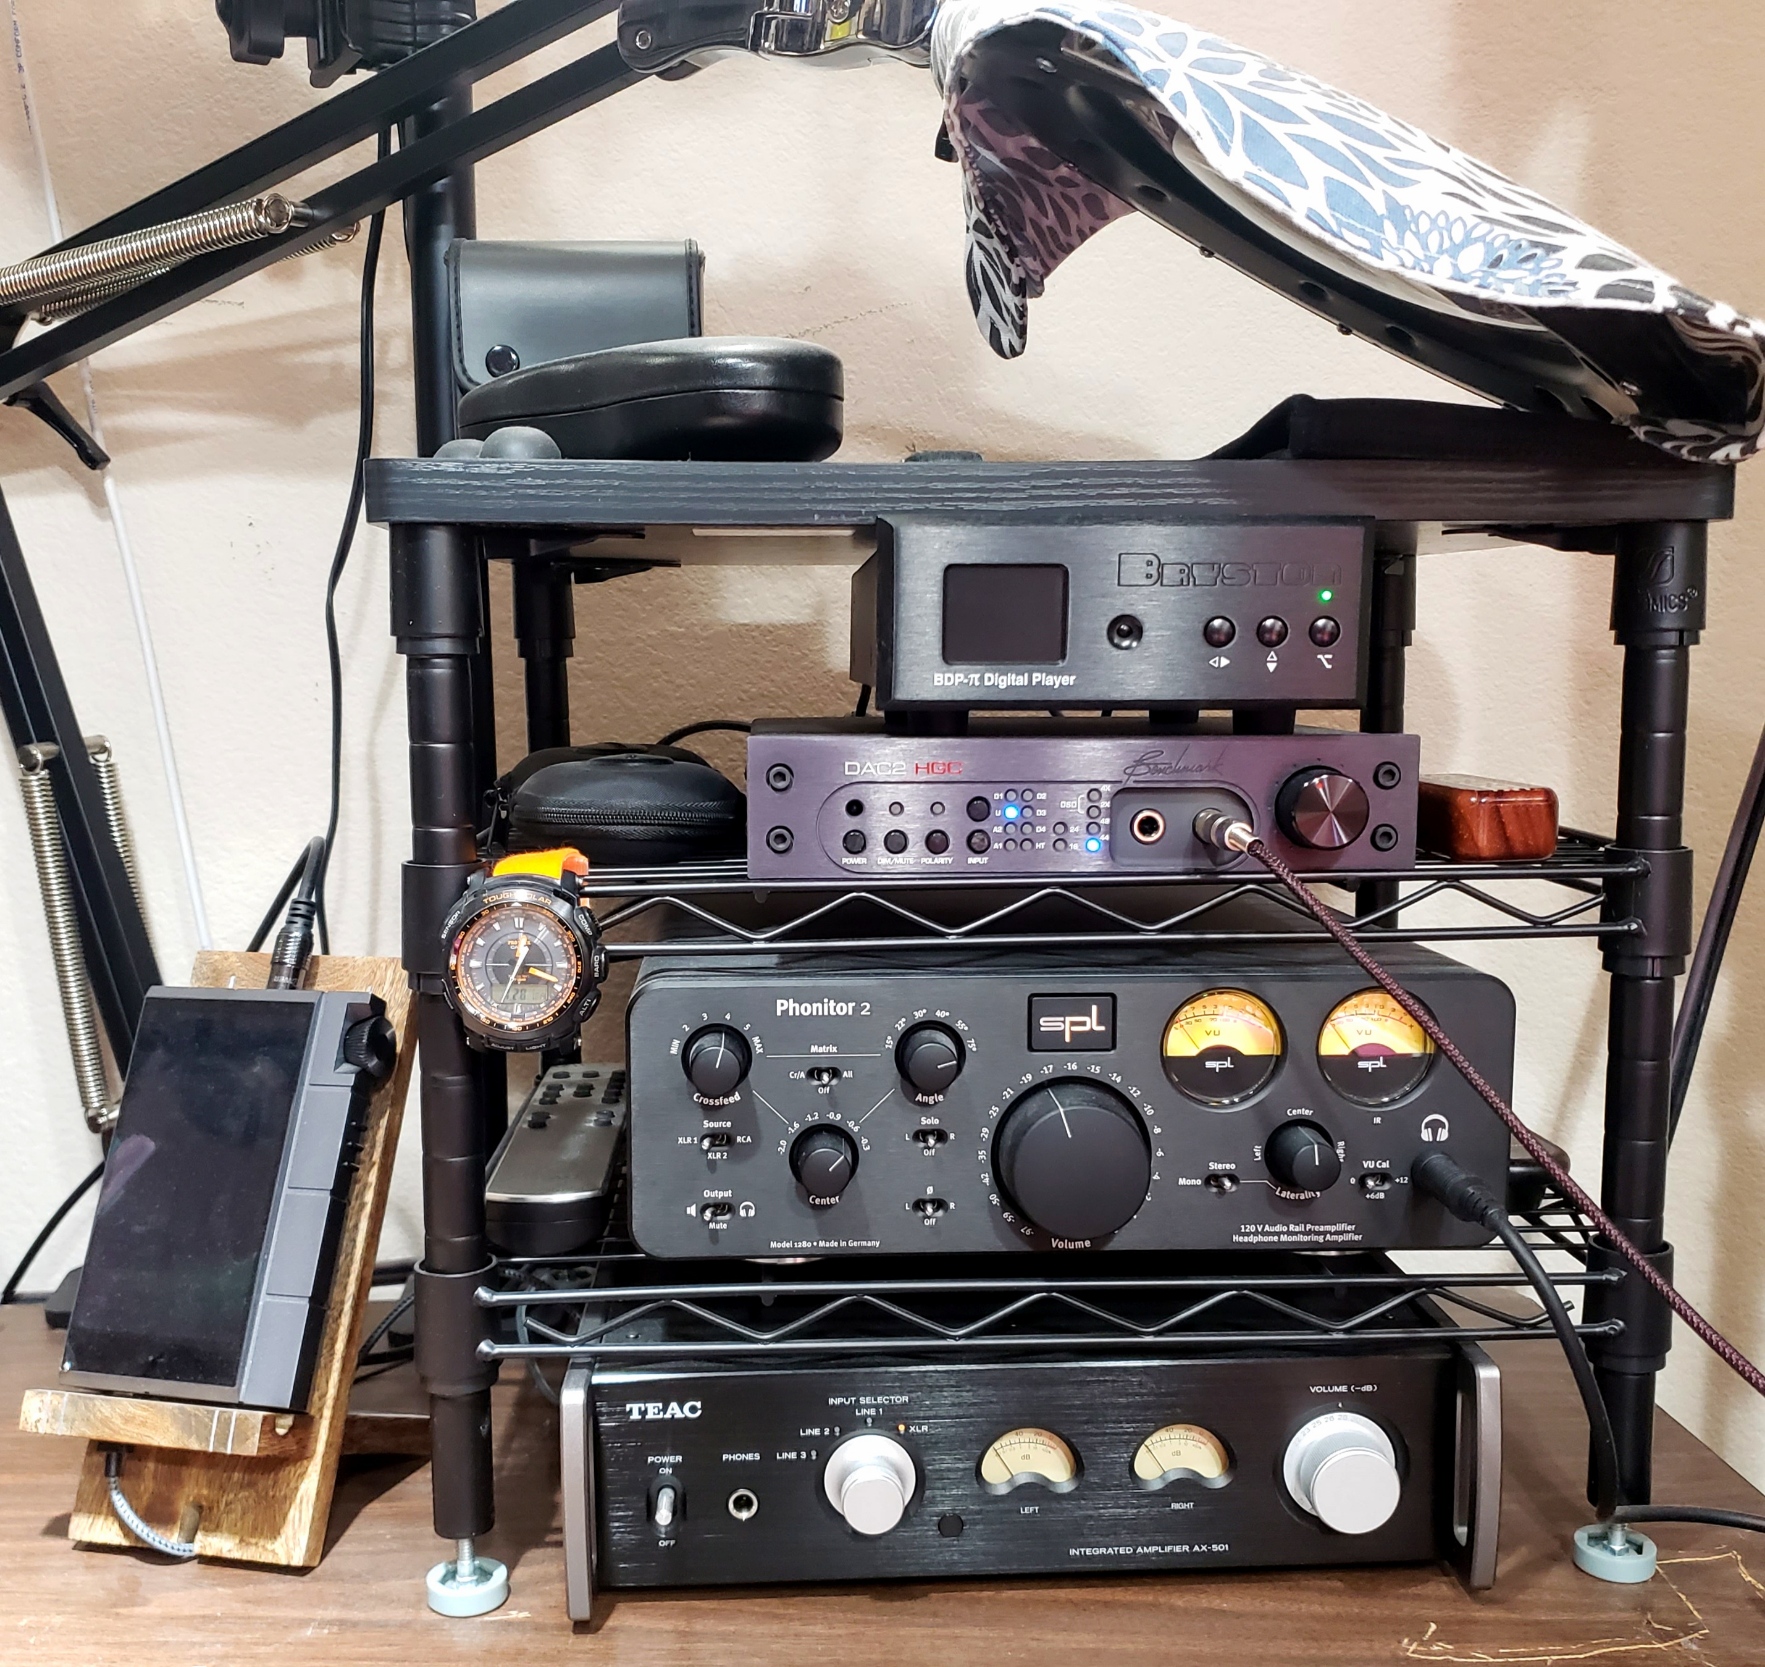
3.3. What power supplies do you use?
- Rohde & Schwarz HMC804x
- This is, hands down, the best bench power supply I have ever used – and I have used a great many power supplies over the years. I really like this one. It has three completely isolated channels with the same capabilities and specifications. It is an extremely versatile instrument with a lot of functionality. All that functionality is nicely presented via a brilliant user interface making the device a pleasure to use. On the automation front, the programmable features are very well thought out and implemented. Metering accuracy is spot on, regulation is tight, and ripple low. It weighs less than my DMM! This supply is the one on my bench all the time. I rarely get any of the others off the shelf.
- B&K 1621A
- I have a couple B&K 1621A units that are about 20 years old. These are old school, half rack sized linear supplies with huge rear heat sinks. These are very heavy units. Mine have ripple well under 1mV and are very tightly regulated making them perfect for sensitive analog work. They are easy to work on and calibrate yourself. You can still buy these things for about $250 new, but I paid $160 for them.
- Korad KD3005D
- I have a couple Korad KD3005D supplies. Single output to 0-30V at 5A. Mine have ripple of about 3mV and regulation <2mV. They are 1/4 rack sized units with a rear fan. These barely meet my absolute minimum standards for a bench supply, but they are super cheap (< $50 USD).
4. Meters
4.1. How to choose between a bench vs. a handheld DMM?
I used handheld DMMs for years, but have switched to mostly using bench DMMs. Here are a few reasons why I tend to use bench units:
- More ergonomic and powerful user interface
- Bench meter displays are bigger and brighter making them much easier to read. Not only are they easier to read, but they display more information at one time. The front panel has more space allowing bench units to present a much more sophisticated and productive user interface.
- Graphical displays & graphs
- I love the moving needle on my VOM, but trend plots are way better! When accuracy matters, histograms for repeated measurements are a fantastic tool. Combined with automation, a modern meter can even do things like produce high resolution bode plots.
- Automation
- Bench DMMs tend to have more sophisticated automation and programmable features. They also tend to have convenient and stable wire interfaces like Ethernet. I have put test automation to great use in creating specialized, synthetic instruments a professional might just buy. For example a little SCPI can transform your bench DMM and AWG into a capable LCR meter.
- More simultaneous measurement options
- Good bench meters offer more simultaneous measurement options (RMS + frequency, etc…). Some units can measure voltage and current at the same time. Some units even have a slot for a data acquisition card (say 16 channels). These features can be very handy on the bench.
- Ease of Maintenance
- Bench meters are easy to take apart, and some older units are pretty easy to work on. This is a big plus for me. Calibration is another issue. I have had more trouble getting my handheld units calibrated for a reasonable price where I live.
- Line powered (no batteries required)
- For some reason the batteries in my handheld units would always die at the worst times!
4.2. Why do you have an analog meter on your bench?
I have four. ;)
- Sanwa Em7000 Peak reading FET VOM
- This meter has much higher AC measurement bandwidth than any of my DMMs. This meter is dead on for frequencies under 1 MHz and about 3% of full scale down at 10 MHz – just try to find a pocketable DMM for less than $150 that can do that!!
- Gossen Metrawatt M102A Analog Multimeter
- A simple meter with a super convenient centered needle mode entered/exited via a flip of the power switch.
- Hioki HiTester 3030-10 Analog Multimeter
- A rugged little VOM suitable for a toolbox, but mine lives in the back of a drawer with the two meters listed above.
- 50 micro-amp, calibrated galvanometer mounted in a box with banana posts
- This device lives on my bench (on a swing arm above the bench actually), and it serves a few of roles:
- Quick voltage measurements: Inside the box are a couple high precision resistors that transform the meter into a voltmeter. It's super handy. No batteries. No selection switch. Not even a power switch. It's just always ready to go.
- Bridge circuits: It can be used directly as a galvanometer via the black & white posts. In addition, the left most banana jack adds a 10 turn, non-inductive pot which may be used as on leg of the bridge or may be used for simply trimming the bridge meter.
- Tricky analog work with sensitive circuits: When we connect test equipment to our circuits, the equipment becomes part of our circuits. On those occasions when meter/DUT interaction is an issue, this device can be a real life saver. The way this device interacts with a DUT is extremely predictable, and I can even simulate it with SPICE.
I had a Simpson 260 on my bench for a long time. I eventually sold it and replaced it with the Sanwa – the Simpson was just too bulky and used non-standard probe cables.
4.3. What bench DMMs do you use?
I have two Bench DMMs. At lest one of them is on my bench most of the time, and it is not uncommon to see them both on the bench.
- Keysight 34401A
- The Keysight is a long time standard found in many labs – branded as Agilent or HP in the past. So it is a known quantity on the bench, and a proven solid performer.
- Keithley DMM6500
- The Keithley is a sophisticated instrument that is so much more than a standard DMM. With it's high sample rate and graphical display it can function as a slow oscilloscope. The device is very programmable, and has a great GUI. It can also accept a multi-channel data acquisition card.
4.4. What handheld DMM do you use?
In the past I used the Fluke 189 quite a lot on the bench. It was a great meter, but when it died I replaced it with a bench meter. The only handheld I have now is an Agilent U1233A. This is a small, almost pocketable, 3.5 digit meter that gets more use off the bench than on.
4.5. Why do you have two DMMs on your bench?
One of the best accessories for your DMM is another DMM. Sure, it might look funny to have two or three DMMs on your bench, but it can be incredibly useful to be able to keep an eye on several voltages/currents simultaneously when troubleshooting. Having an extra DMM is just like having a few extra oscilloscope channels.
4.6. What about DMM probes?
Check out my article on probes
5. Probe Positioning Equipment
In order to effectively use probe positioning equipment, one needs to firmly secure the PCB. For more on that, see the PCB Support section of this document. Once you have the PCB secured, then how do we put probes on target? I have three solutions for that.
5.1. Use header sockets
Seriously, most of what I probe now days are header pins. So just use 0.25" pin sockets and be done with it.
5.2. Sensepeek PCBite
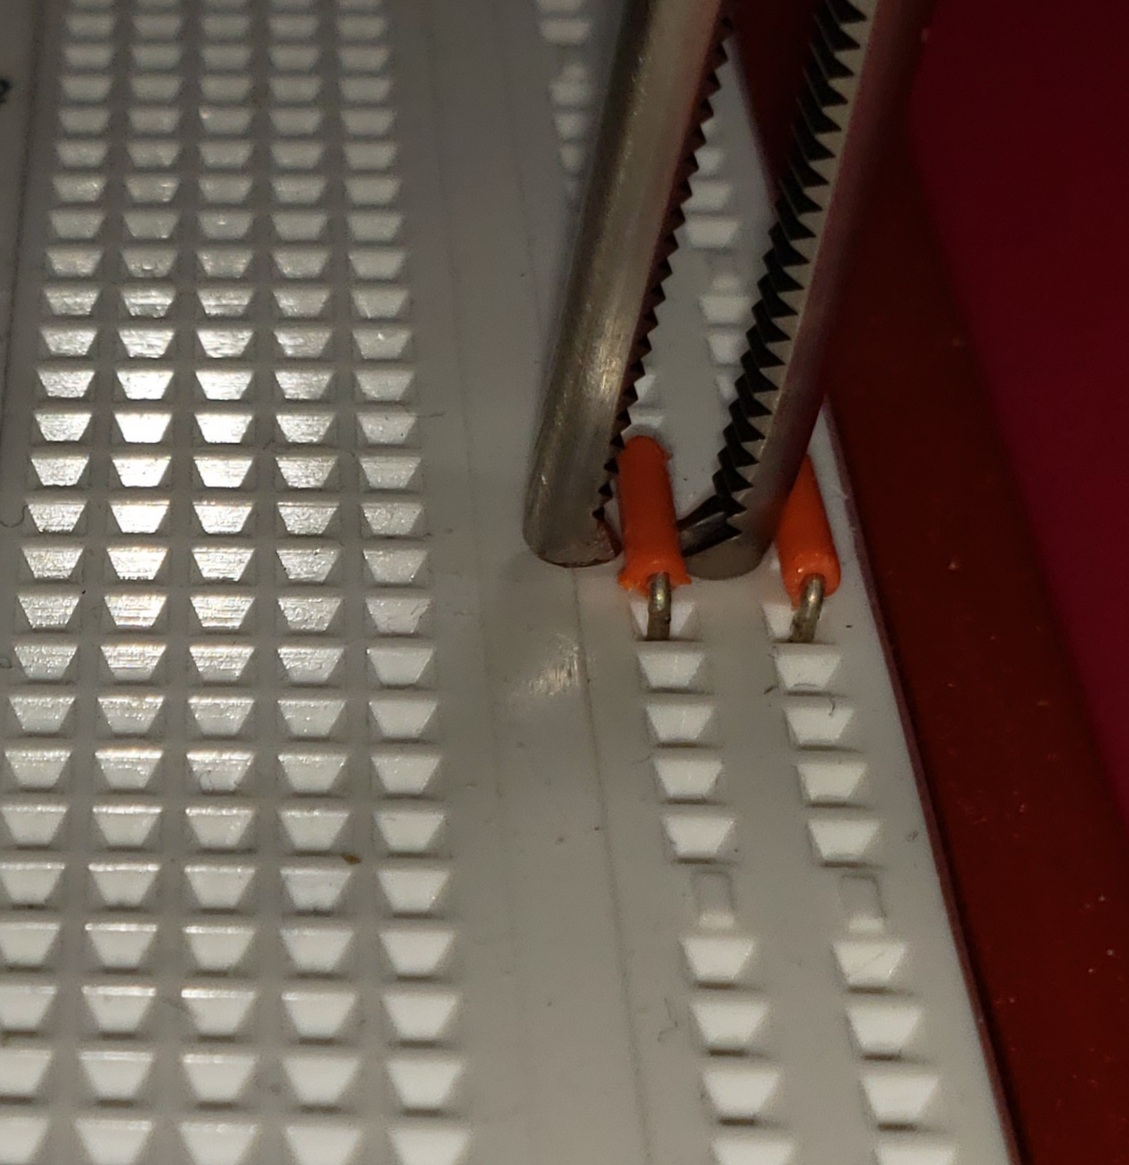
This is a fantastic solution for probing small stuff. Mechanically, the system is deceptively simple; however, it works exceptionally well – they really got it right. Probes are easy to place, and they stay put. When at my soldering station, the table itself has enough steel so that both probes and stands stay put. I have a sheet of galvanized steel semi-permanently placed under the ESD mat on my electronics workbench. While the PCBite kit posts work well to secure a PCB, you can use any solution you like. I frequently use the Stickvice or Omnivise.
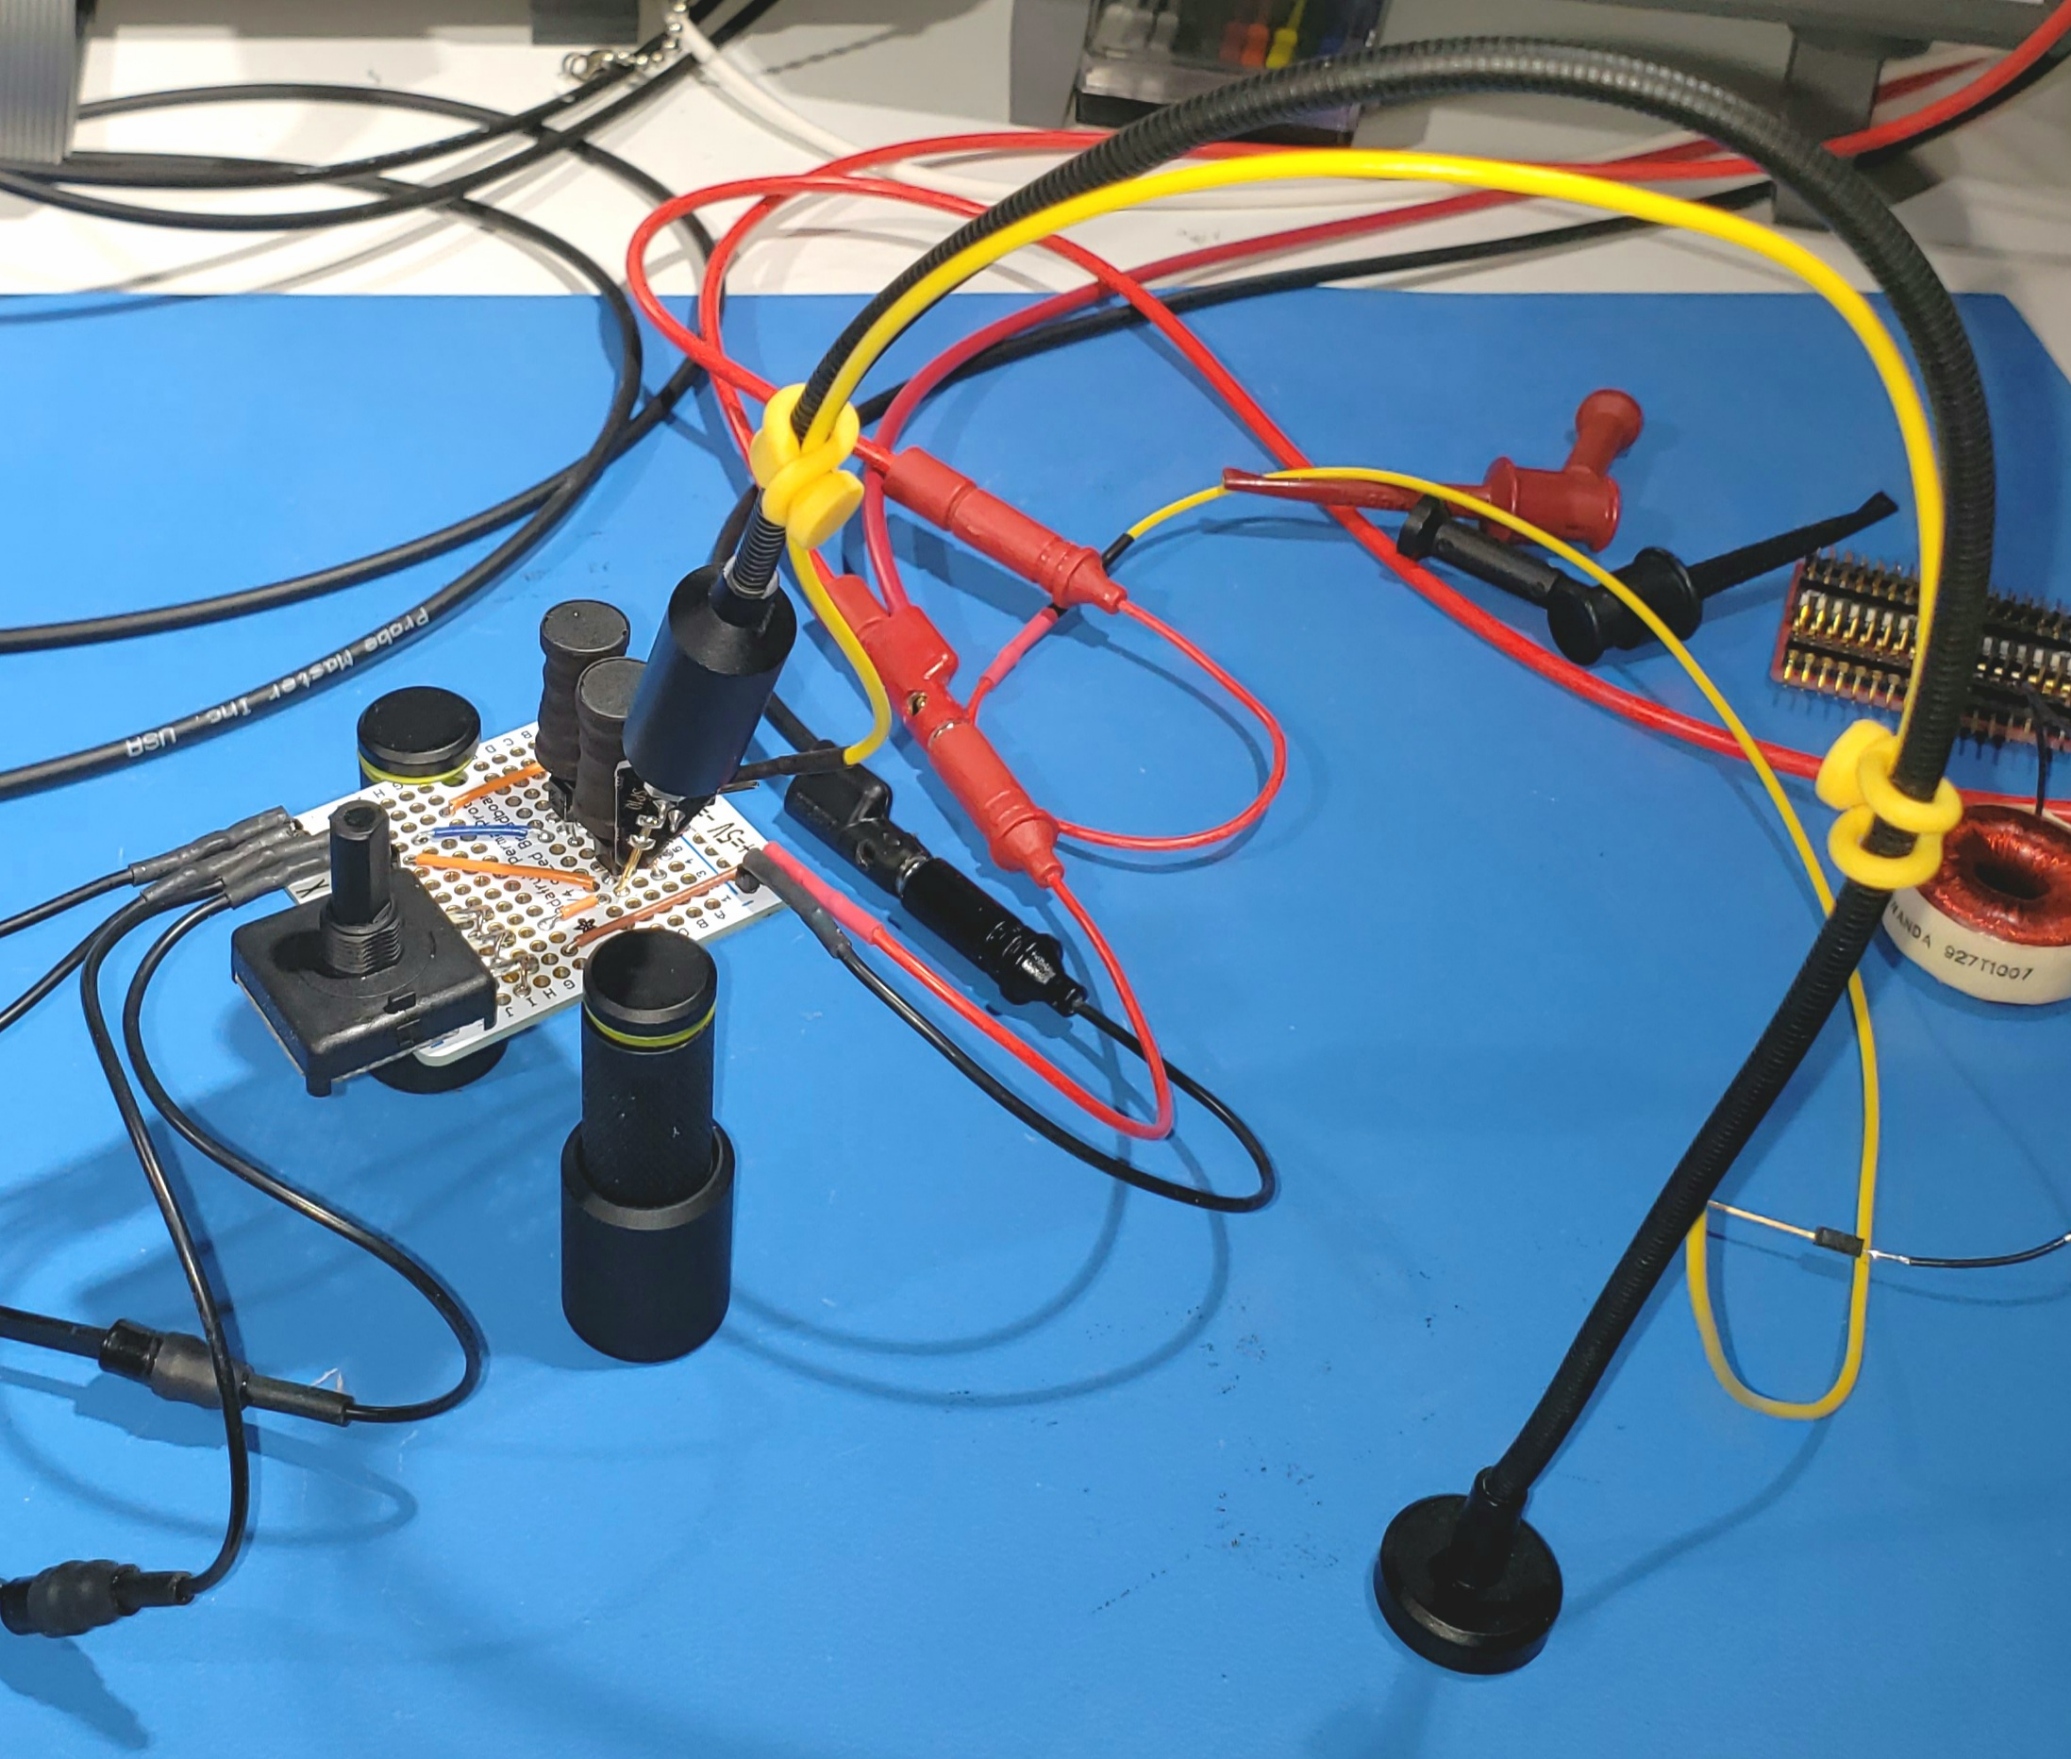
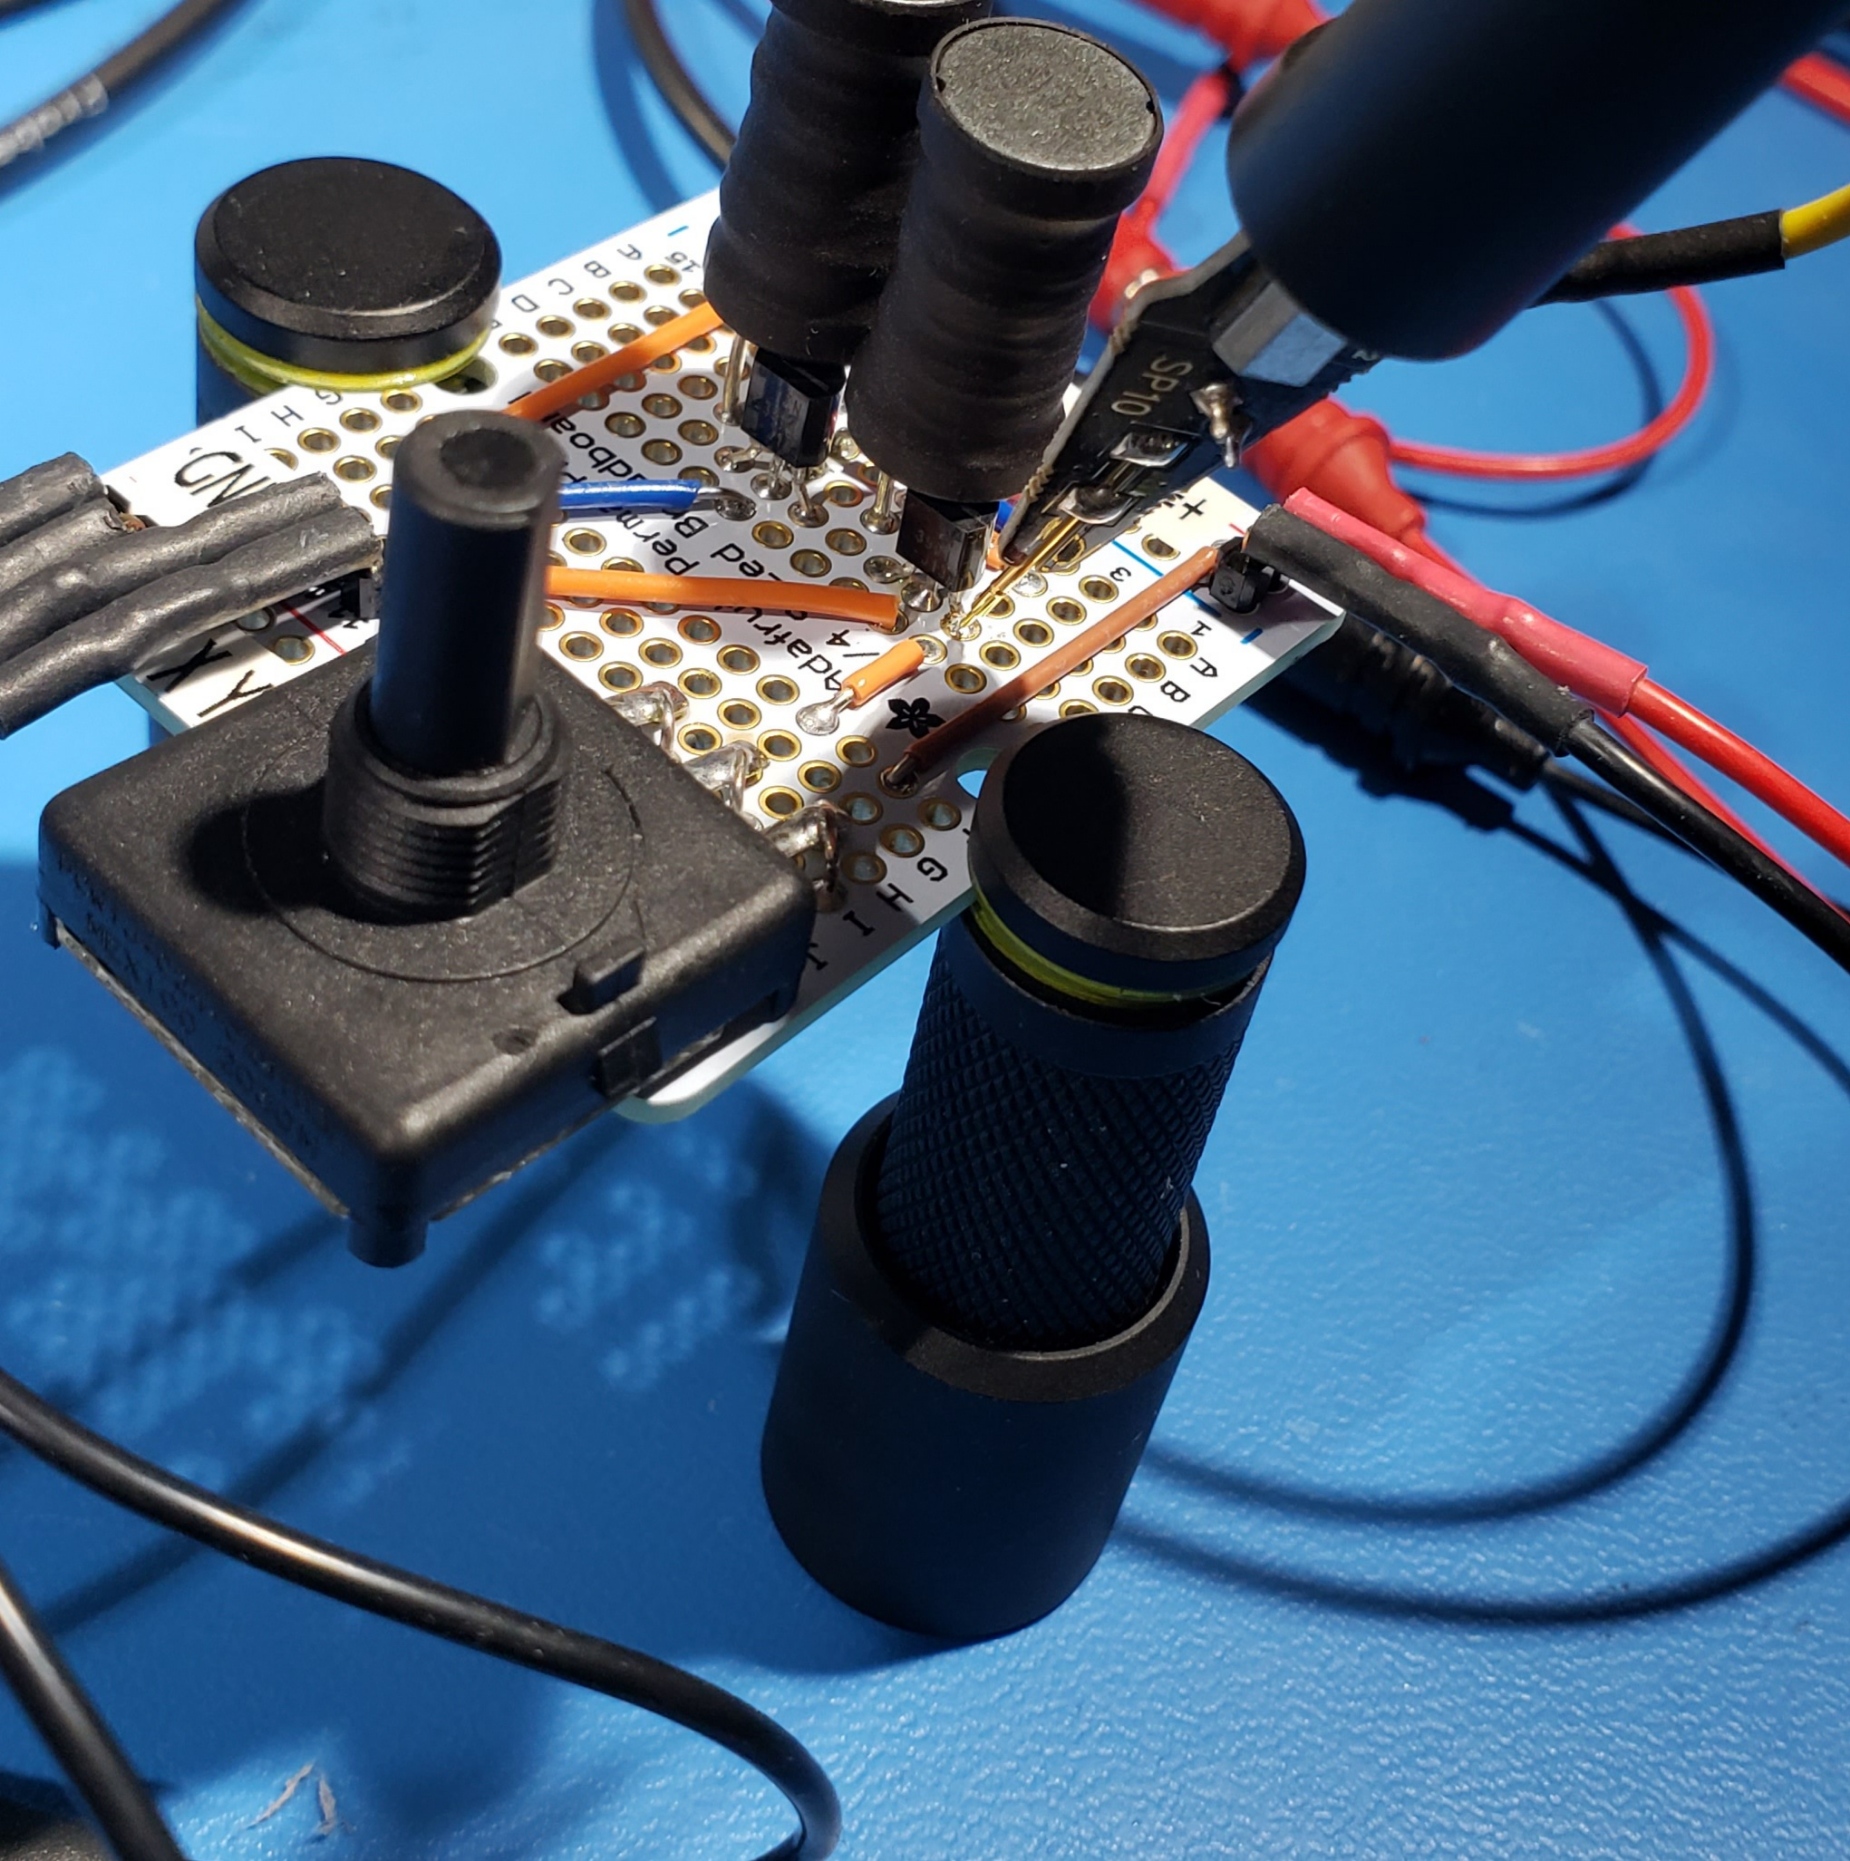
I keep these probes on the rack right beside by bench, and the posts stuck to the metal shelf above the bench.
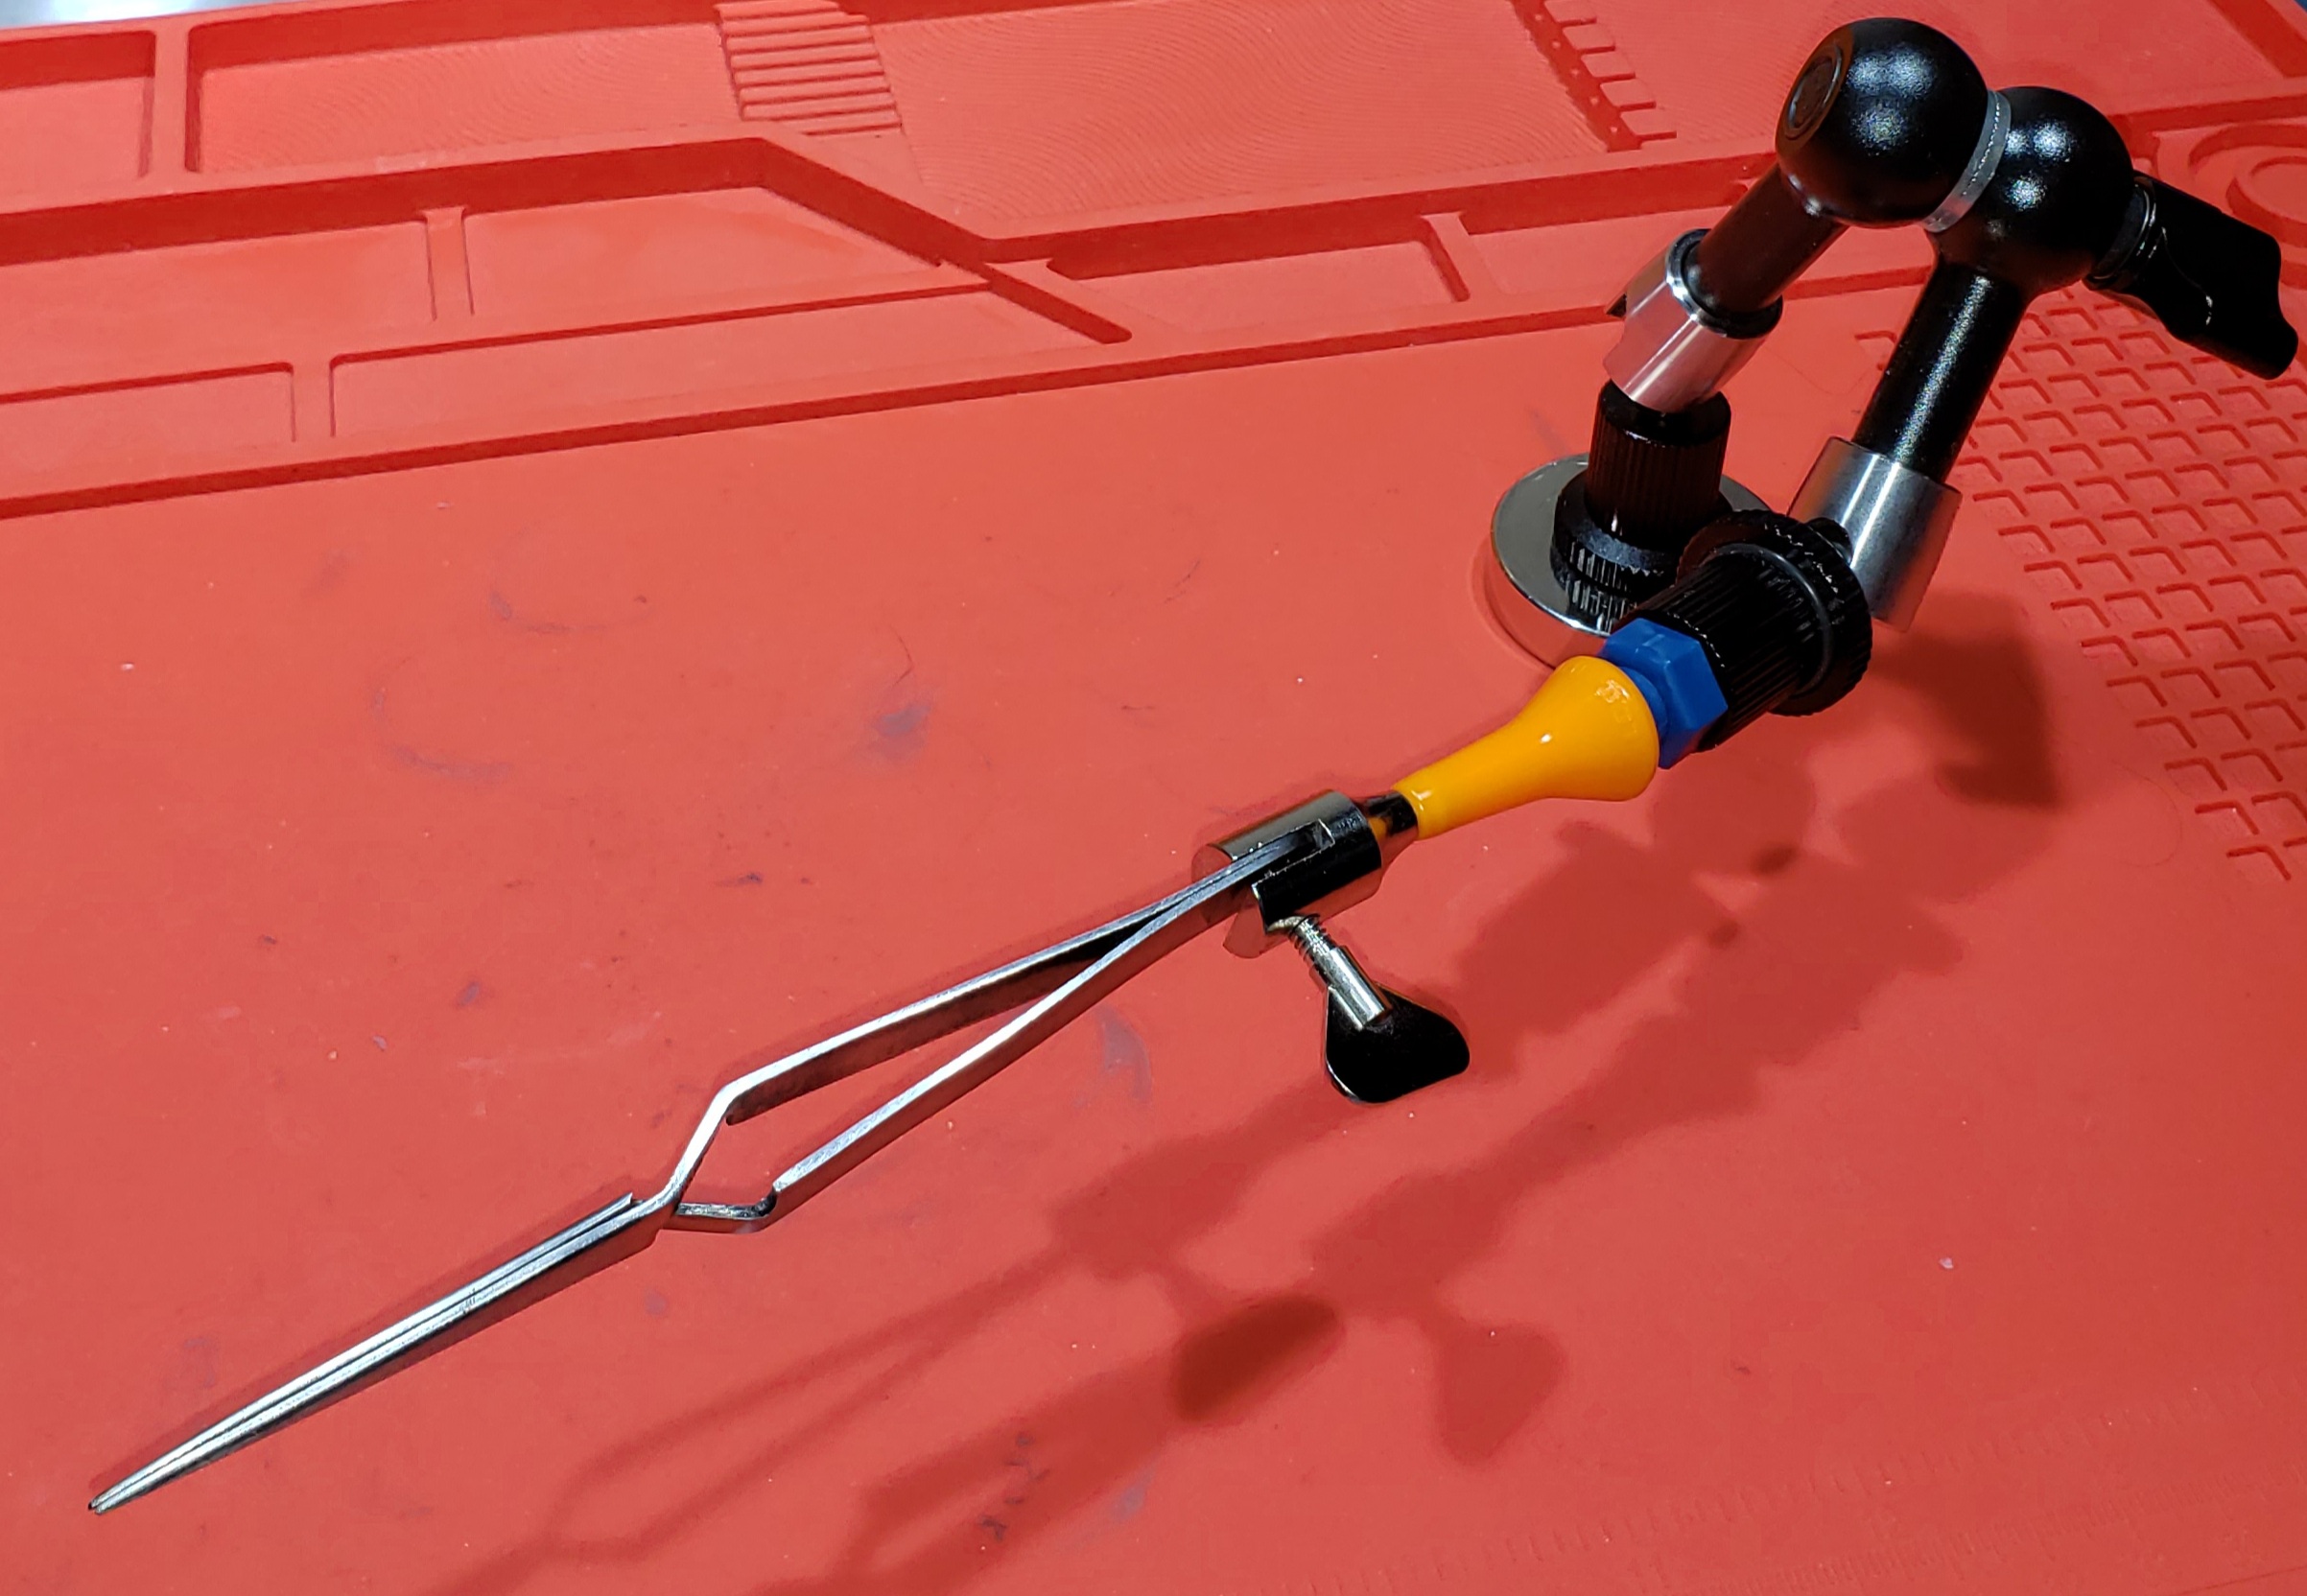
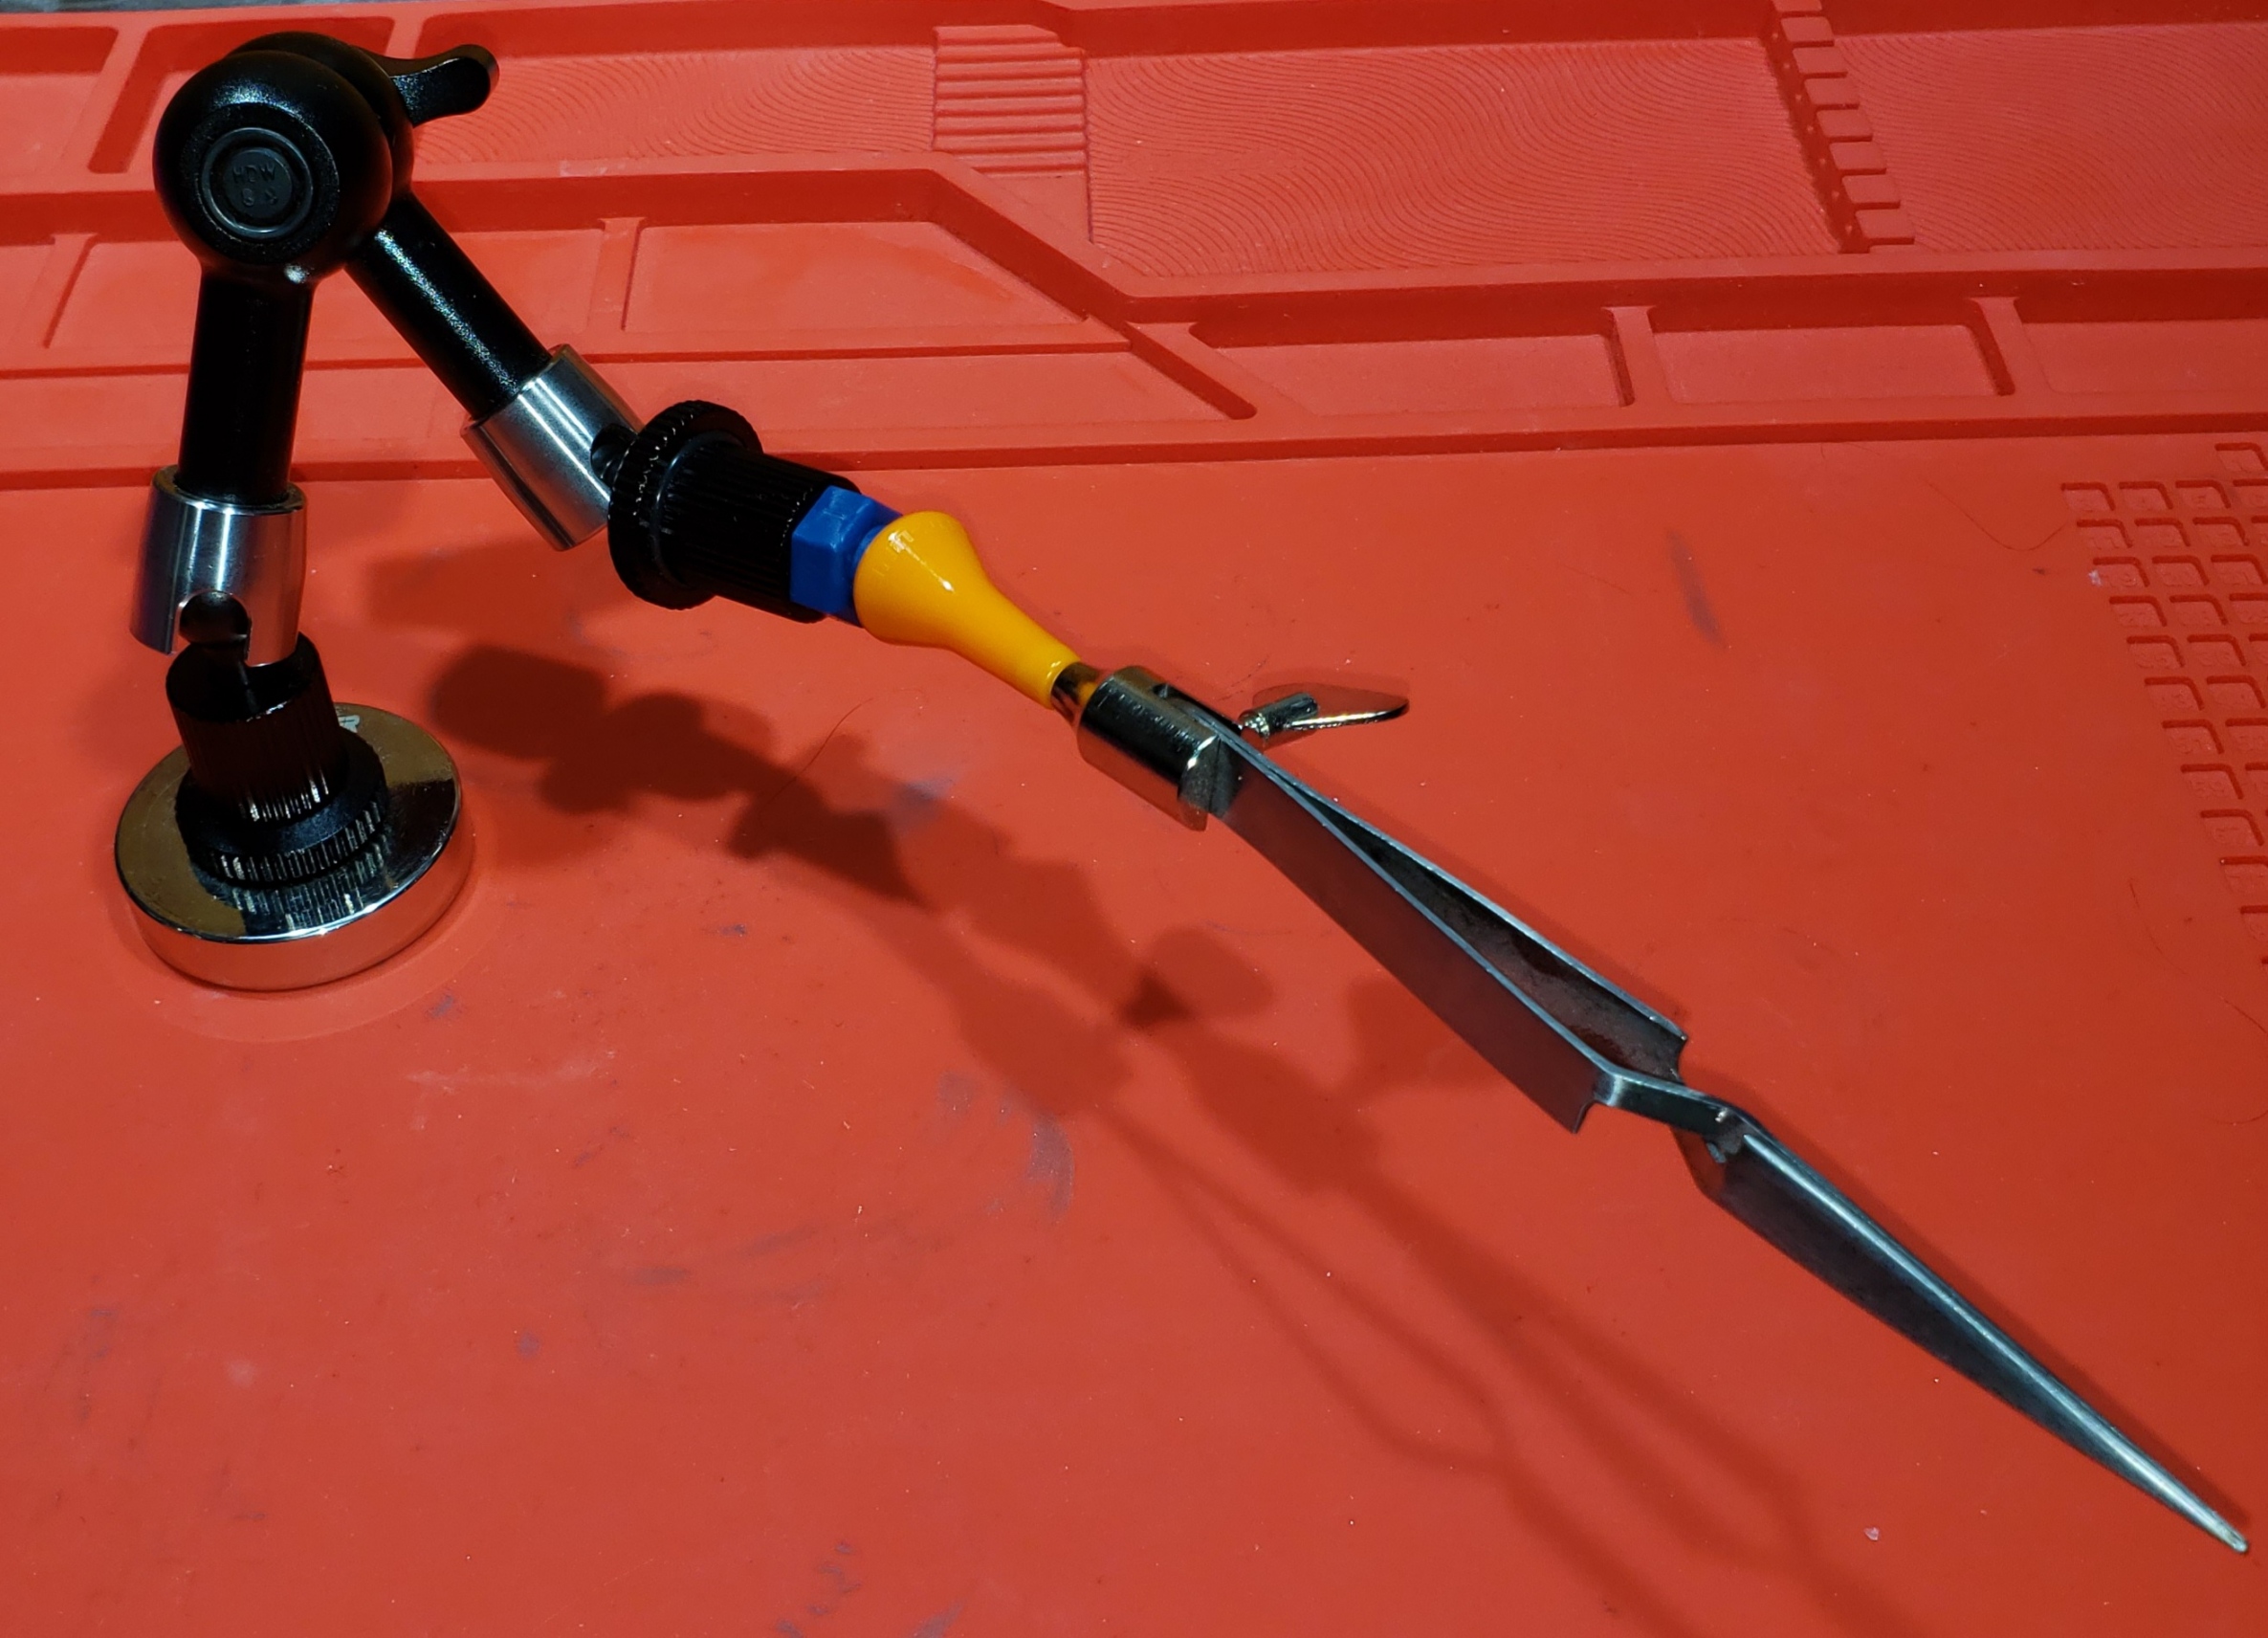
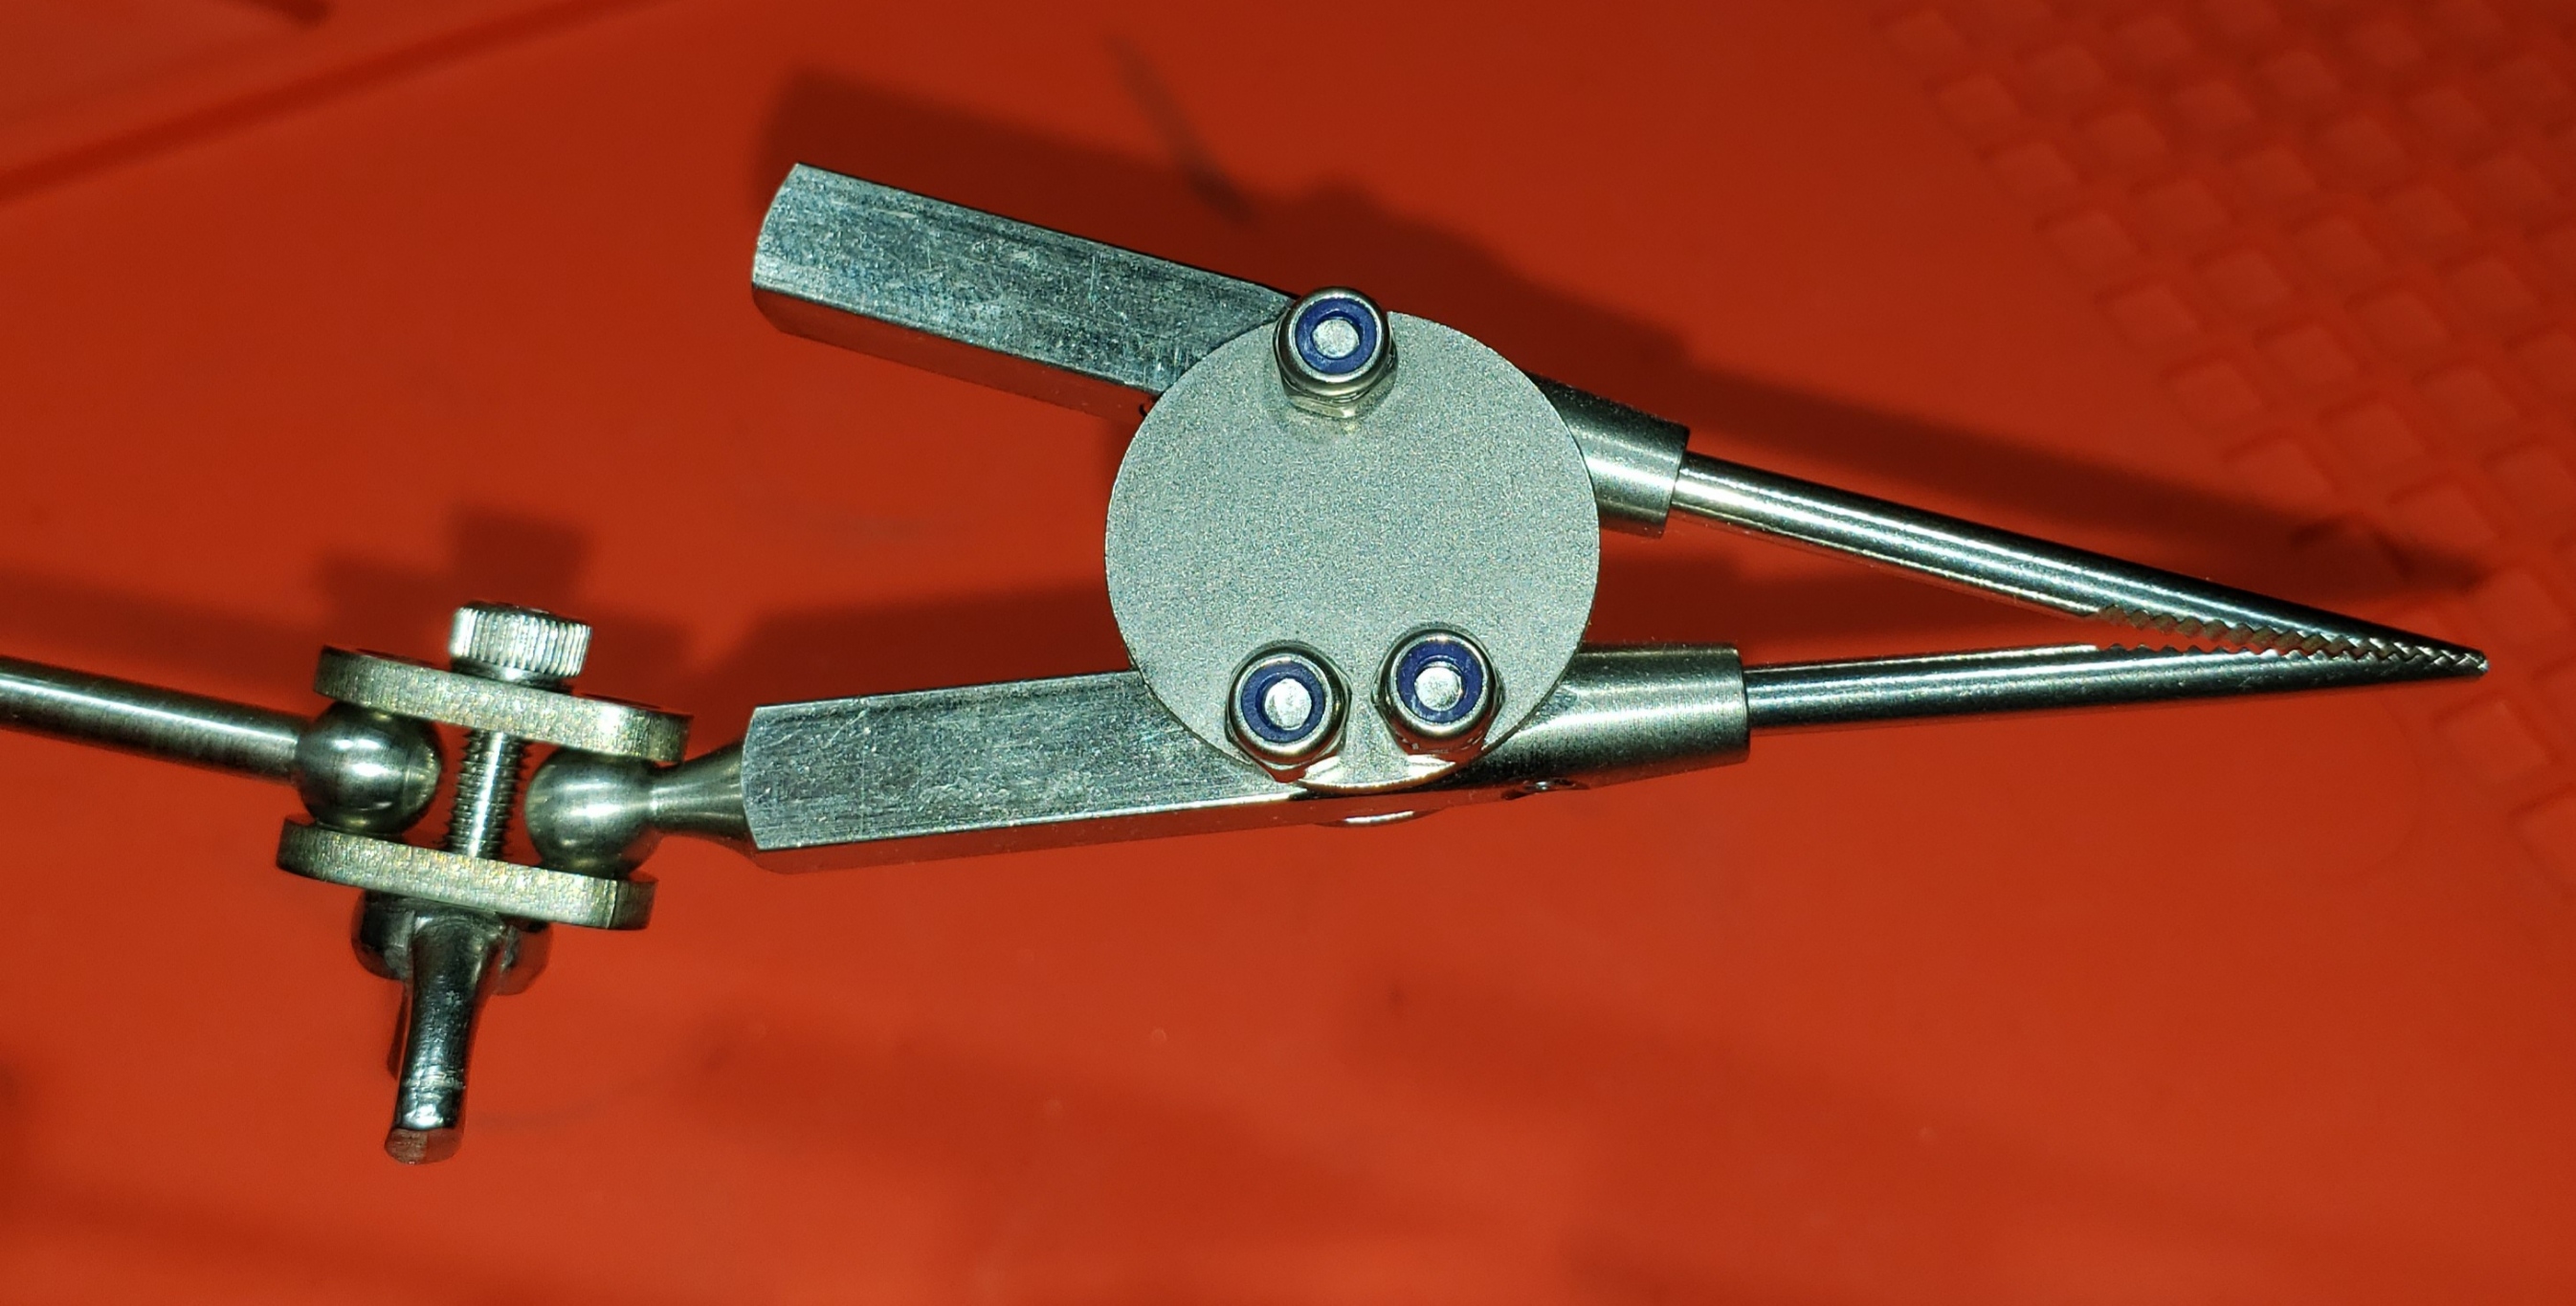
5.3. Magic Arms
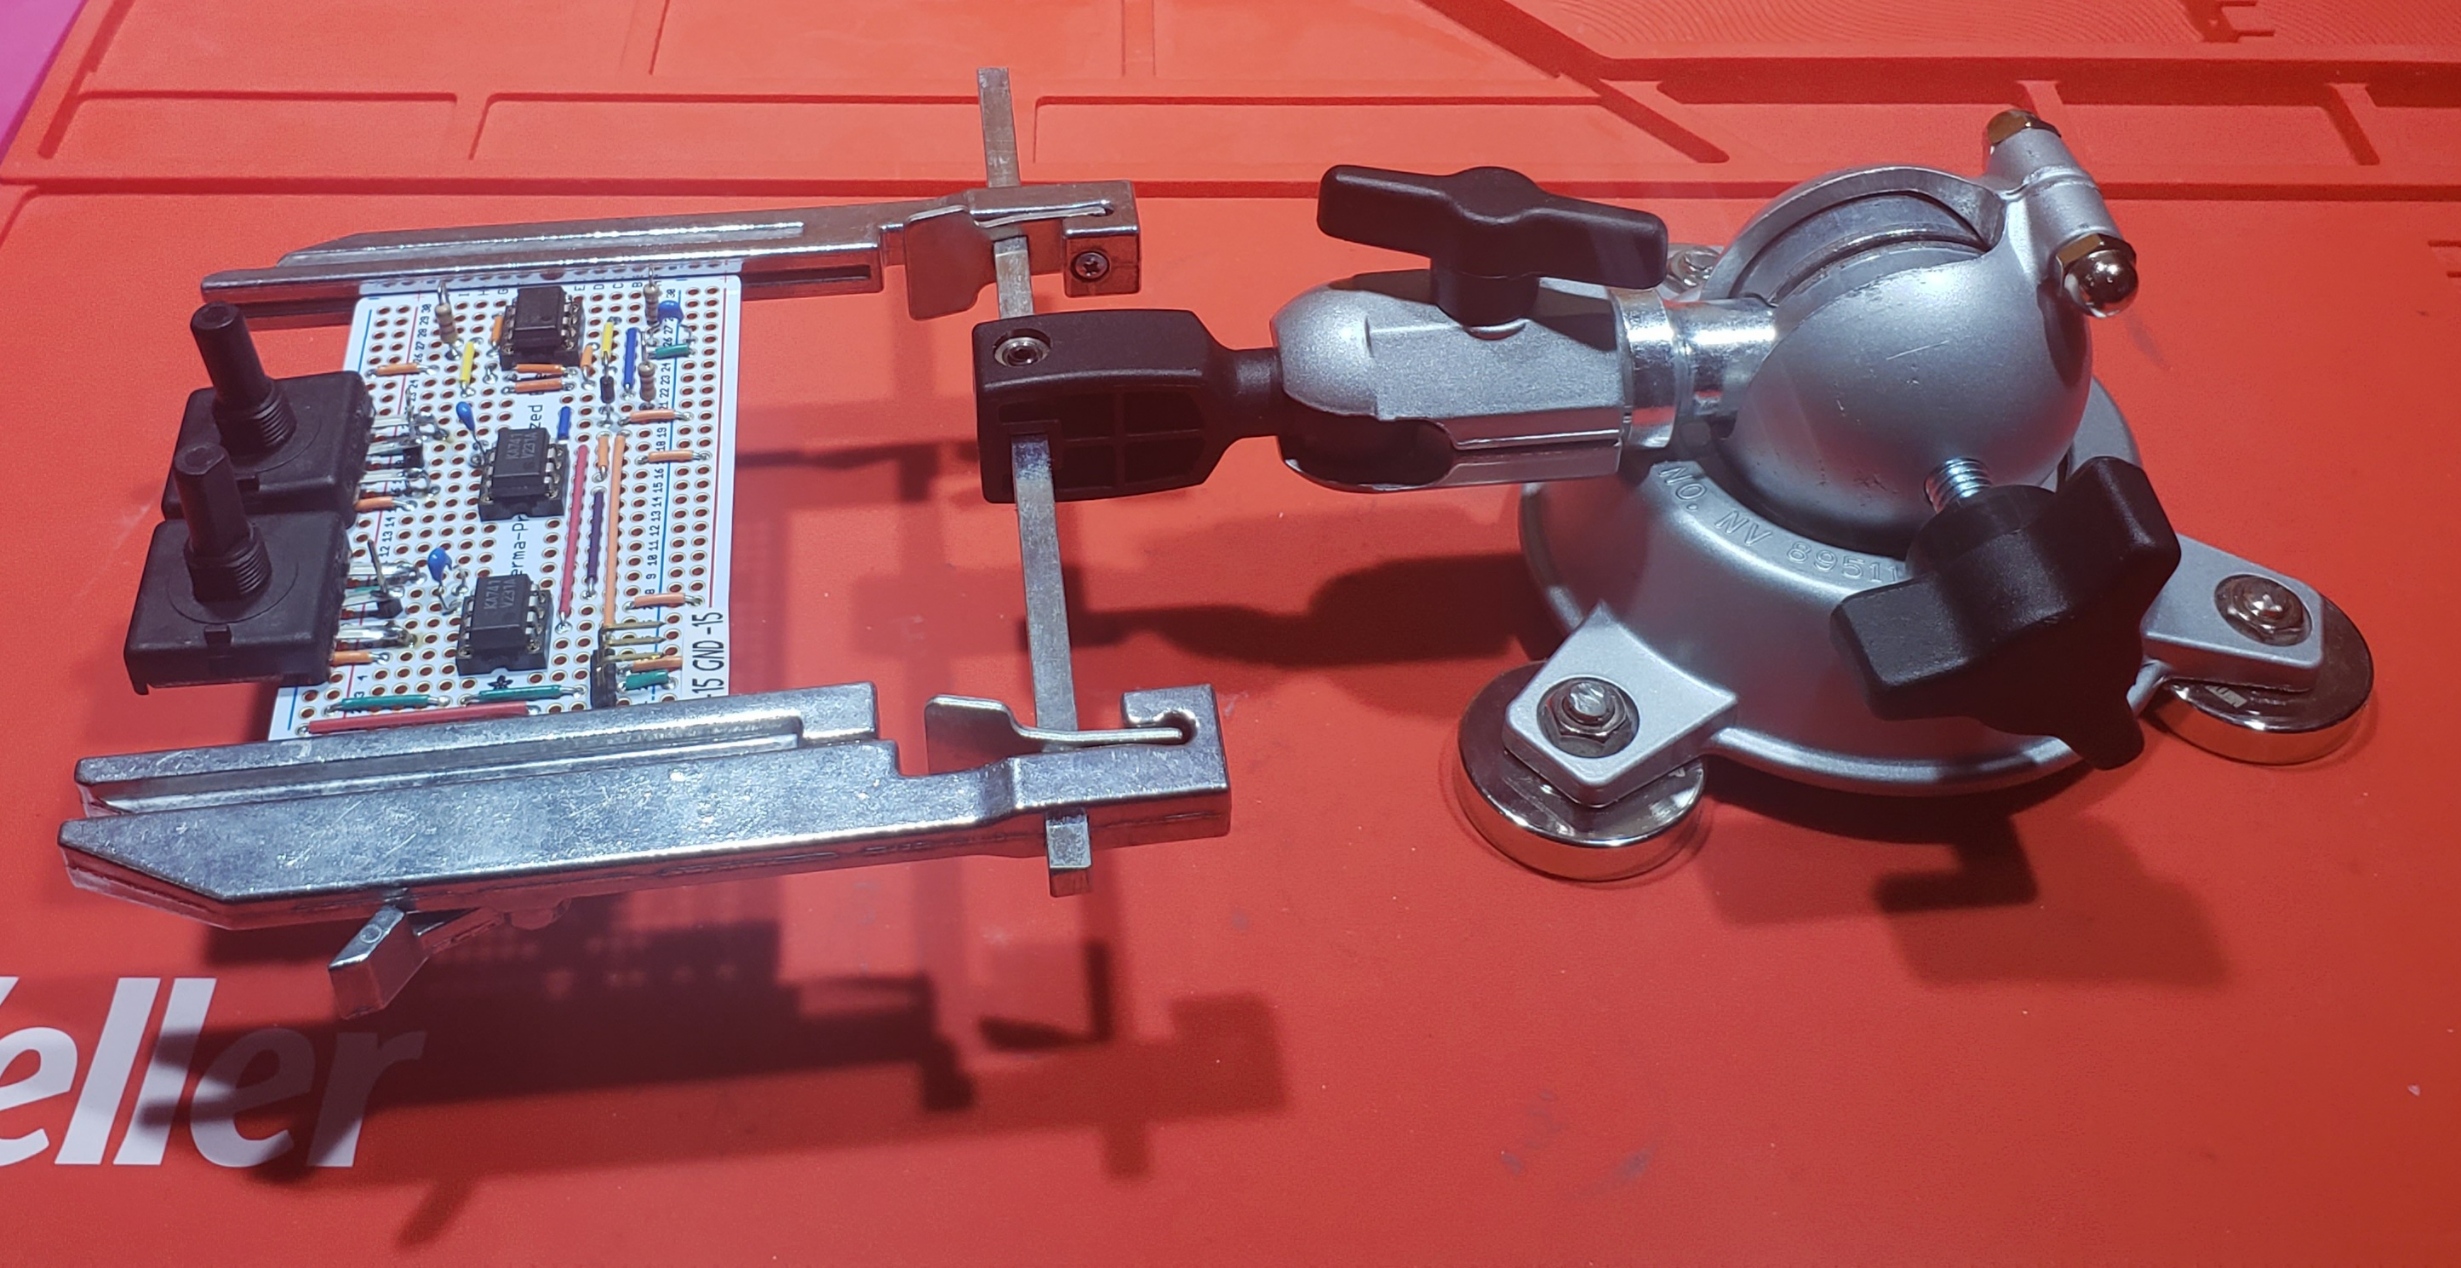
The first time I saw a $1500 "oscilloscope probe positioning device" I was shocked. As an amateur photographer, I immediately recognized the solution as consisting of about a hundred dollars worth of stuff you could pick up at the local photography store – assuming one used the most expensive, European branded equipment. If we went with value brands, the whole thing would cost about $20!
The "infinity position, 5 DOF arm" used by these solutions is called, by photographers, a "magic arm". Photographers use them to position things like lights, microphones, or cameras. Manfrotto makes the best ones I have used, but for smaller arms the value brands are pretty good. As for the "probe clamp", one has many options from the photographic store. The one used by that expensive probe positioning device is known in photographic circles as a "micro clamp". I personally find the micro clamp a bit bulky for smaller probes, and prefer to use spring loaded camera cable clamps instead – they work well for both DMM probes and oscilloscope probes. For the base I use a standard, photographic magnetic base – used by photographers to mount things like magic arms and ball heads. The final touch is a probe with a spring loaded tip, and you are ready to go. Here is an action shot:
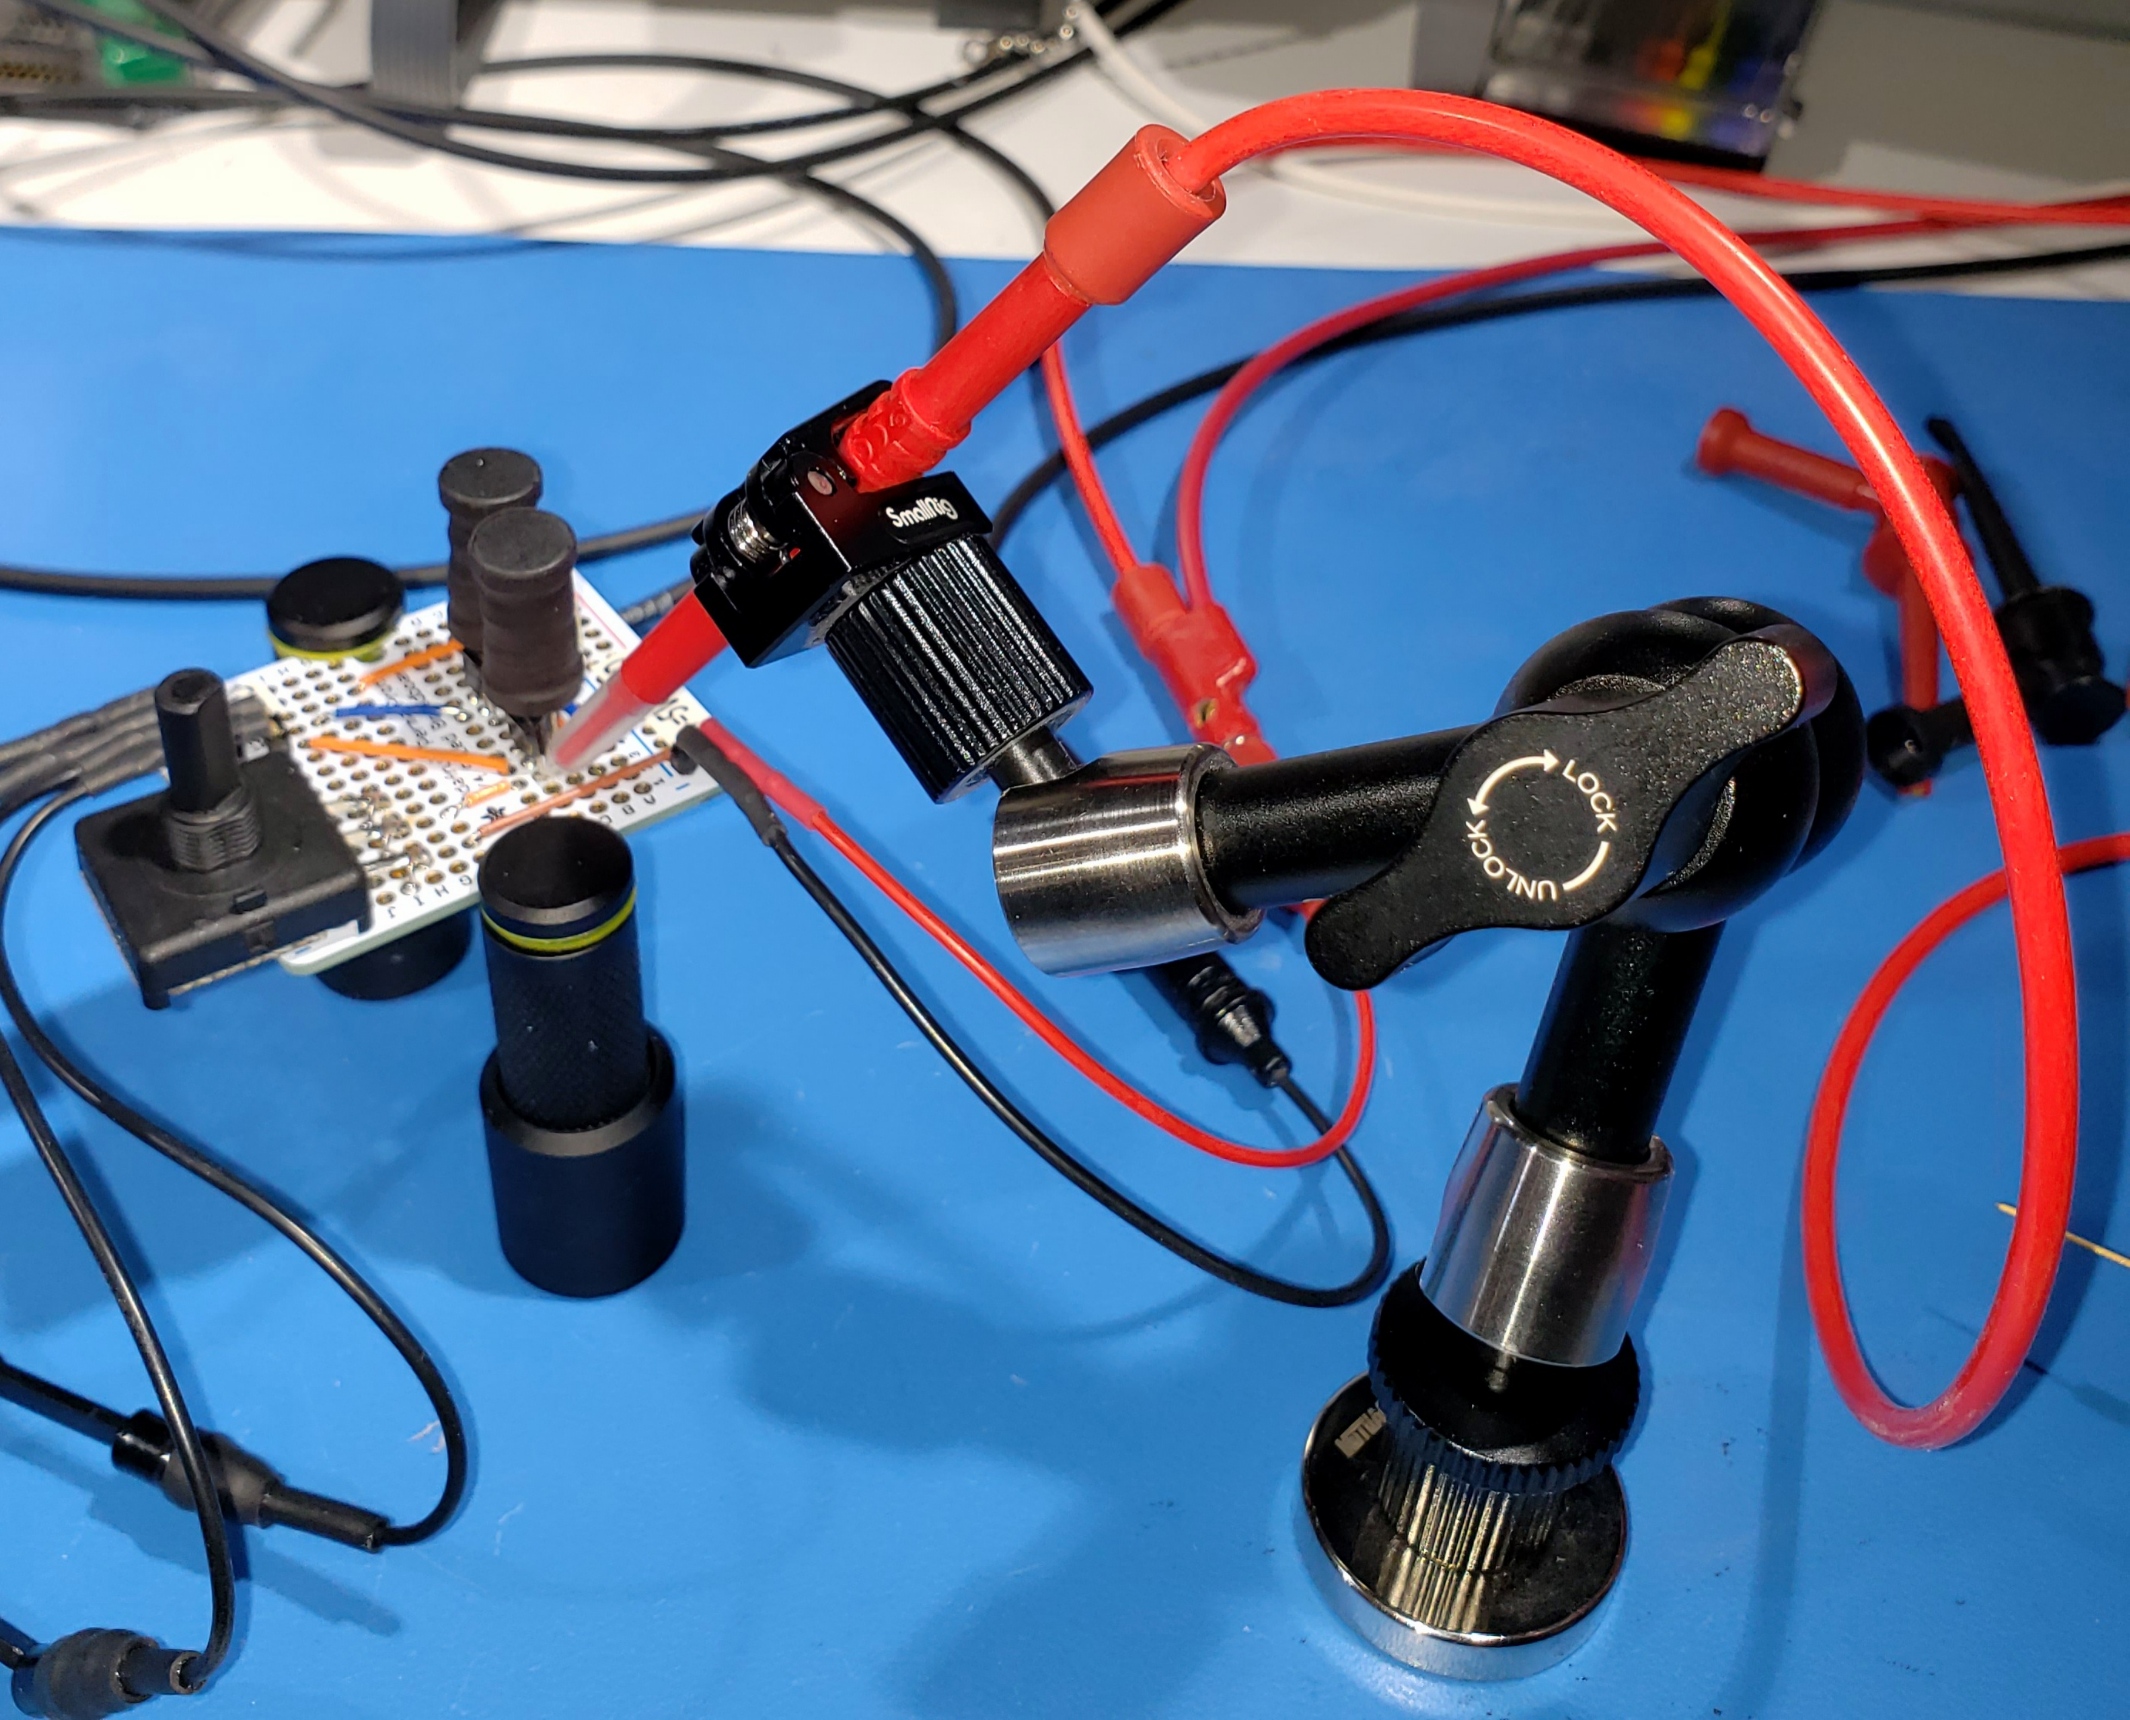
I keep two magic arms kitted out for probes. I stick them to the metallic shelf above my bench so they are always handy.
6. Temperature
6.1. Why is temperature measurement so important on the bench?
Thermal information can be a sensitive indicator of circuit operational condition. Just as with voltage measurements, it can be very useful to simultaneously measure temperature at several points across a board under test.
Even low power circuit troubleshooting can benefit from temperature monitoring. For example, a temperature differential of just a degree between two transistors in a symmetrically configured circuit can indicate trouble, and measuring temperature avoids probing sensitive circuits.
More obvious temperature measurement applications include solving thermal management problems. For example, measuring the temperature differential across a heat sink assembly can provide critical information regarding how well the sink is being ventilated or detect problems with thermally conductive heat sink bonding agents.
6.2. OK. What equipment do I need?
Just a DMM that supports thermocouples or RTDs. I also have a Fluke 54II on the bench, and it has proven itself to be a solid performer over the years.
I also have a no-name IR imaging device which can be really useful on the bench. I use it quite a lot to diagnose heatsink issues. I have used name brand units, and I can't say they are any better than the cheap ones you can get on e-bay aside from durability.
6.3. How can I keep thermocouples positioned on the DUT?
Wooden clothespins work quite well most of the time. Binder clips, heat-sink clips, and soldering clips all work well too. I normally clip the probe wire to something sturdy, and then bend the wire so that the probe is in contact with the DUT. This eliminates the thermal capacity of the clamp from impacting the measurement.
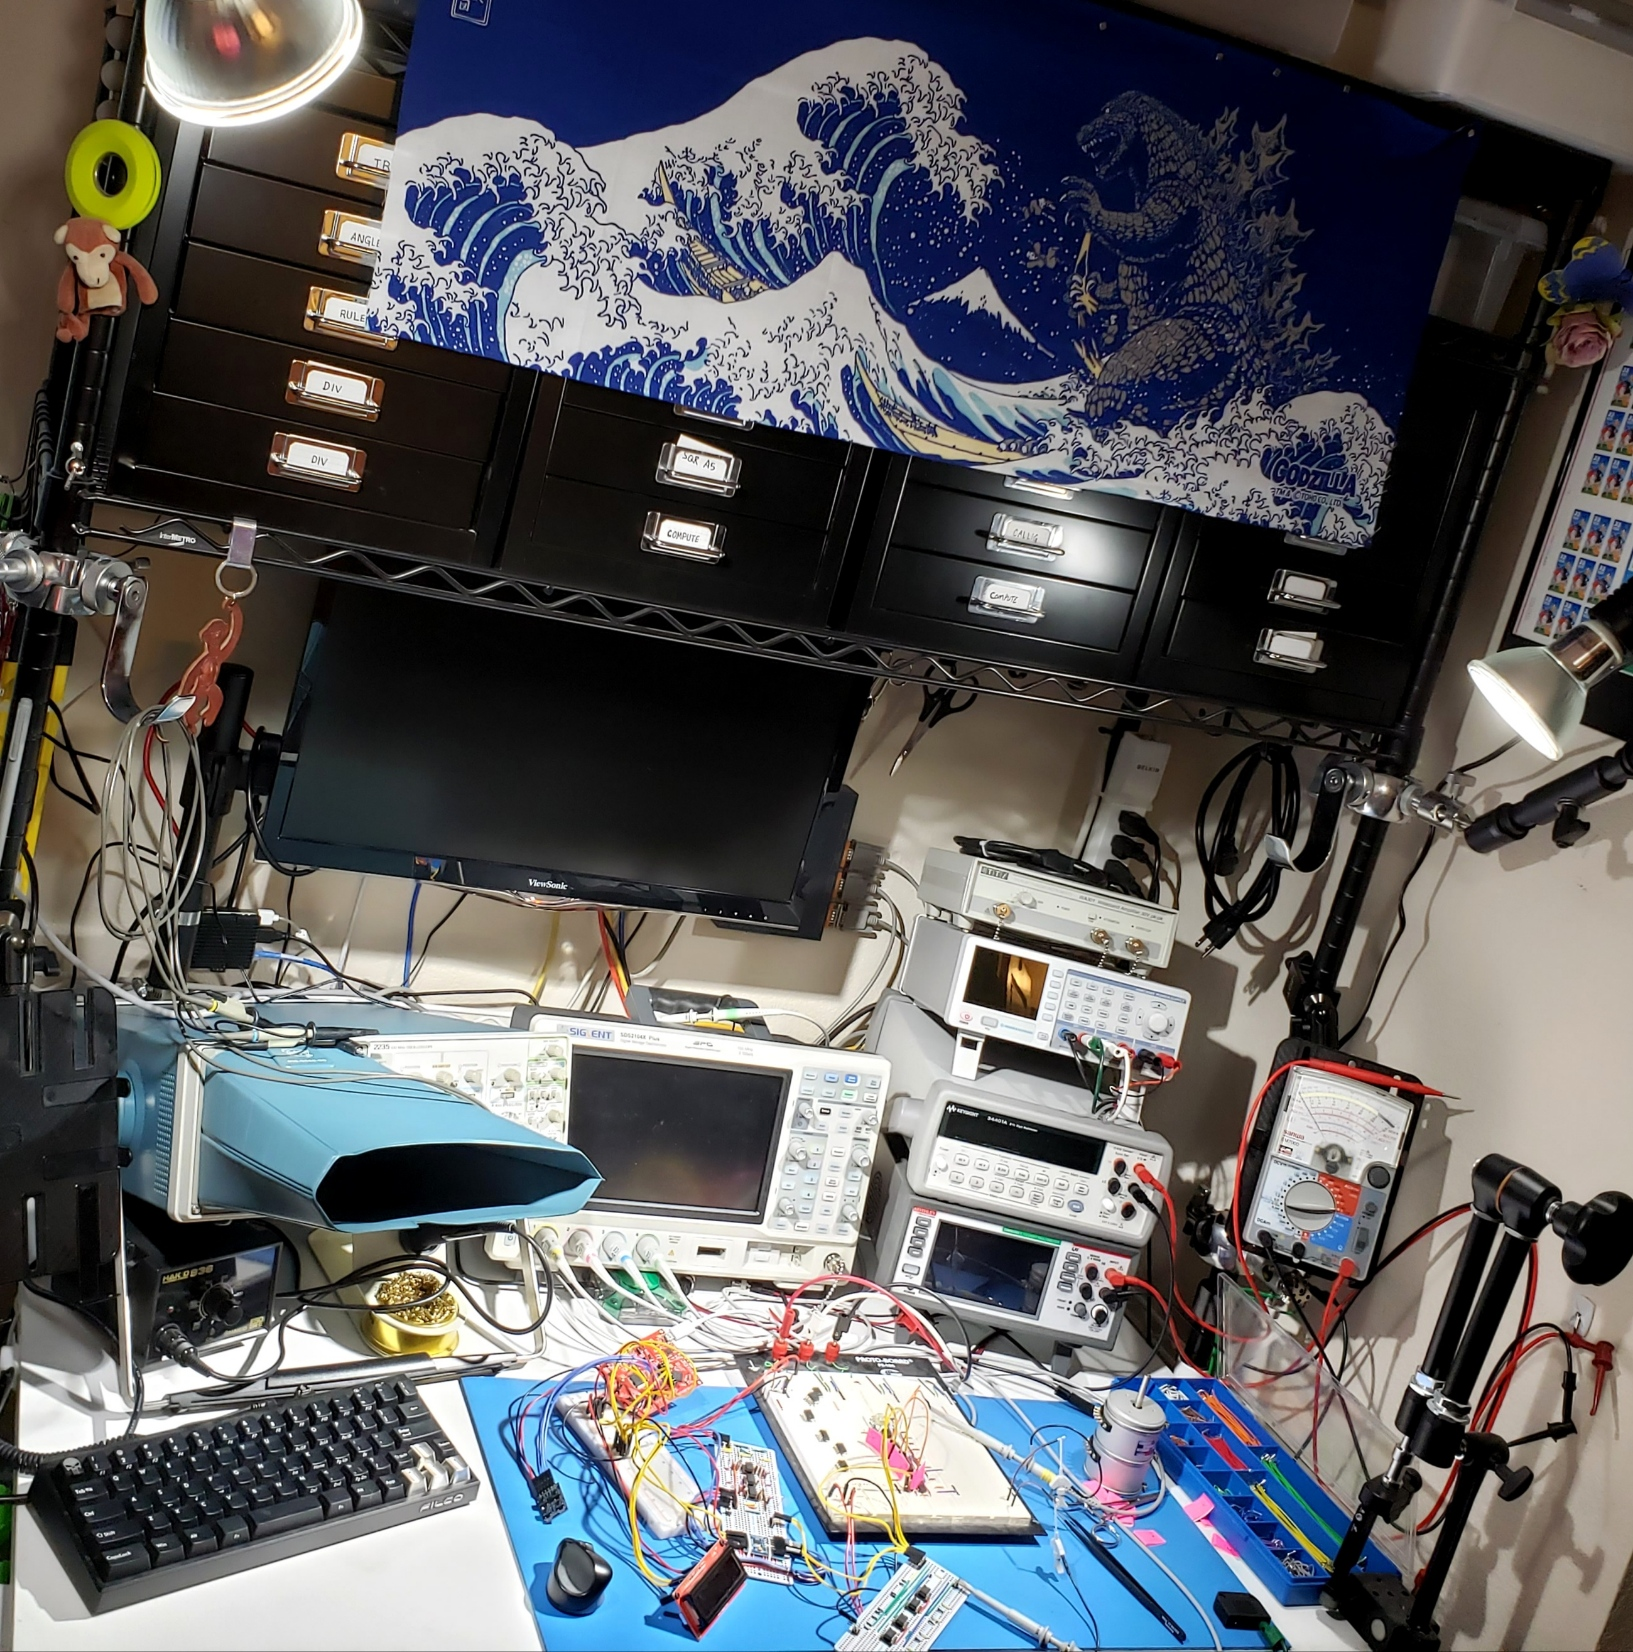
7. Oscilloscopes
7.1. What oscilloscope do you use?
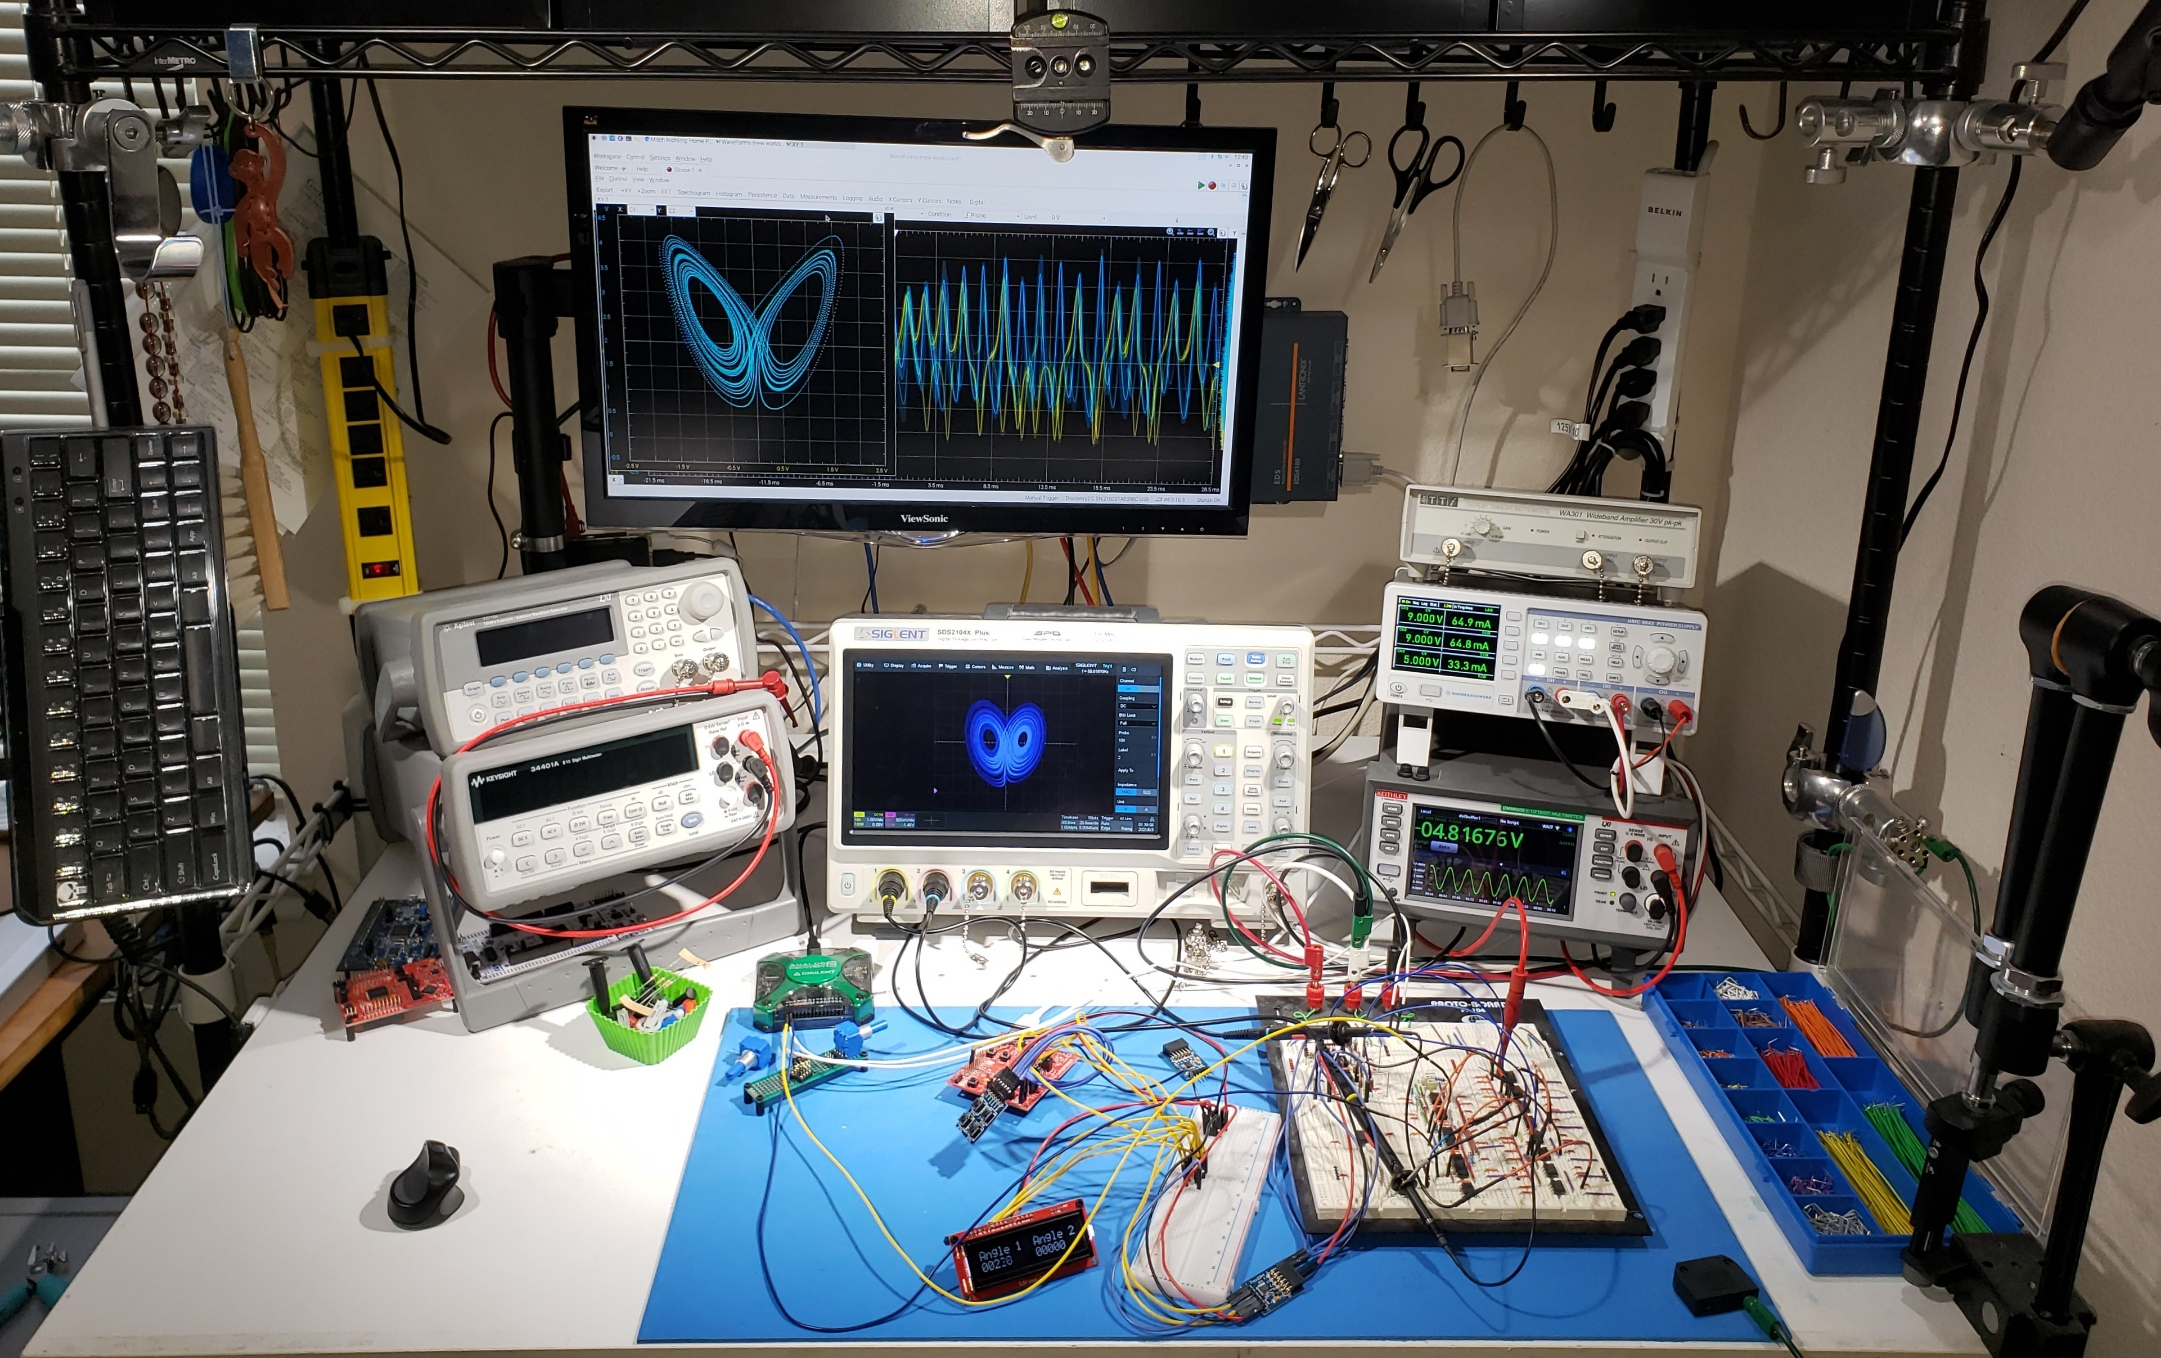
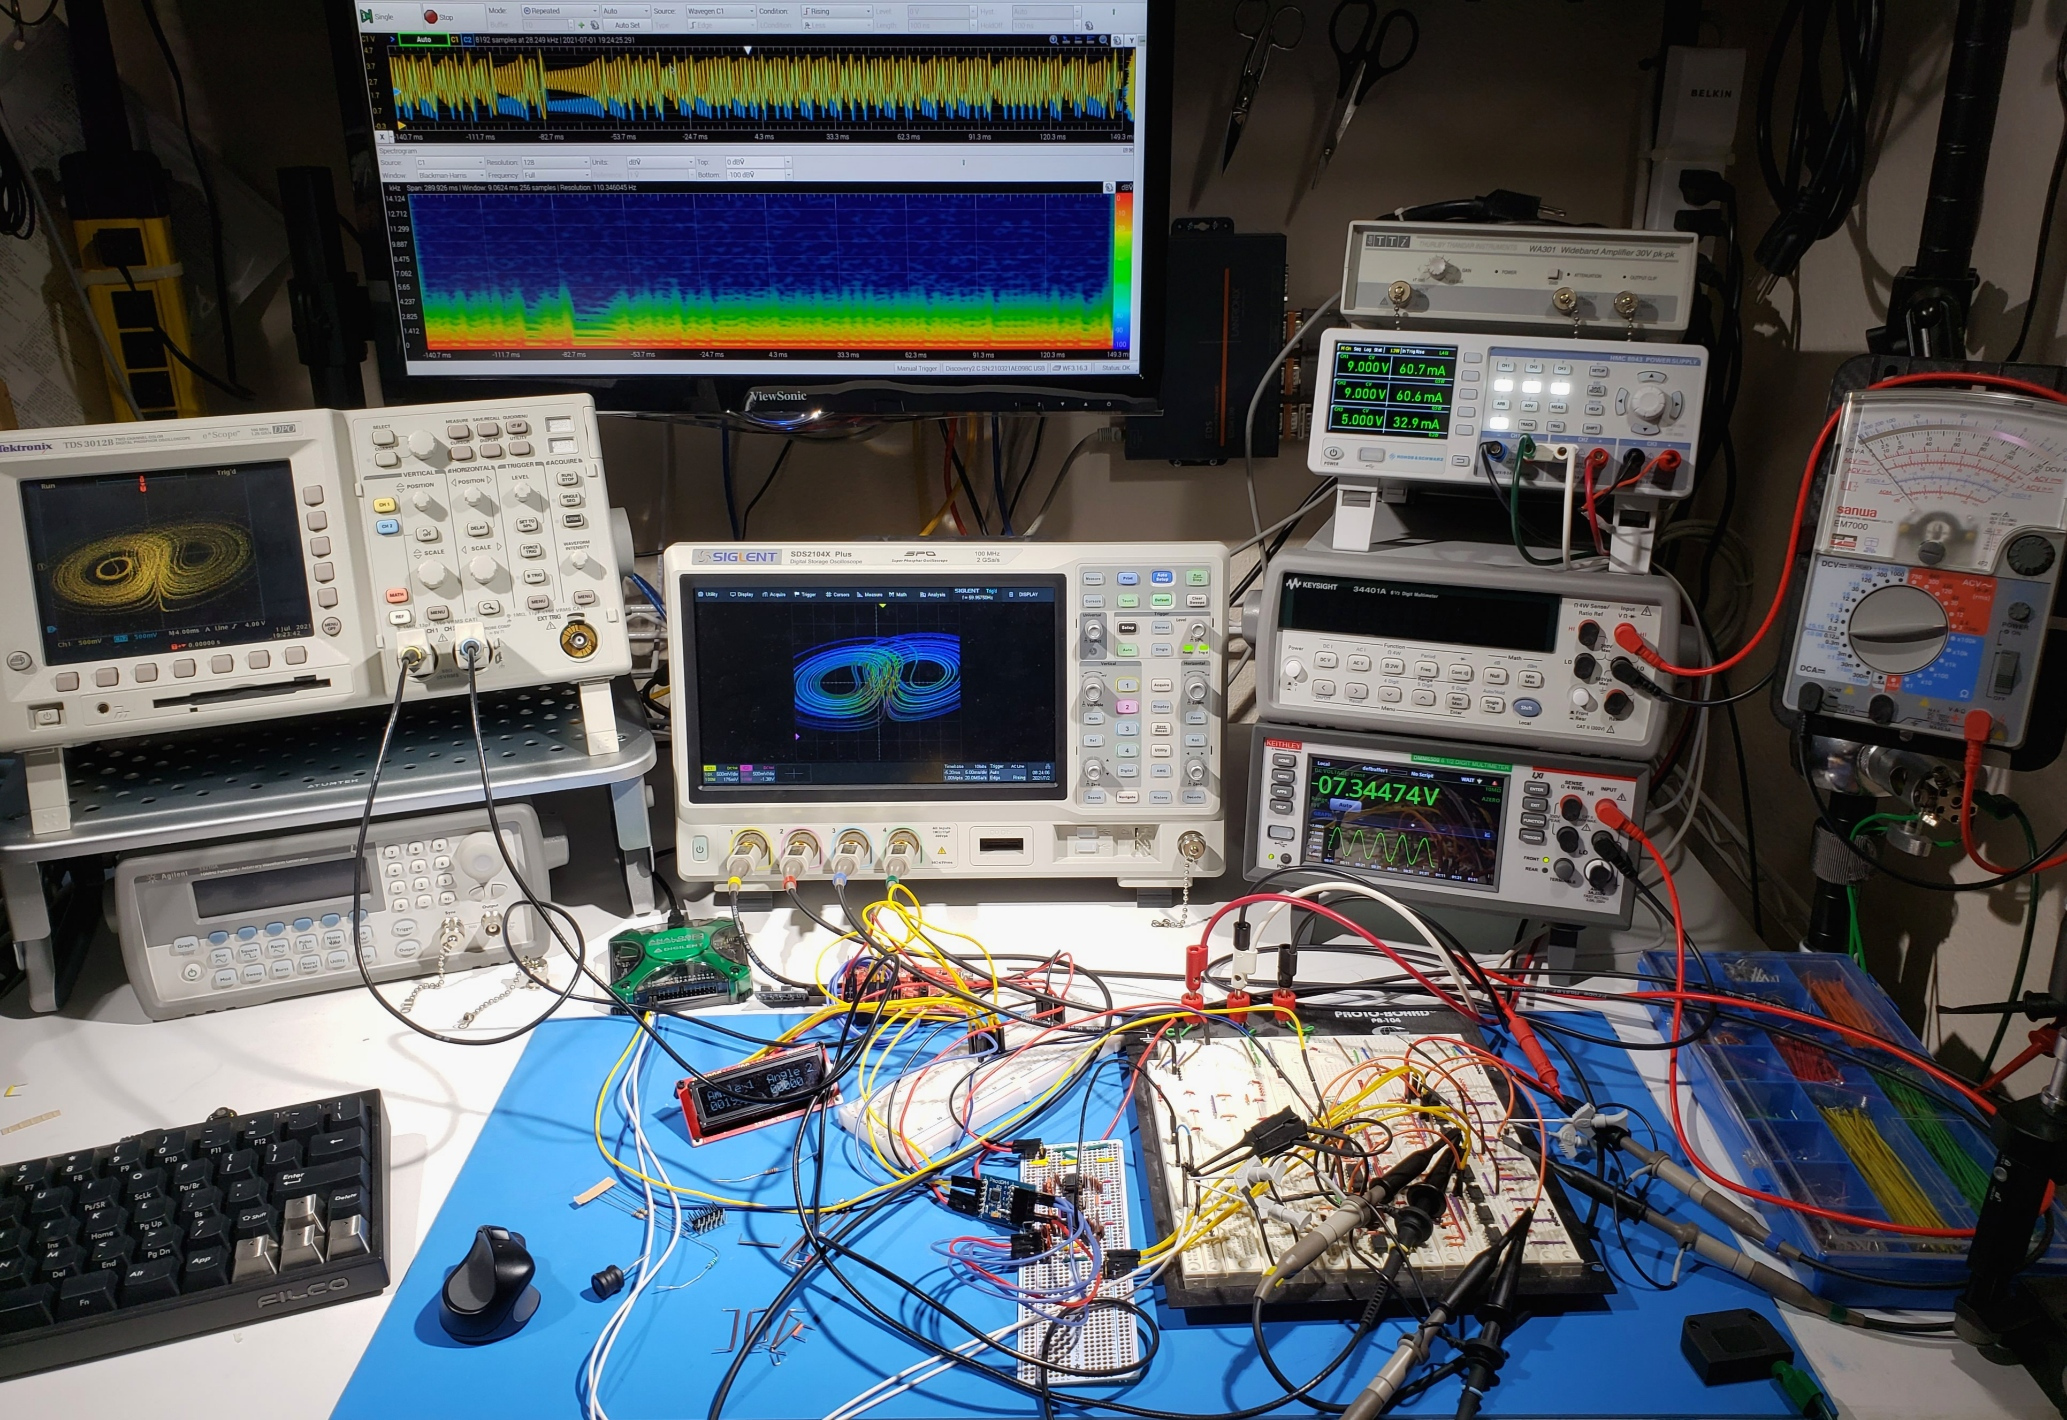
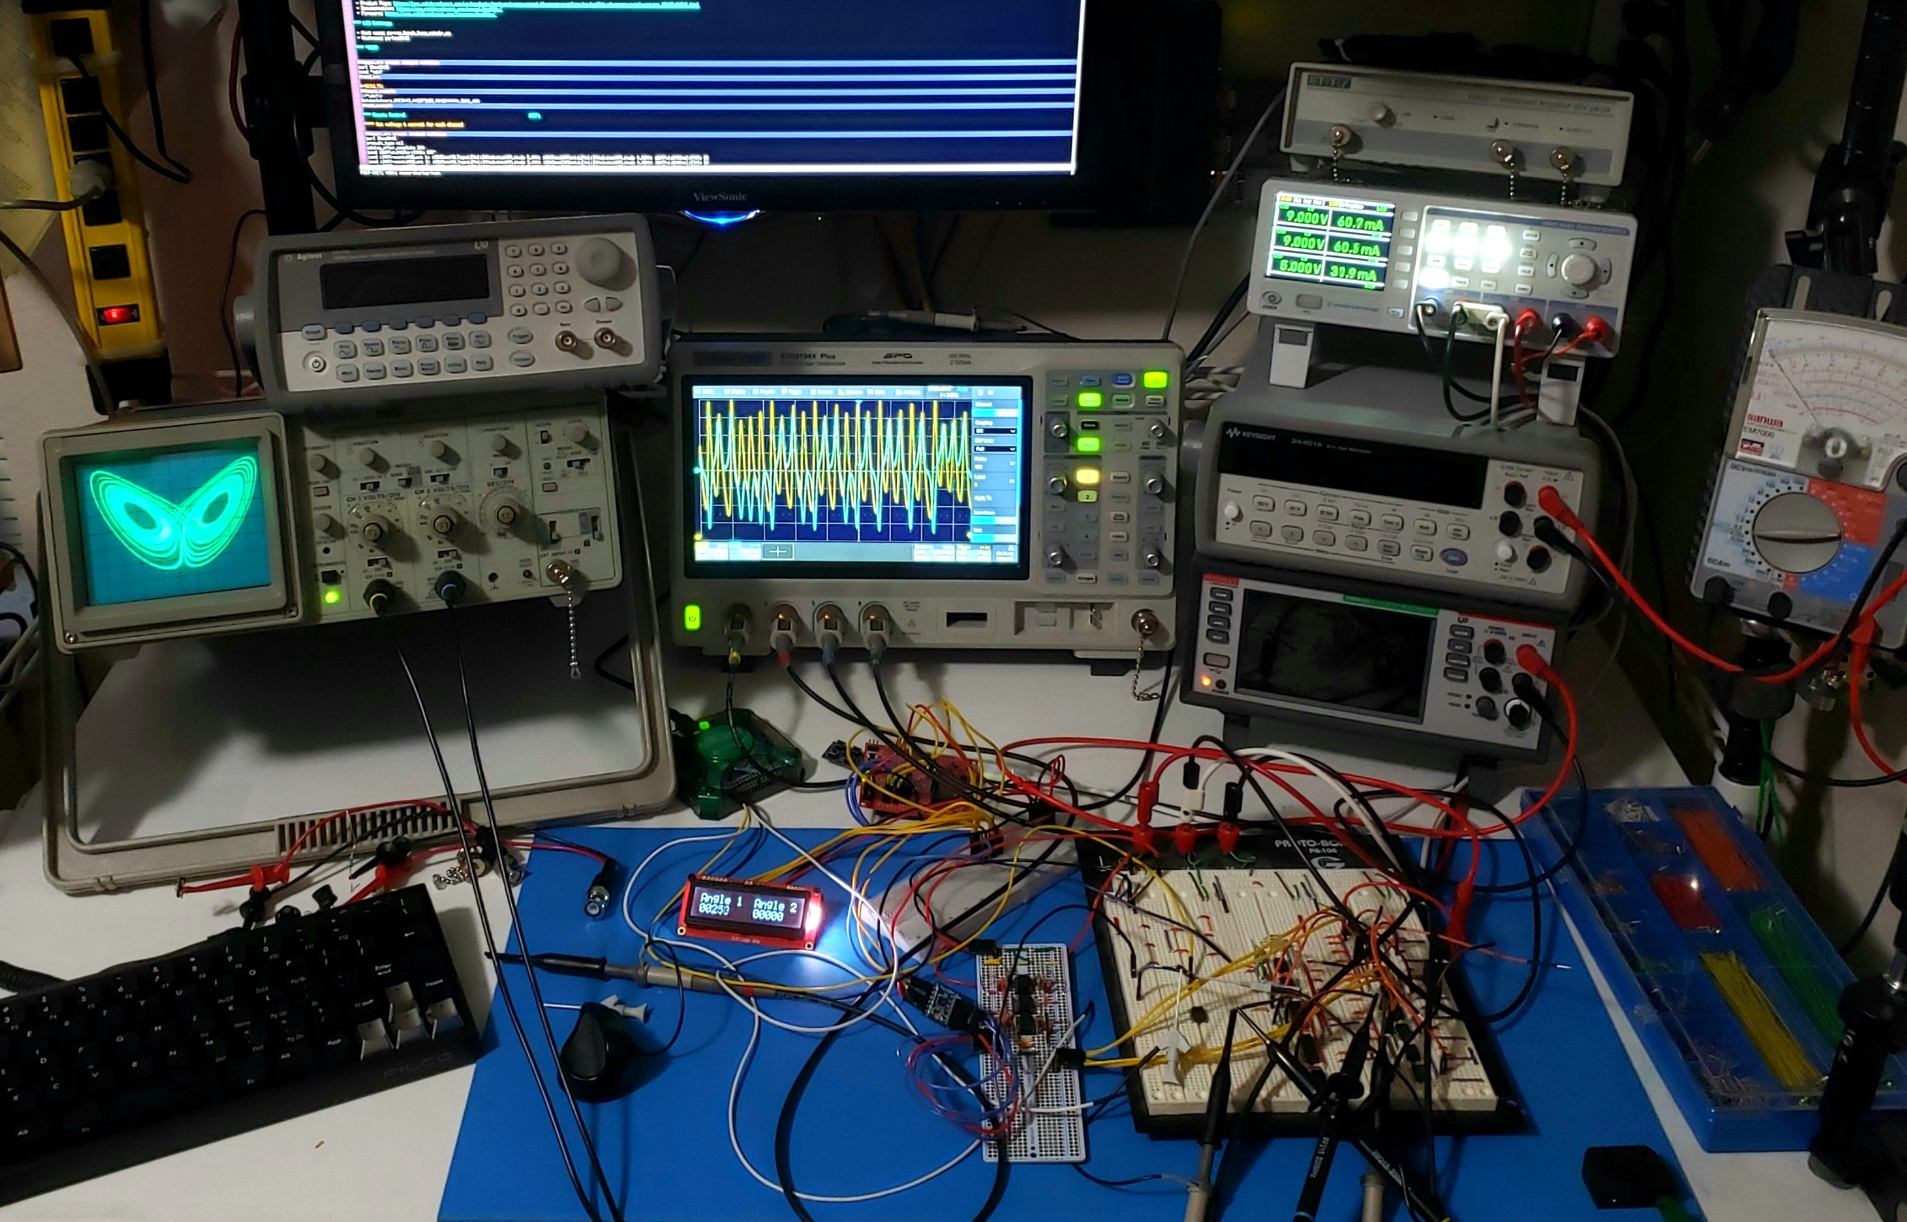
- Siglent SDS2354X Plus (Digital MSO/DPO, 4+16 channels, 500MHz, 2'ish Gs/s)
- This is my primary scope for mixed signal work. It's pretty much always on the bench.
- Rigol DHO4804 (HD Digital DPO, 4 channels, 800MHz, 4'ish Gs/s)
- This is my primary scope for analog work. It's pretty much always on the bench.
- Analog Discovery 2 (USB digital instrument, 2 differential channels, 30MHz, 100Ms/s)
- This is a USB device with several instruments. I use this device far more than I expected.
- Tektronix TDS 3052B (Digital DPO, 2 channels, 500MHz, 5Gs/s)
- I pull this one off the shelf when I need higher bandwidth and/or sampling rates.
- Tektronix 2235 (Analog CRT, 2 channels, 100MHz)
- This is one of Tek's first budget scopes. It blows away all my digital scopes in X-Y mode.
- Tektronix TDS2024 (Digital, 4 channels, 200MHz, 2Gs/s)
- This scope is far more compact than any of my other scopes, and I occasionally use it on my other bench or at my soldering station.
7.2. What oscilloscope should I buy?
I can't give you a good answer, but I can tell you about a few things I wish I had given more consideration when making past buying decisions. ;)
- Don't overlook the user interface
- A good UI is important
- Large touch screens make a big difference in productivity
- Don't overlook connectivity & programming
- Ethernet!
- Make sure the remote control firmware is robust. It is super easy to crash scopes from some vendors by sending a bad SCPI command.
- Make sure the SCPI/LXI features you need are actually implemented. Again, low cost providers can skimp on this.
- If you use LabView, then make sure robust drivers exist and that the vendor has a history of keeping up with LabView updates
- Don't overlook integration with other bench equipment
- Scopes are frequently capable of controlling signal generators from the same manufacturer – automated bode blots for example
- Can your scope dump a waveform that is easy to load into your AWG?
- If X-Y is important to you, then do some extra research
- Cheap analog scopes can seriously outperform even the most expensive digital ones for some X-Y applications
- I had a low end, analog Tektronix 2205 I got for $100 on EBay. I later upgraded to a 2235. For X-Y mode, they both blow away every digital scope I have ever used.
- If you go digital
- Remember digital performance on X-Y is almost impossible to judge from the spec sheet
- Many digital scopes do something called "triggered X-Y mode" in which the timebase settings matter
- For some digital scopes the memory settings matter – with longer record lengths leading to slower screen updates!
- If possible try the instrument on your signals first
- Think about your use case for digital inputs on a mixed signal scope
- The real power of a MSO is being able to display analog and digital simultaneously
- For serious logic debugging I find a logic analyzer and a real computer to be much more efficient
- Some scopes can decode things like SPI & I2C with the analog channels
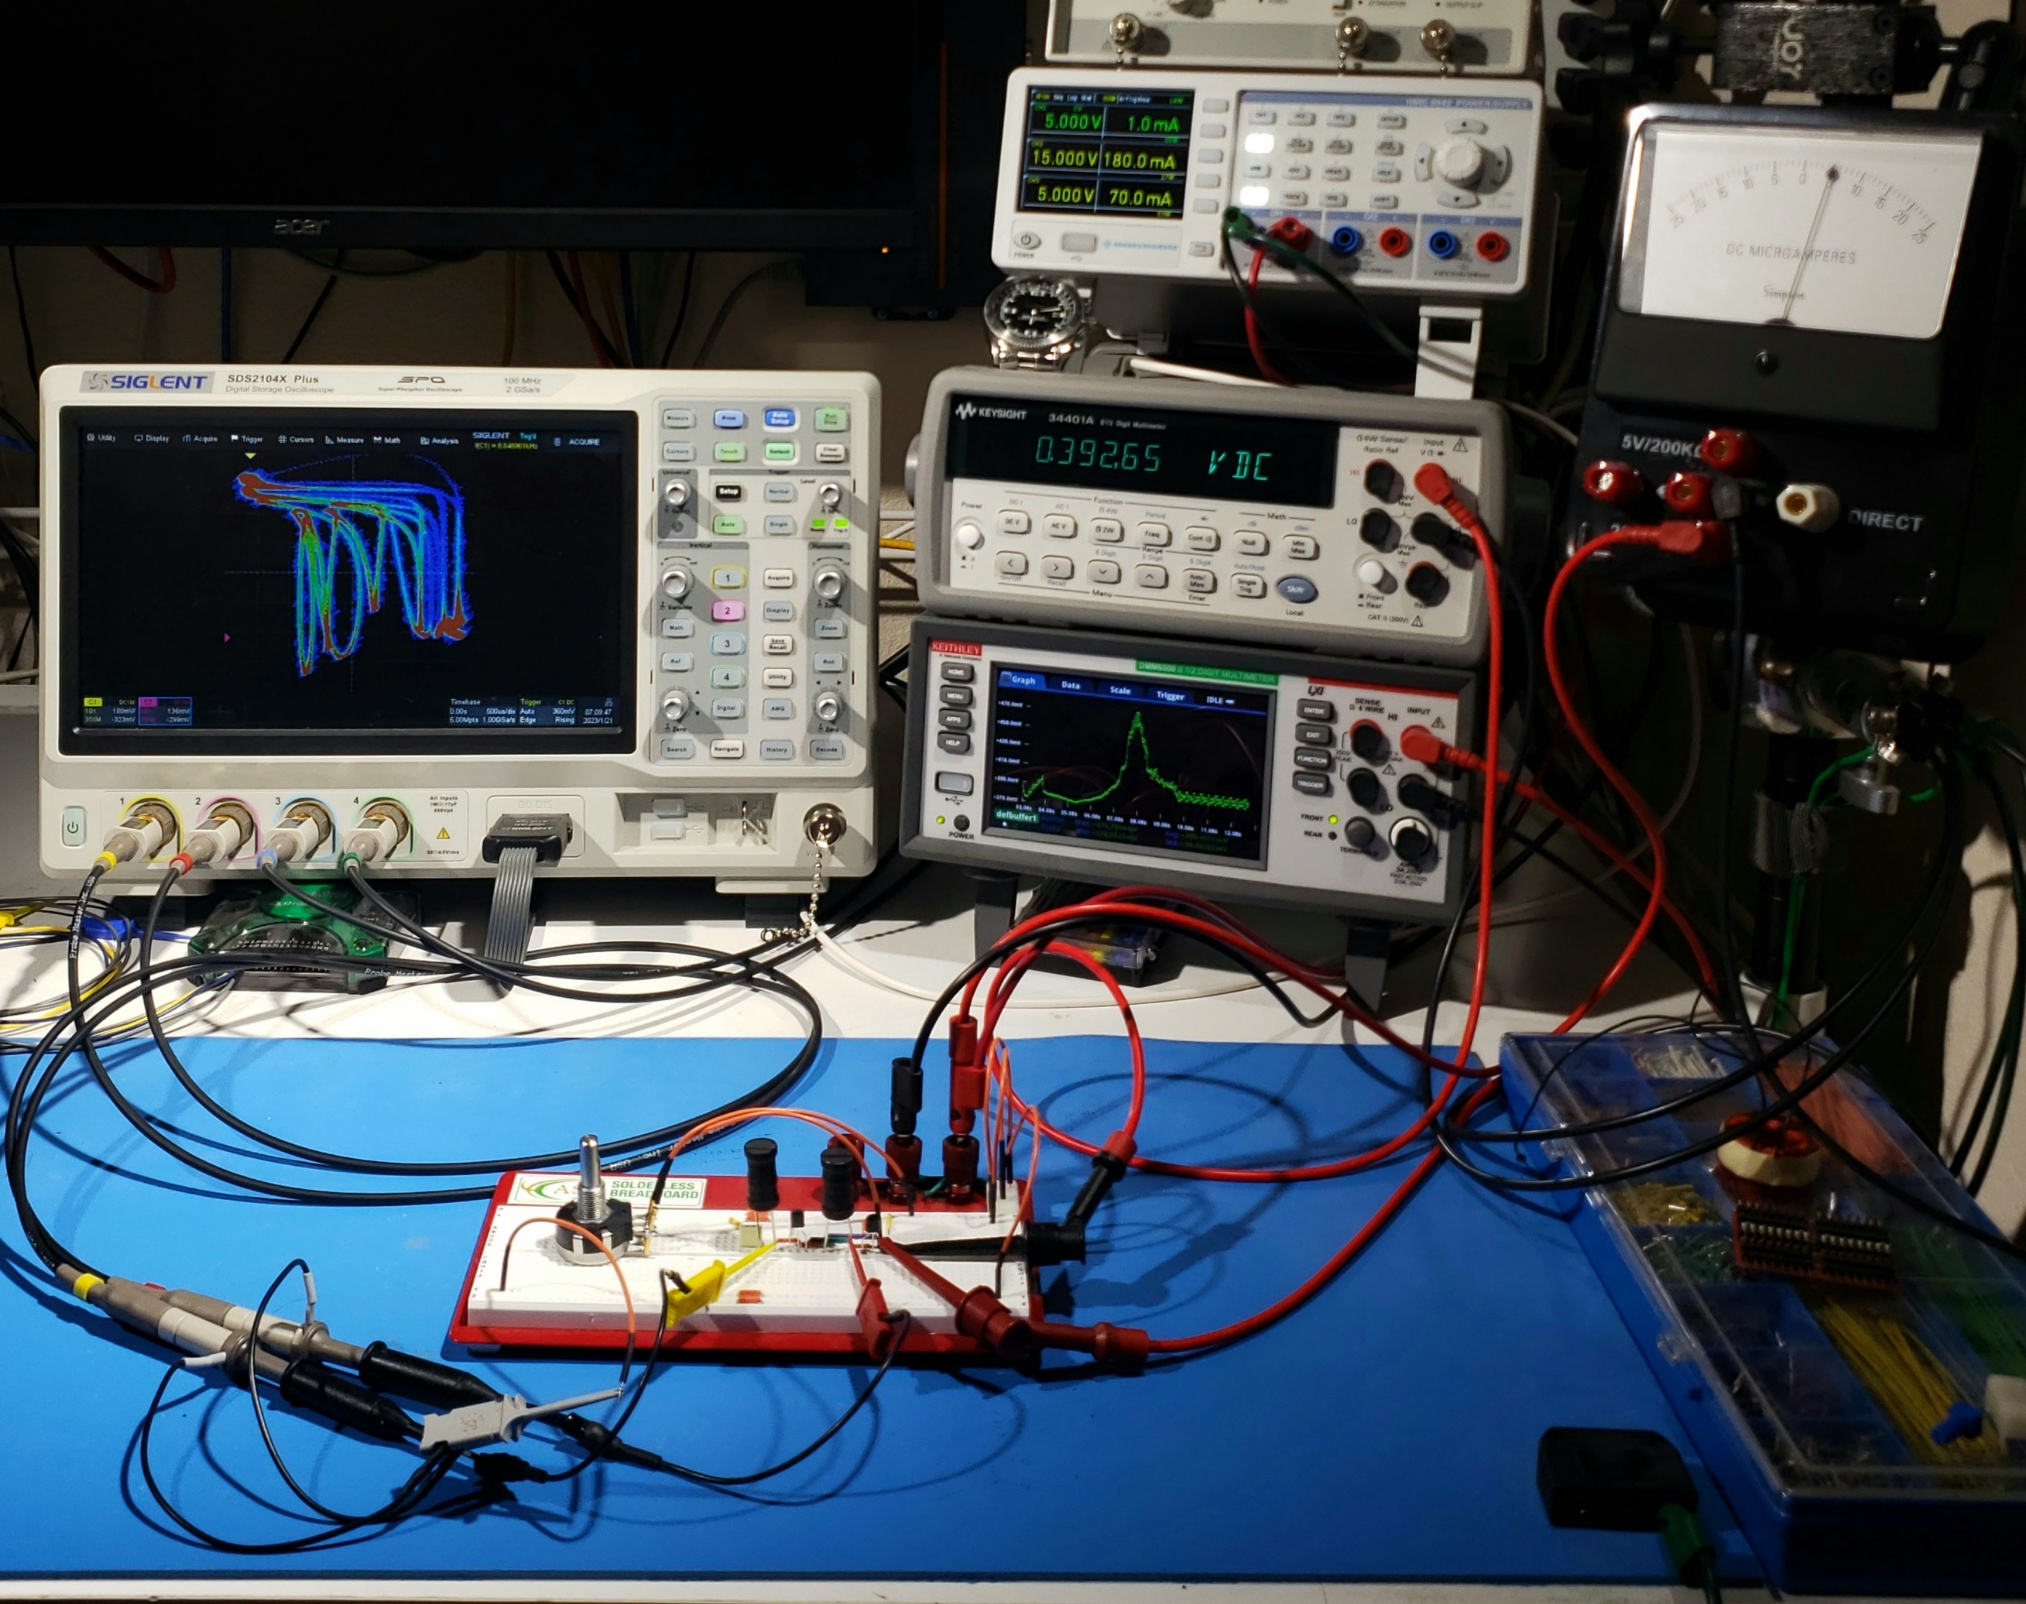
The AD2 semi-permanently connected to my always on bench computer gets a lot of use, and it is hands down the worst scope on my bench from a specifications perspective! I find I use my Siglent more than any of the other scopes on the shelf. In many ways it is inferior to my other scopes, but the large touch screen makes it a pleasure to use.
8. Test Automation
8.1. Ethernet is king!
Dump the old interfaces! HP IL & GPIB were cool back in the day, but we can do better today. Serial? Really? Just say "NO"!
I refuse to buy new automated test equipment without a physical Ethernet port - or at least support for a USB Ethernet dongle. It is so much simpler to just hook everything to an Ethernet switch and be done with it.
For used equipment, I sometimes give in and purchase something with an older interface. When I do, I access that old interface via Ethernet.
8.1.1. Serial? Do it over Ethernet!
I have a couple bits of old gear with RS-232 or RS-485 interfaces. I hook them up to a Lantronix serial console server on my bench Ethernet network. So now I can use standard TCP/IP for them the same way I do with newer, Ethernet equipped instruments. This greatly simplifies my automation code.
Note that serial consoles designed for datacenter use may not have high voltage isolation. For the bench I feel safer with an industrial server with a couple kV of isolation on the serial side.
8.1.2. GPIB? Do it over Ethernet!
I only have one bit of kit with GPIB, so I went with a simple GPIB to Ethernet converter. The one I used was from Prologix. It cost about $150, and has worked out very well. I can now connect to my old counter just like it had a real Ethernet based SCPI interface!
8.2. Stick to raw socket SCPI over TCP/IP (Ethernet)!
I have been burned. More than once. I'm jaded on this subject.
Yea. I know. All those fancy drivers and APIs sure are cool. But at the end of the day they are a pain to manage. Software updates. Driver bugs. OS updates breaking things. Pick a programming language you like and use it. It's not hard to make a TCP/IP connection, send some commands, and read the results. The APIs for socket communications have been stable for decades. Once you get it working, it will probably work forever. I like that.
8.3. What do you use for SCPI programming?
I almost exclusively use mrSCPI for instrument programming.
9. Analog Discovery 2
This is a great little device with pretty good software. When I purchased the thing it was more as a toy to play with; however, it has become a workhorse on my bench. Sure the specs are way worse than my regular test equipment, but it's just a super handy little thing.
9.1. What do you use it for?
- Exploring new parts
- New serial LCD? New accelerometer breakout? The AD2 makes it super easy to power that device, and then interact with its digital interface (SPI, I2C, GPIO, or whatever). It gets even better if you have a mixed signal device to explore – like a DAC or ADC breakout board. The AD2 lets me measure analog outputs and inject signals into analog inputs. That's seriously cool. And it's all super easy to do with the Waveforms software that comes with the device.
- Low frequency data capture
- I work a lot with very complex, low frequency signals – chaos circuits for example. While the AD2 suffers from some cross-talk and noise, it has proven to be a pretty nice way to digitize these lower frequency signals and get them into my computer where I can analyze them.
- Serial bus debug
- The AD2 is a great tool for snooping a serial bus and doing protocol analysis. It also makes a great ad-hoc client for interacting with a serial bus. In the past I might have used a Bus Pirate, Binho Nova, or microcontroller EVM board for this kind of thing. The AD2 is better.
- LCR
- I have used a testing harness for years to measure impedance using my function generator and DMM or oscilloscope. I even have an SCPI script that automates the procedure. Turns out the AD2 has an impedance analyzer add-on board that uses the same basic circuit and method I used before. The difference is that Waveforms has a much nicer user interface than my old SCPI script. Yes, I get more accurate results with my old setup. Yes, I can measure a wider range of devices with my old setup. Still the AD2 is super handy for the cases where it works.
- Octopus-style curve tracing
- The AD2 makes a pretty good component tester and transistor curve tracer.
10. Digital Discovery
I would say that the Analog Discovery 2 takes care of about 70% of my logic analyzer needs and the Digital Discovery takes care of the remainder.
The Digital Discovery has 32 logic analyzer channels – twice that of the Analog Discovery. With 32 active channels it samples at 200Ms/s – twice the speed of the Analog Discovery 2. You can double that when only using 16 channels, and quadruple it when only using 8 channels (that's 800Ms/s). Unlike the Analog Discovery 2 you can set the logic levels to anything from 1.2V to 3.3V – both for the logic analyzer and pattern generator.
11. Signal Generators
11.1. More power Mr. Scott!
How much current can your signal source supply? I measured my Agilent, and it can supply about 150mA – far more than is normally necessary. Sometimes I do need a bit more, and for quite some time I used a homemade buffer circuit I slapped together one night from an OPA541 and an old medical power supply I had in the junk drawer. It worked far better than it should have given the shoddy nature of the build. Today I use a an Aim TTI WA301 which can provide about 300mA, or just about 2x what my Agilent can deliver. It's a solid little unit, and has served me well. I wish it had a power switch, and wasn't ground referenced…
11.2. Floating Outputs
Sometimes you just need a floating signal source. I have a rule at the bench to never float equipment that is not designed to be floating. So what do I do? First of all my Agilent has a floating output, but sometimes I need to use another generator or amplifier. For low frequency applications (<1KHz) I have a 50 Ohm audio transformer potted inside one of those BNC filter box enclosures that can simply be attached to the end of a BNC cable.
11.3. Shopping Advice
Here are a few things that have tripped me up in the past…
- Grounded or floating
- Floating outputs are something you don't need all the time, but when you do they are super handy!
- External time-base
- If it's an option, then get it when you buy the generator – it's more expensive later.
- Oscilloscope integration
- Having your oscilloscope know how to run your signal generator is very handy.
12. A-Brand vs. B-Brand Vendors
How many Siglent vs Agilent or Rigol vs Tektronix threads can you find? ;)
My short answer: Don't sweet it.
My feeling is that the delta in performance and quality between the traditional A-Brand test equipment vendors (Tektronix, Keysight/Agilent/HP, etc…) and the B-Brand ones is shrinking. Today most of the A-brands have "low end" product lines that are nothing but re-branded products from those B-brand manufactures. So A-brand doesn't quite mean what it did in the past. In addition, we have seen some disappointing, "high end" products from some of those A-brands over the last few years. For example some oscilloscopes with such poor interactive performance that they are truly painful to use – you know who you are. At the same time the B-brand companies are gaining more and more expertise, and producing better products all the time. So for mid-tier an low-tier test equipment, I don't hesitate for a moment to go with a B-brand.
On the truly high end, the stuff that costs a quarter of a million dollars, you don't really have that many choices. Most hobbyists don't need to worry about that stuff. ;)
12.1. Are there specific trouble areas for B-brand gear?
B-brands generally offer far more test value for the dollar; however, I have noticed a few areas where I need to pay more attention:
- Test Automation
- The remote control capabilities of B-brand gear tends to be less well implemented. For example, I have found it is much easier to crash B-brand gear than A-brand gear with incorrect SCPI commands or poor automation scripts. For example A-brand gear tends to be more tolerant to common mistakes like sending commands too quickly or failing to read the result of a command. At the end of the day, this means I need to be more careful about how I code up my automation. For a professional lab where efficiency is money, that's a big deal. For me, it's a hobby so I can take a bit more time.
- Driver & Application Software
- The A-brands tend to have more robust and full featured software – mostly because they have been working on the same software platforms for a couple decades. Internationalization can be an issue as well.
- Documentation
- A-brand gear has a ton of great documentation, case studies, white-papers, and training. Sometimes B-brand gear is quite limited, or you need to run it through translation software to get documentation in English. That said some of the better B-brands have really come a long way in this regard – Siglent & Rigol are good examples of B-brands that have done a pretty good job with documentation.
- Specifications
- The specifications on B-brand gear can frequently be optimistic, while on A-brand gear they tend to be Conservative. Also B-brand gear will at times have specifications that are a bit more carefully worded and you really need to pay more attention. For example, most A-brand signal sources that advertise 15MHz will be able to deliver that frequency for all waveforms; however, B-brand gear may deliver that frequency only for sinusoidal waveforms. At the end of the day that means I read the specs a bit more carefully, and I test the edge cases of the performance envelope so that I really know what to expect from the gear.
- Support
- It is a lot easier to find a shop that can calibrate a Keysight DMM than say a Siglent. In my community I have have a couple dozen labs to choose from for calibrating my Tektronix & Keysight gear, but I only have two I can use for my Siglent & Rigol equipment.
- Resale value
- A-brand gear is much easier to sell on e-bay than B-brand gear. This isn't much of an issue for me because I tend to keep my gear till the magic smoke escapes, but if you are a person who likes to switch out gear this is an issue.
Note some of these comments also apply to low-end A-brand gear too – much of that stuff is simply rebranded B-brand gear to start with.
13. The Other Bench
I have other hobbies: photography, postage stamp collecting, watercolor painting, R/C models, drawing, video games, astronomy, lock picking, etc… The work surface I use for that stuff is by largest work surface:
- About 12 square feet of work surface
- Leica S8API on a 700mm track stand with a permanently attached Raspberry Pi camera and 27" 4K monitor
- 7" illuminated swing arm magnifier
- Photographic studio lighting
- A very nice stereo.
;)
I frequently use it for the "cleaner" parts of final project assembly for larger projects. For things that might get messy, I tend to use my soldering station.
14. Soldering & Assembly
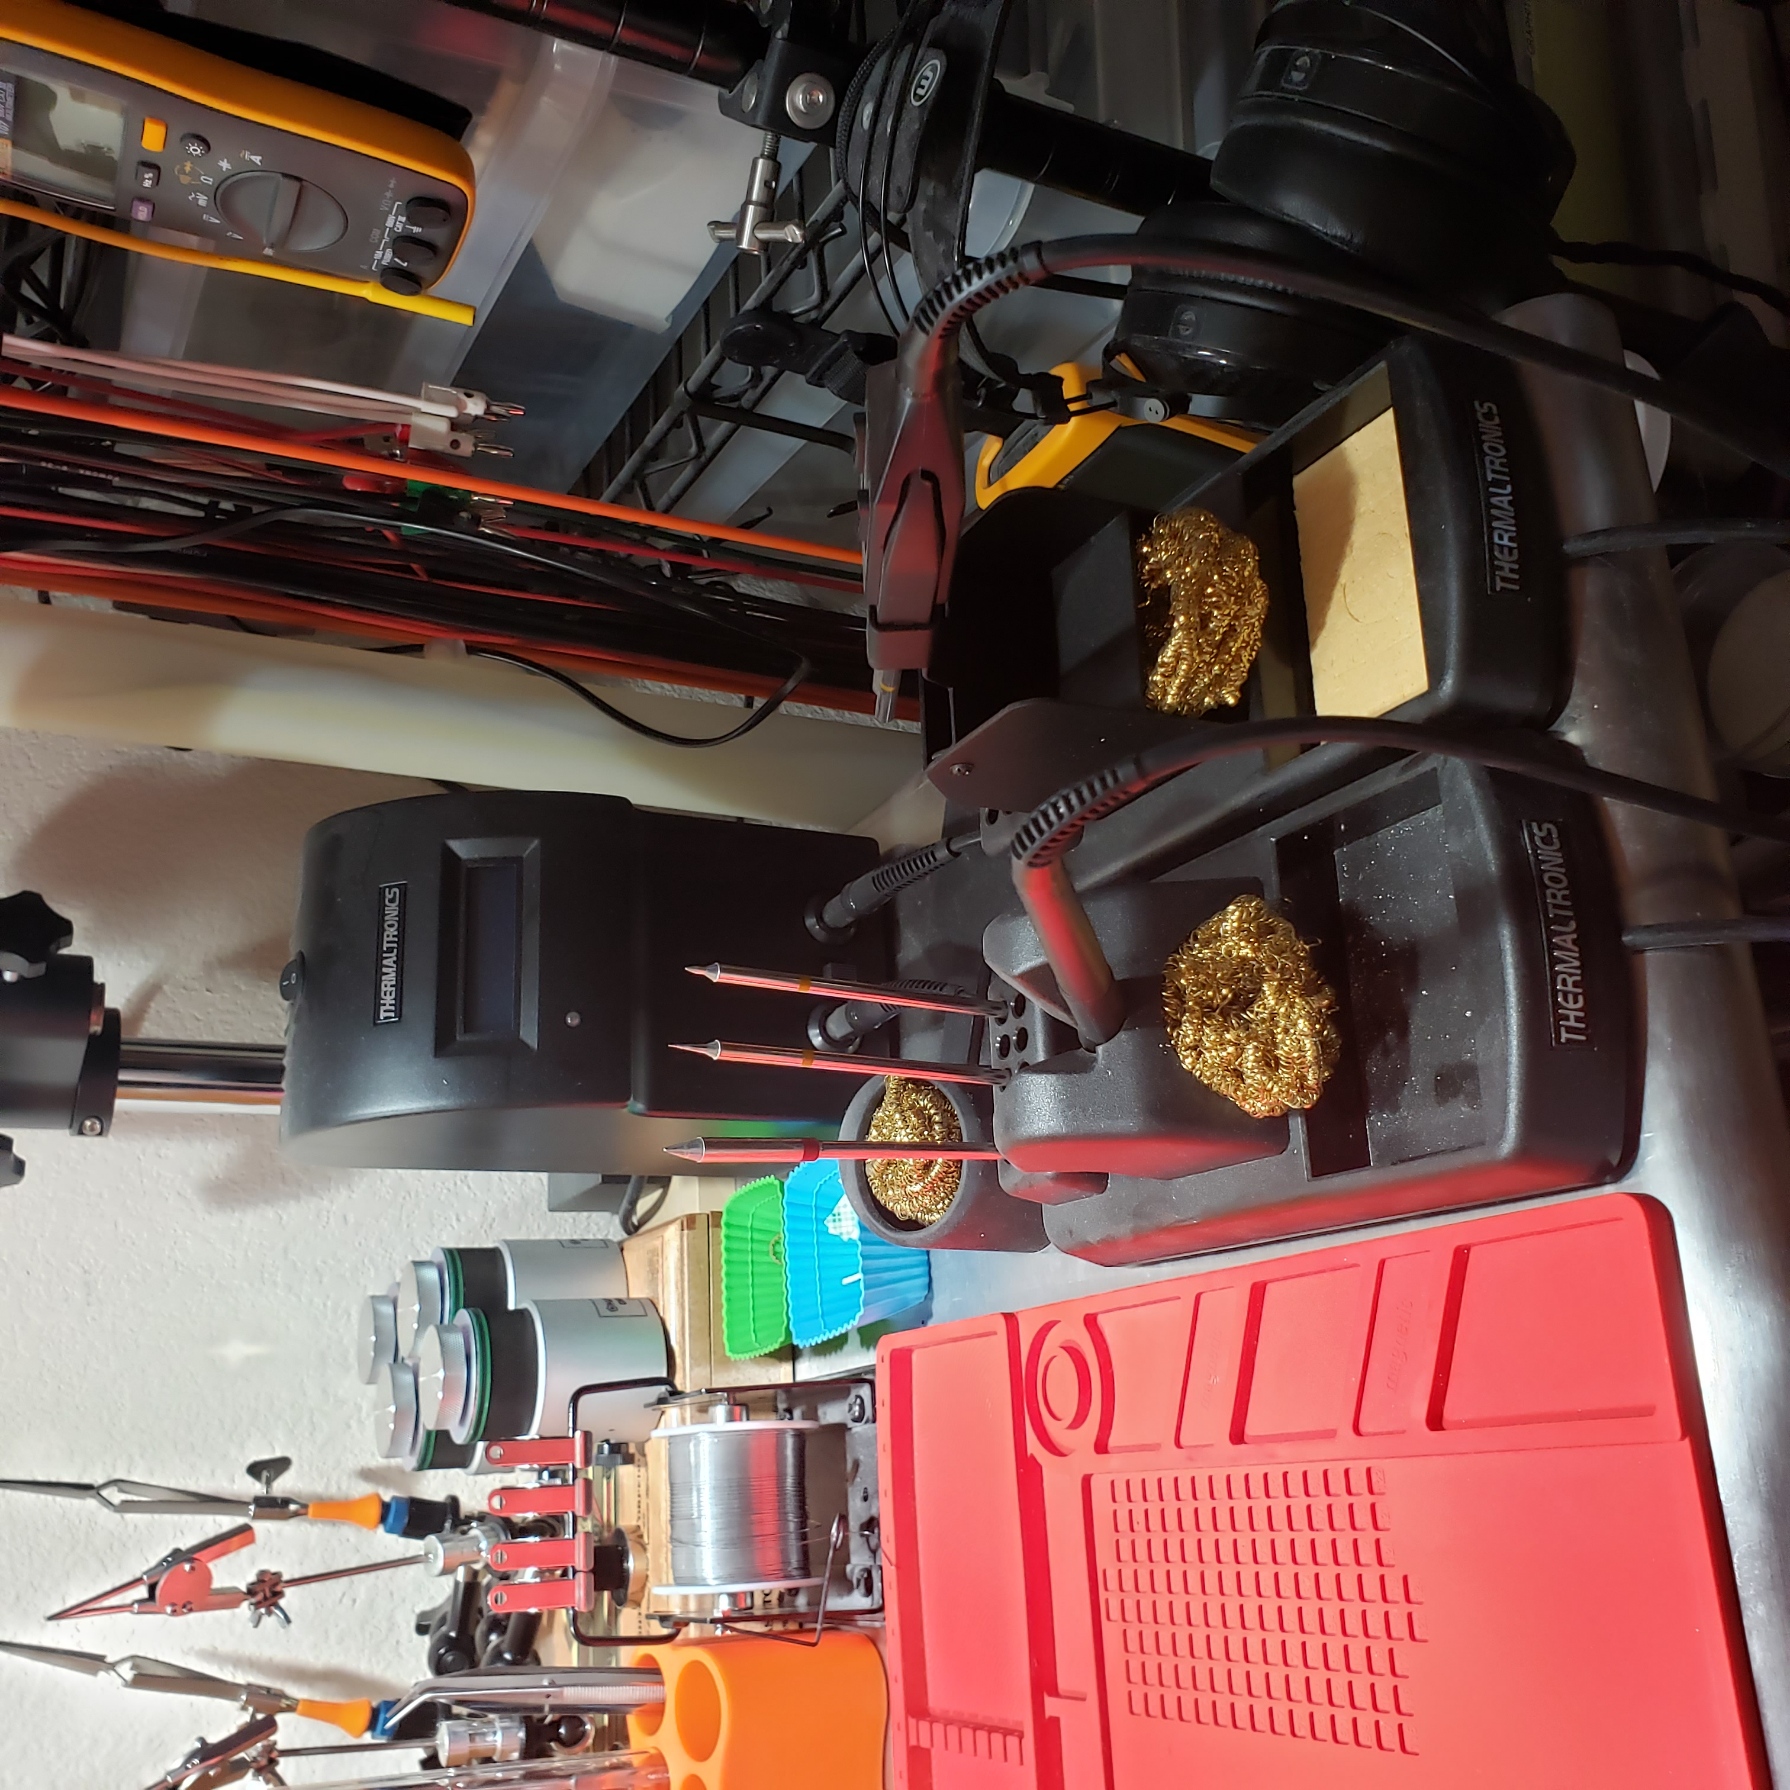
14.1. The Dirty Bench (Soldering Station)!
OK. The "Soldering Station" isn't just for soldering:
- Detailed mechanical work like photographic equipment & watch repair
- Knife sharpening
- Locksmithing & lock picking
- Model work (for painting I use a drop cloth)
- Watercolors
- Project assembly
- Robot & RC build/repair
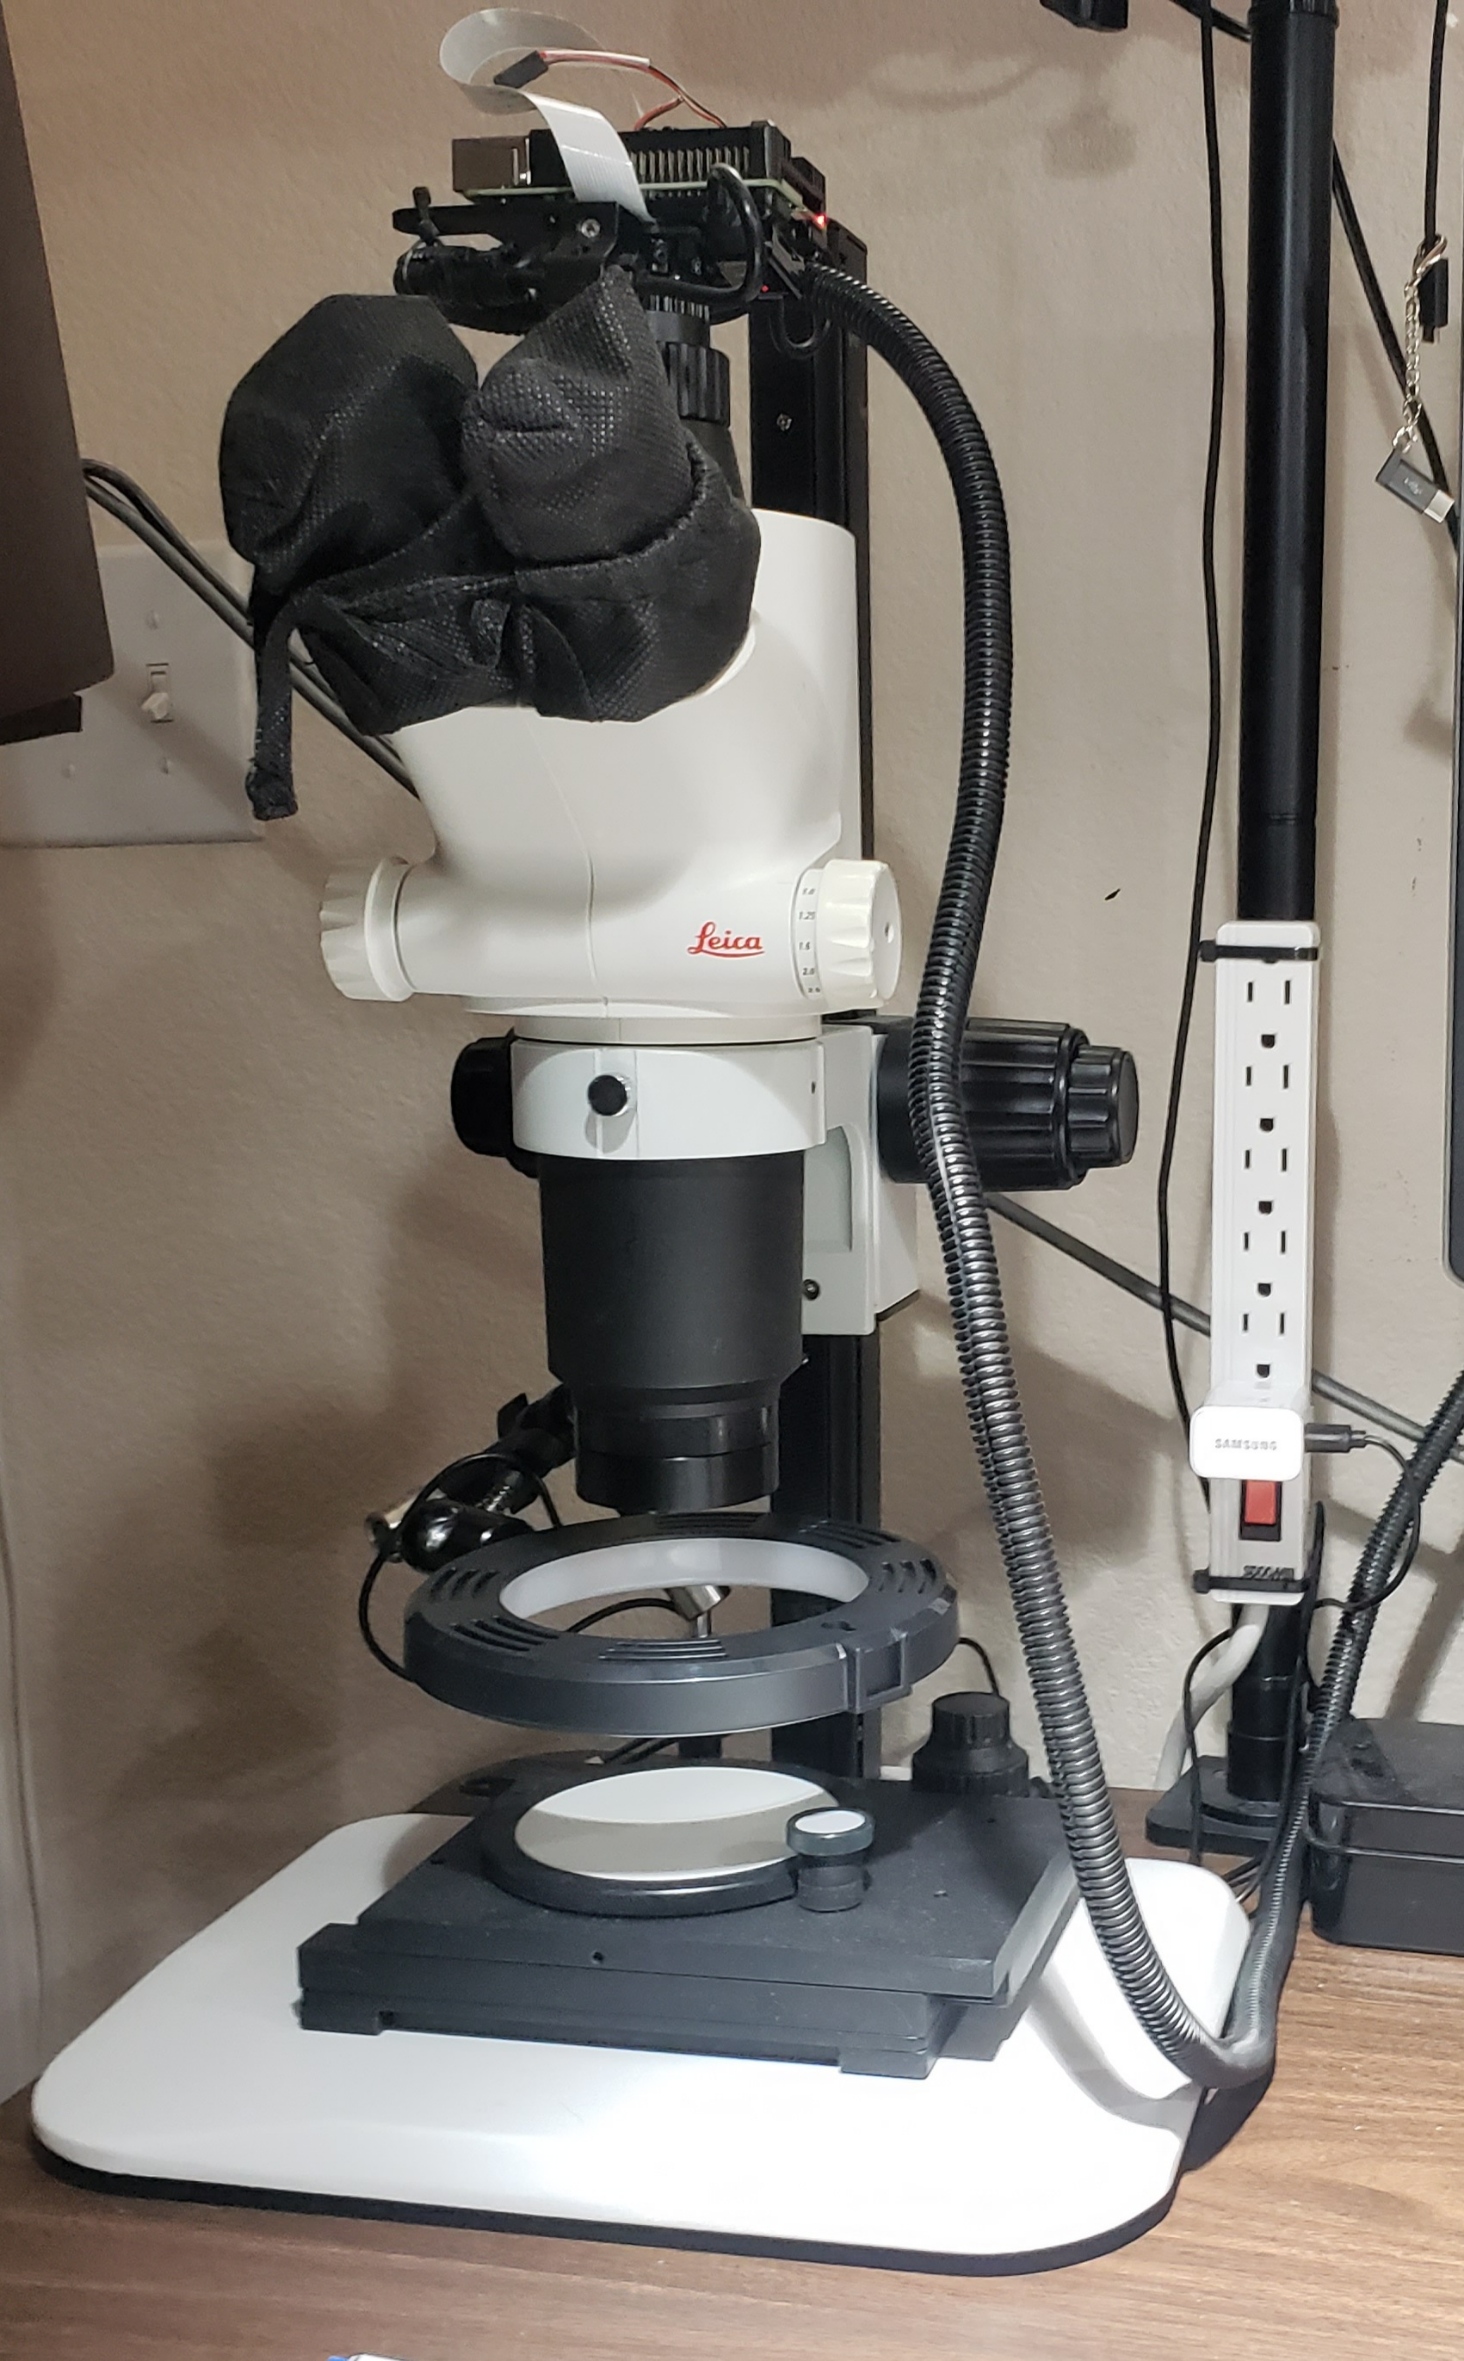
In short, this is the work surface designed to get dirty. It is kitted out with good 6500K illumination, a Leica S4E microscope, and a Thermaltronics TMT-9000S – with tweezers and a standard handpiece. The table is stainless steel with heat resistant, silicone pads on top. The pads help keep things from rolling off the desk, provide a bit of cushion, and prevent shorts. The work surface is about 2 inches higher than my typical work surface as I find this more ergonomic when working with small stuff.
I occasionally need to solder something on the electronics bench or the other bench. For example I might need to solder down an oscilloscope probe to a DUT. For these occasions, I have an old Hakko 936 I pull off the shelf as necessary.


14.2. Do I need a microscope for soldering?
A microscope is very helpful when things get smaller than about a millimeter. Things to look for:
- ESD safe!
- Working distance
- My feeling is that 100mm is the absolute minimum for soldering.
- The maximum working distance is a function of your body shape – just how long is your neck?
;) - If you do need a super long working distance (>200mm), make sure your intended mount is tall enough!
- Wide field of view. At least 30mm at 7x.
- Depth of field
- The absolute minimum is around 10mm for soldering, but 20-30mm is more comfortable.
- Front lenses can sometimes be added that reduce magnification and increase working distance
- Eyesight issues
- If you wear glasses when using a microscope, then look for an eye relief of about 20mm.
- If you have strongly different vision in each eye you can use individually focusing eyepieces in most scopes
- Microscope head ergonomics
- Comfortable horizontal & vertical angle
- Height is right for your bench
- Adjusts for your interpupillary distance
- For zoom scopes
- Prefer models that don't change the working distance as you zoom
- Prefer models that stay focused as you zoom
- If you want to measure things, then look for click stops on the zoom wheel
- Magnification that covers the range from about 2x-20x
- Stereo scopes work best for soldering because they provide some depth perception
- Look for a non-inverted, non-mirror image! It makes soldering quite a bit easier!
- Cameras
- Double check the field of view is sufficient with your camera/microscope combination!
- Choose a camera that can work with the same level of illumination used for visual observing
- If you plan on switching back and fourth between EP and screen, get a scope that can focus both simultaneously
- Bench lighting can make video flicker, so look for cameras with switchable refresh/frame settings
- Don't go lower on resolution than FHD
- Use a monitor with the correct aspect ratio!
14.3. Hand Tools
14.3.1. You have two tool drawers labeled "Scalpel"? What's up?
They contain surgical scalpels which I use for various hobbies and tasks around the house.
For the most part I switched from "precision knives" to surgical scalpels quite a long time ago. BTW, "precision knives" is the industry term for "hobby knives" or "X-Acto knives". Things I like:
- I like the way the flat handle of a scalpel fits in my hand providing a sense of precise control over the blade
- The handles provide a tactile sense of where the blade is in relation to your hand
- Major brands have an extreme level of quality control. Defective blades from Swann Morton or Bard Parker are super rare
- Blades are available in both a flexible (as in they bend) and rigid form
- Blades are available in both carbon steel (sharper) and stainless steel (more resilient to chemicals)
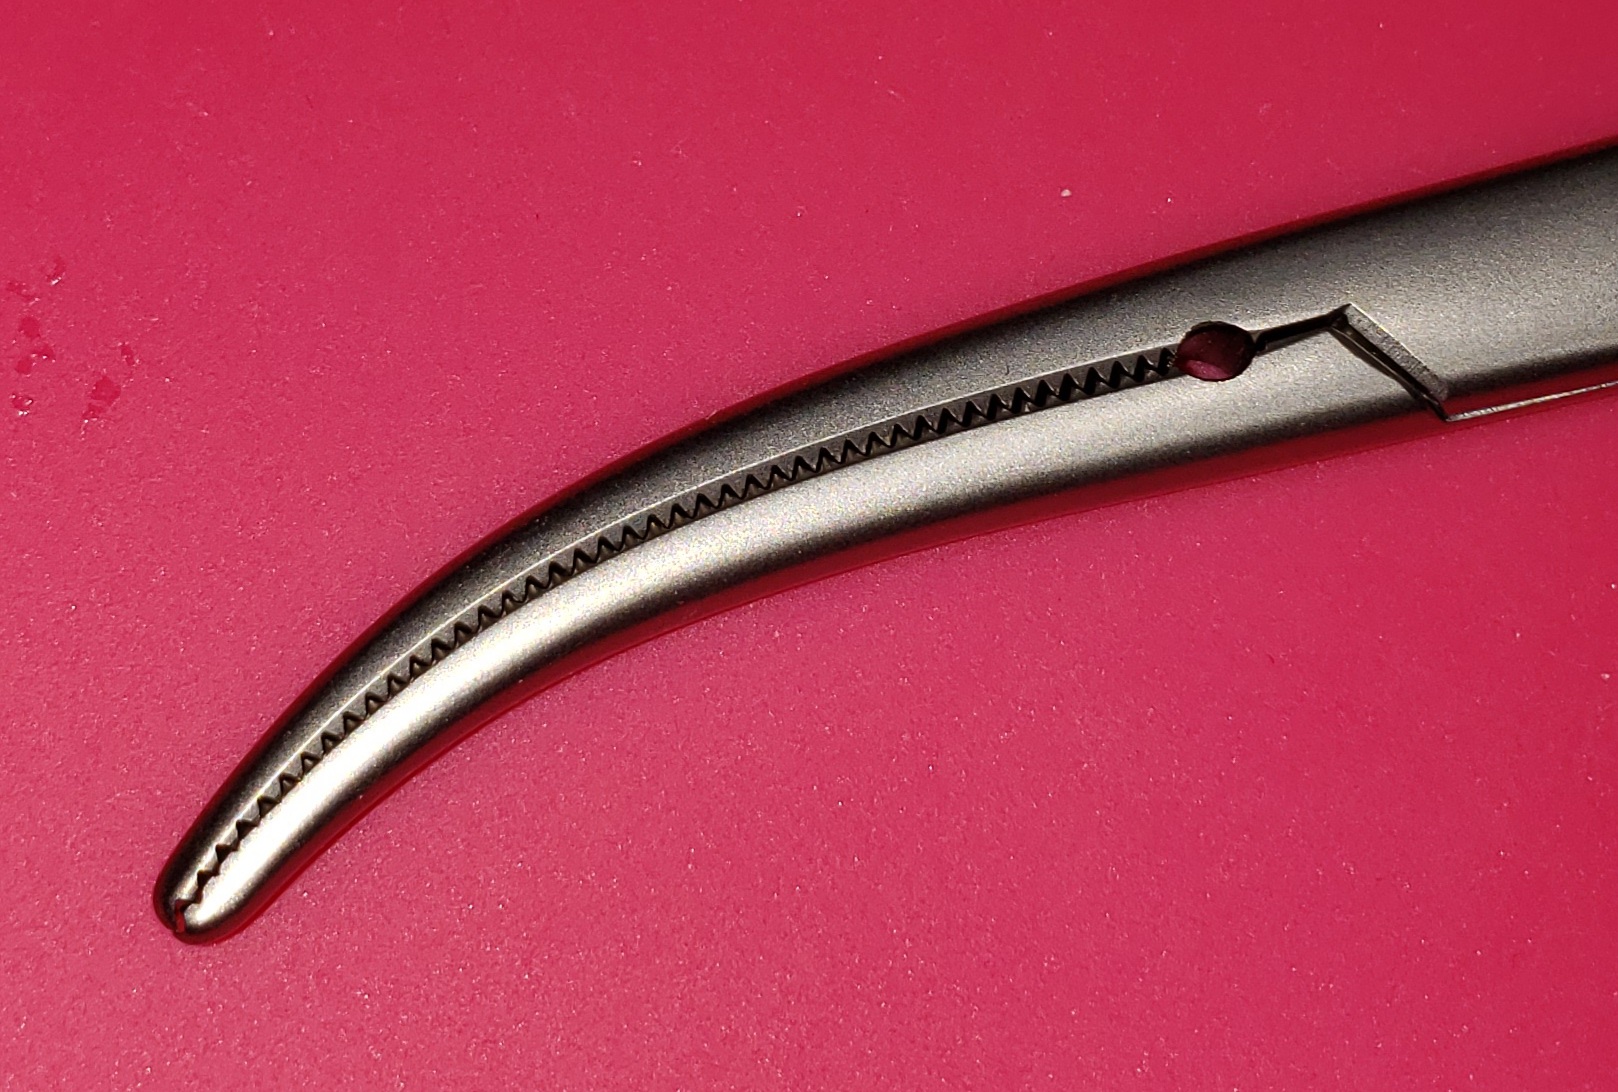
The "L" drawer contains larger blades, and the "S" drawer contains smaller blades. The drawers have blocks of wood that elevate the blades so that a scalpel may be removed from the box by pressing down on the "circle" near the top of the handle and grasping the bottom of the handle. The scalpels are arranged in a way that none of them bump into the edge of another blade – that's the reason for the empty handles and little, stick-on bumpers.
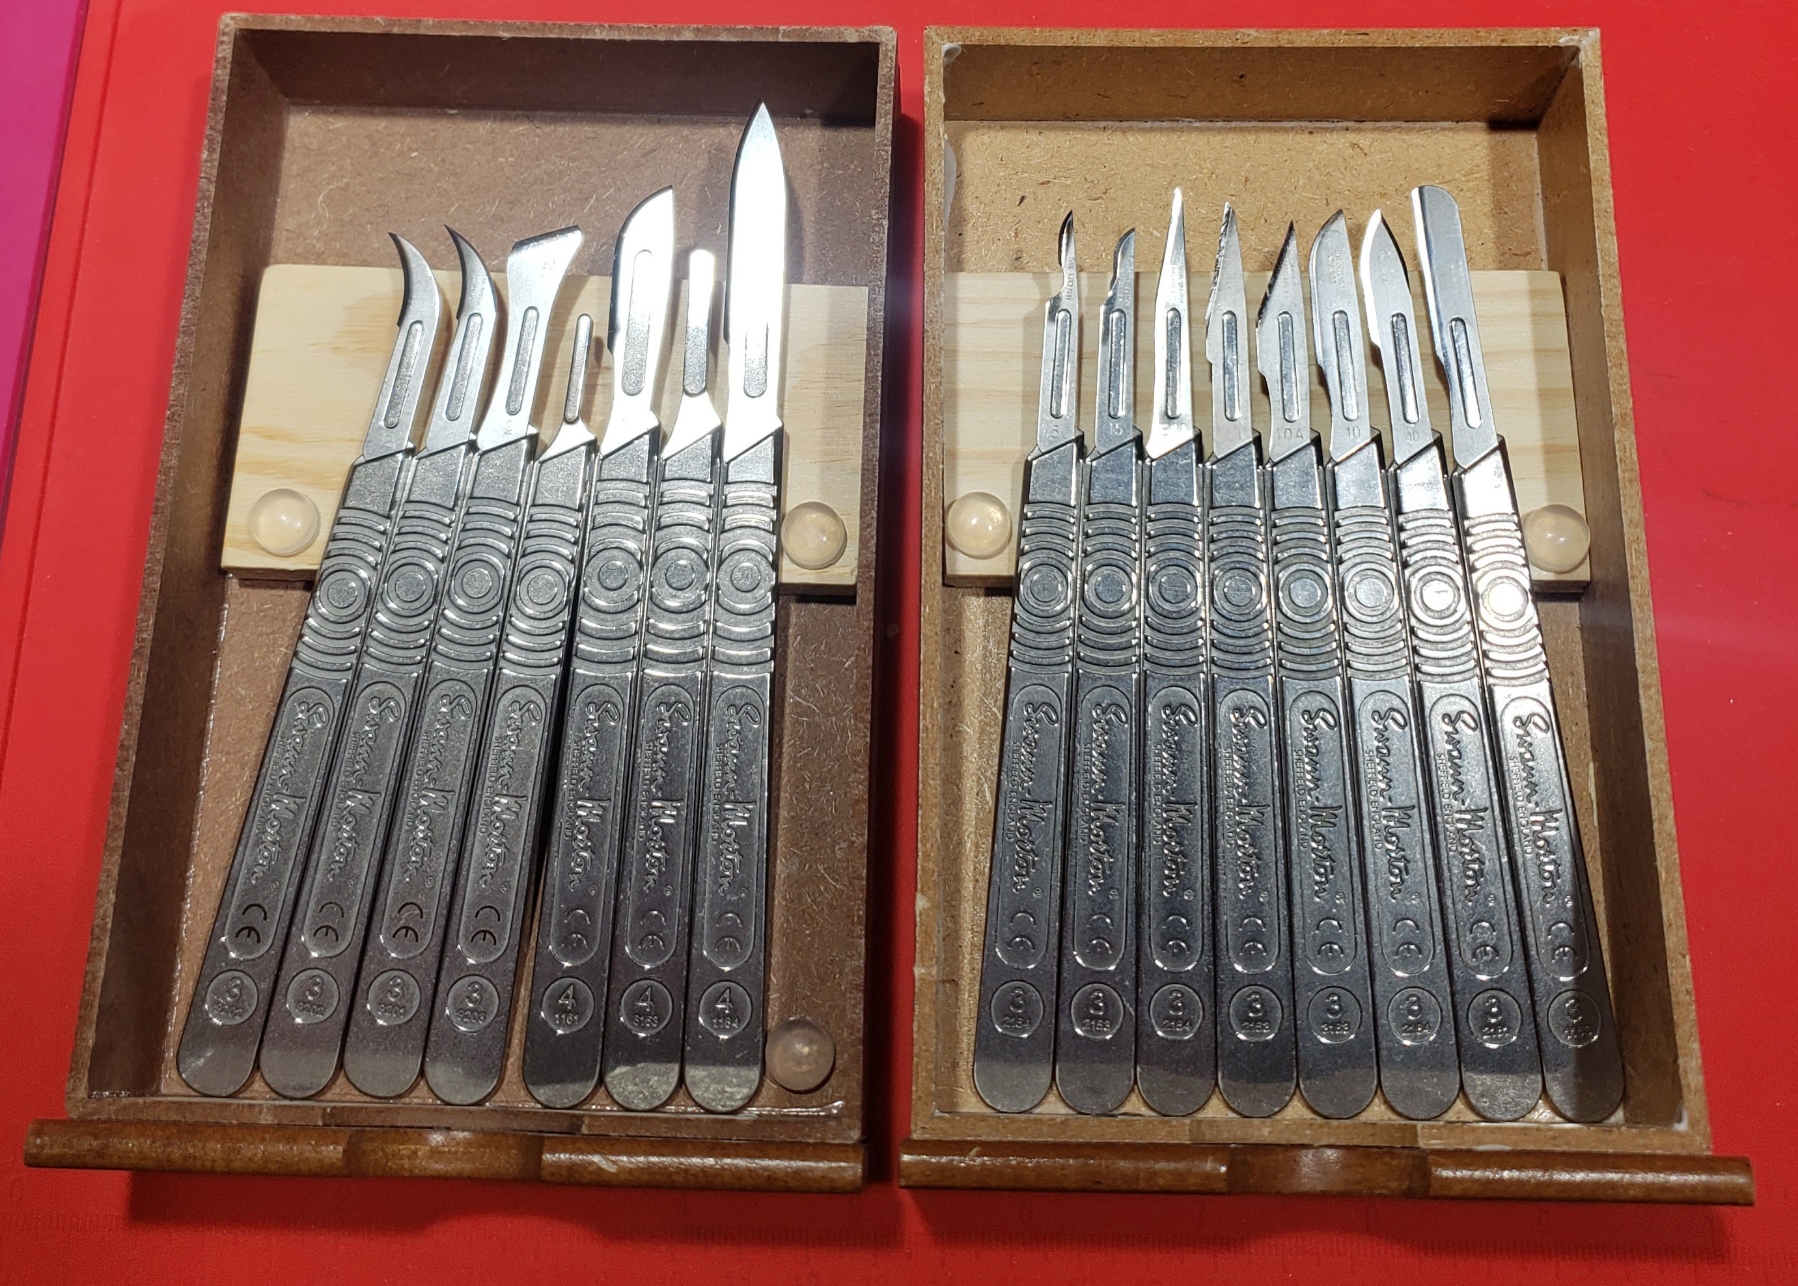
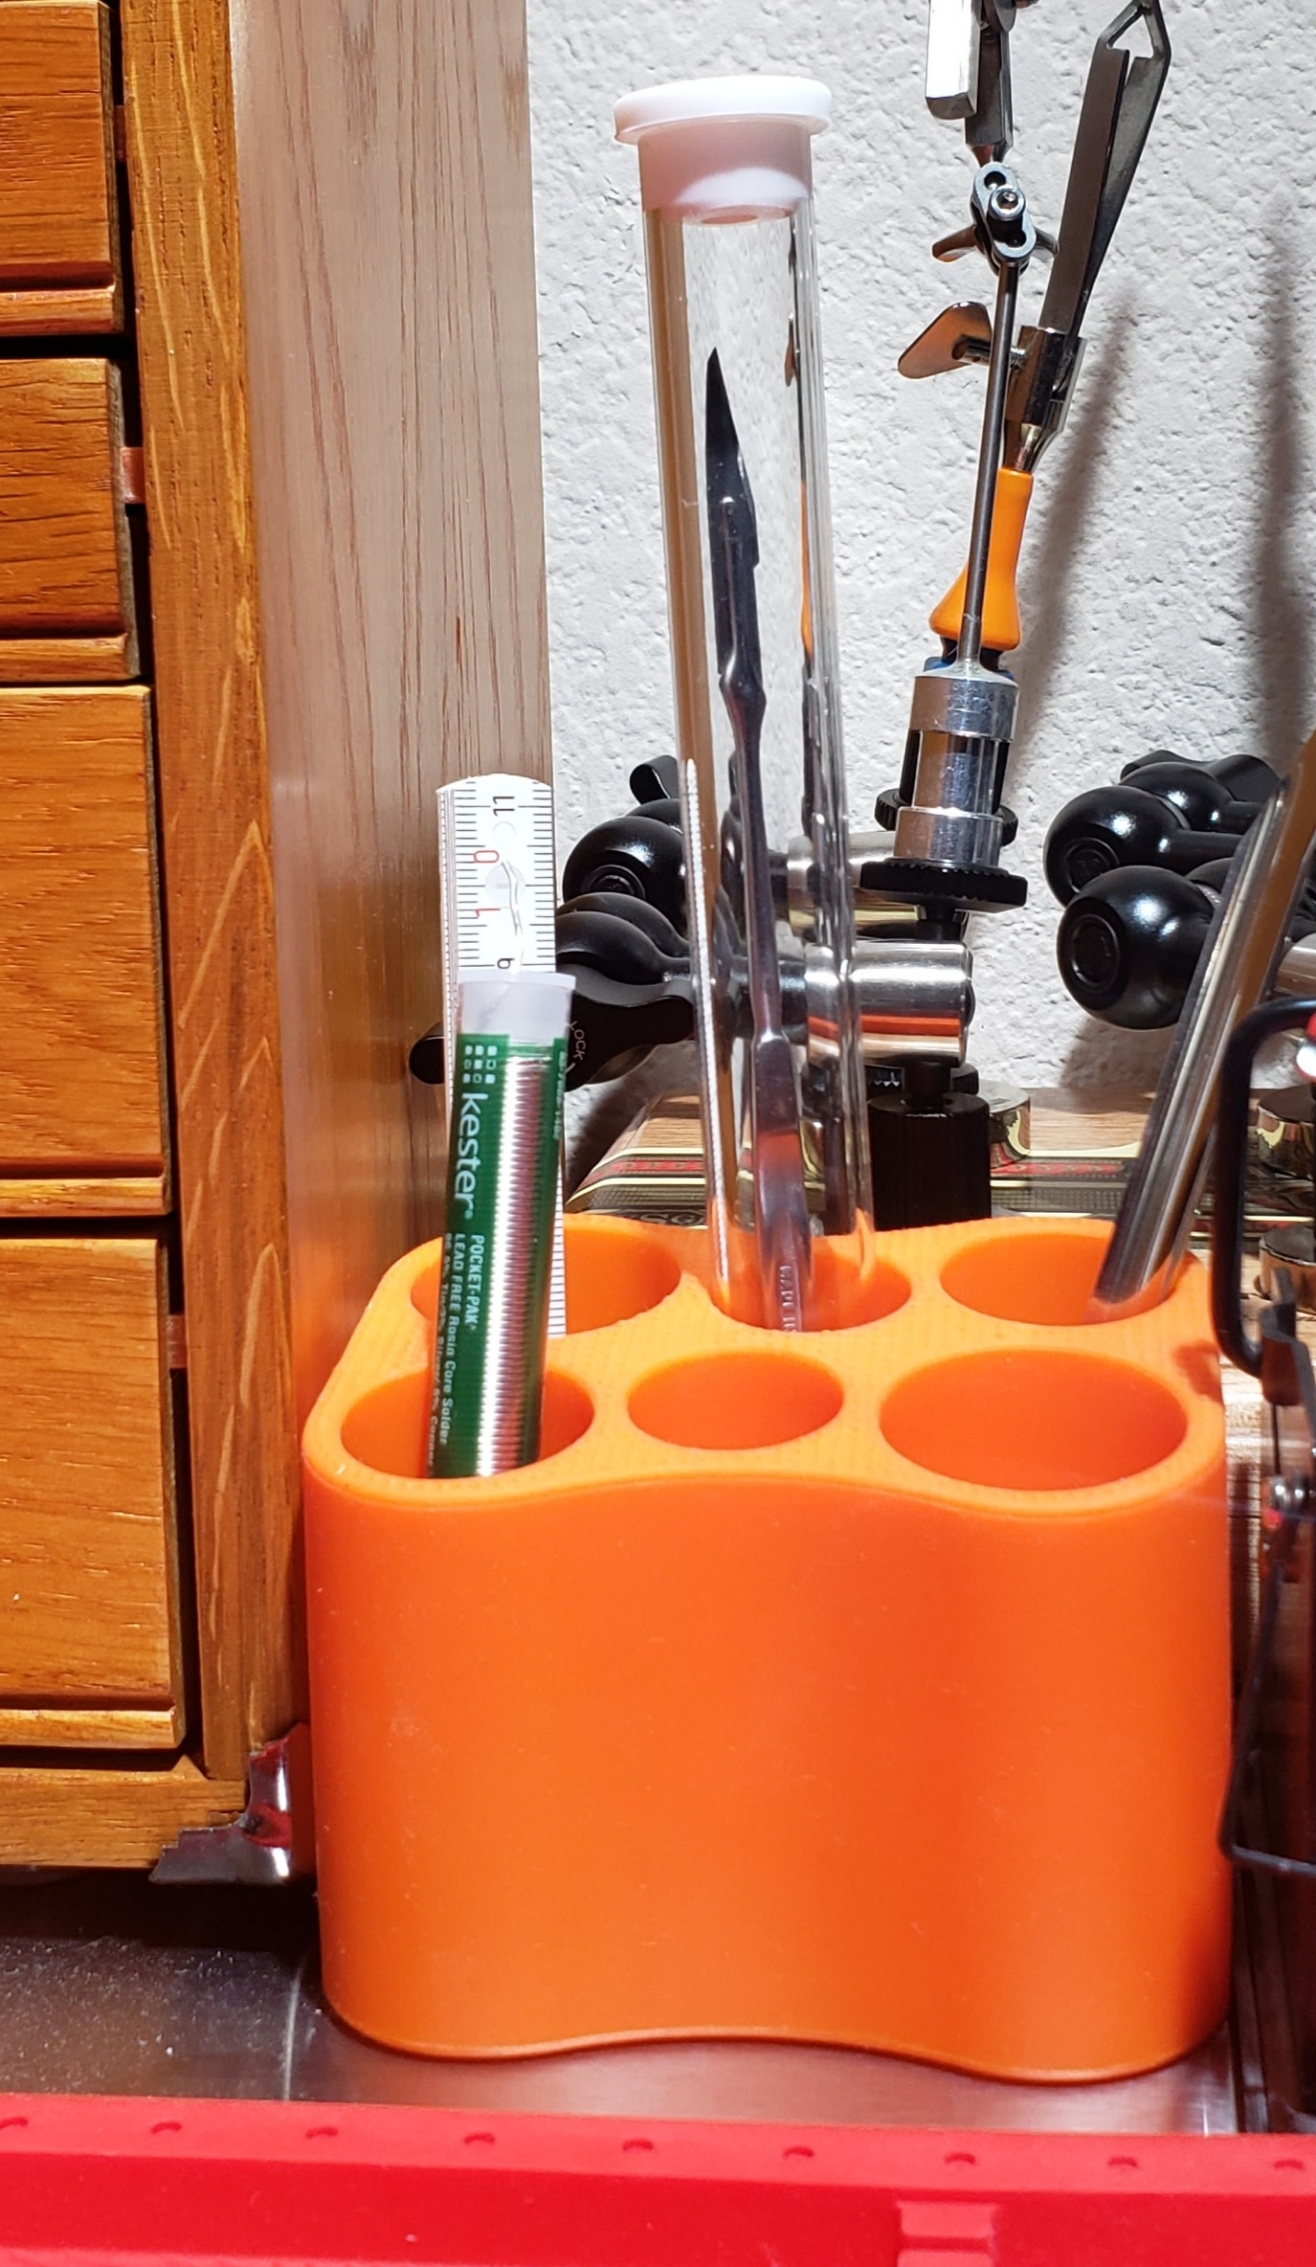
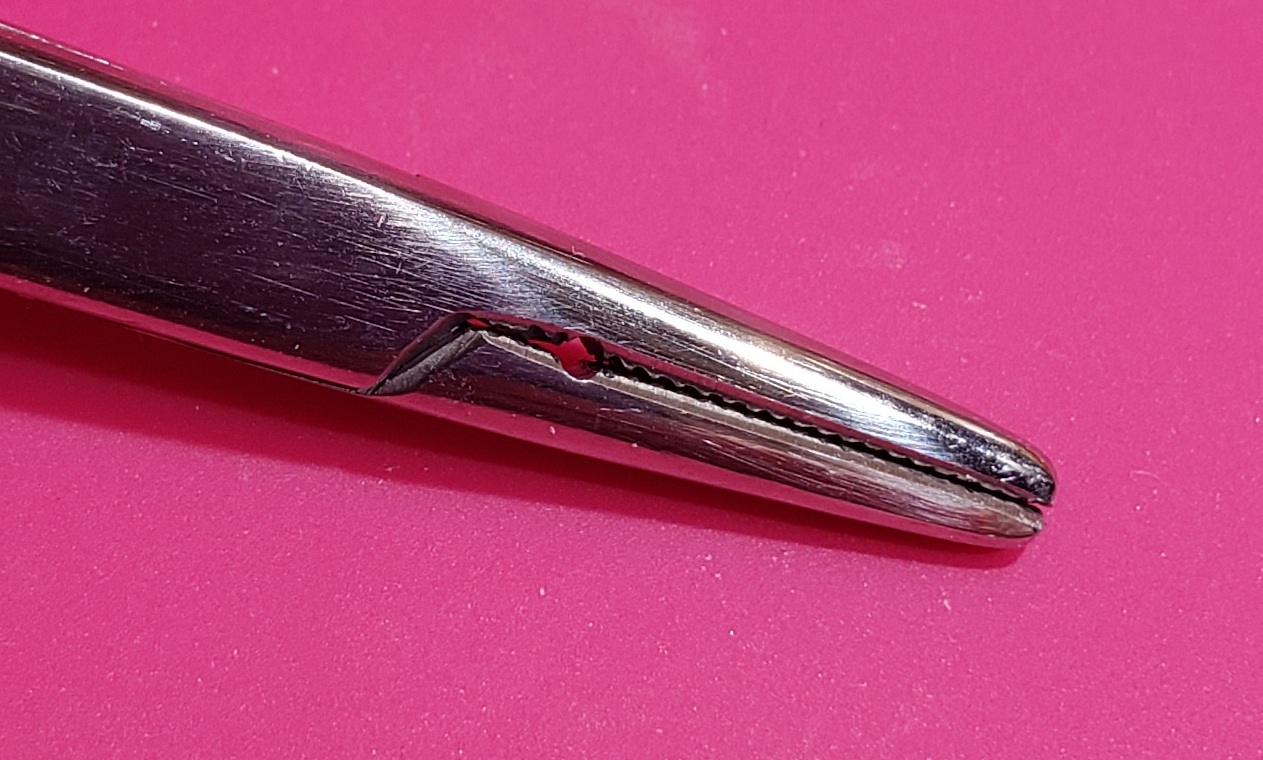
I have a long #3 handle with a stainless steel #11 blade that lives in the tool caddie by the soldering mat because I use that one quite a bit while soldering. I have an acrylic tube setting over it to keep the dust off and so I don't poke myself. When I'm soldering that scalpel is usually laying on the soldering mat in that little tool holding section at the top.
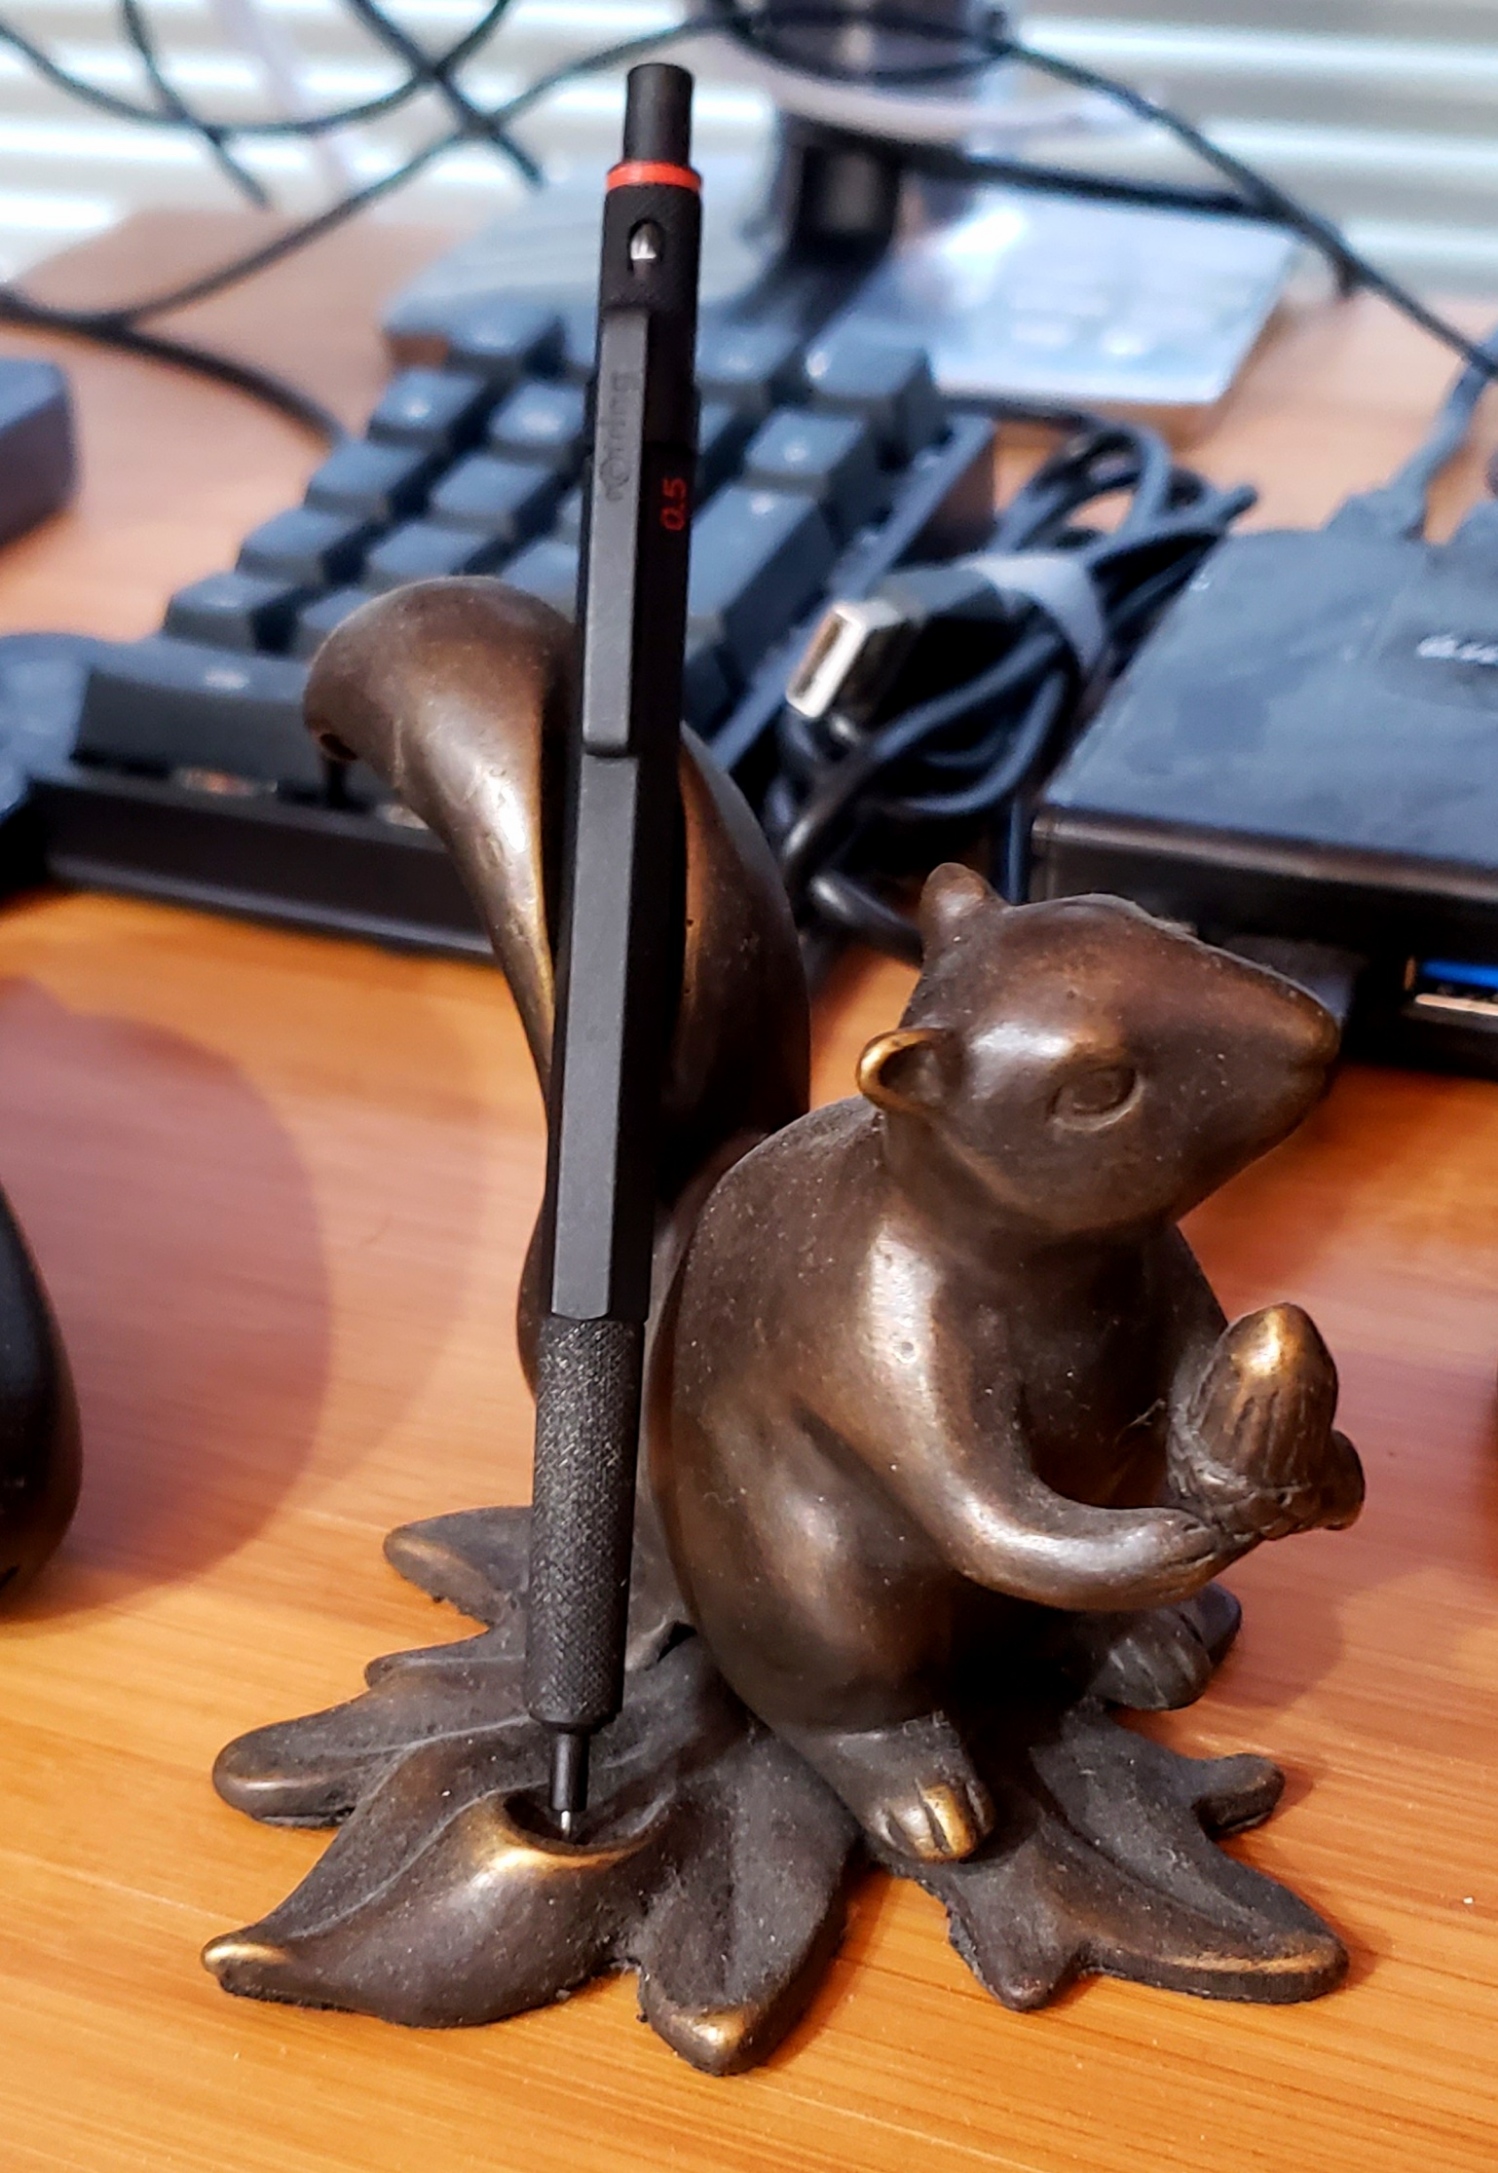
Lastly I have a skin grafting blade on a #3 handle that lives in the top section of the Gerstner chest – on the far left in the following image.
For electronics work I mostly use the #11 (regular and fat). The rest of the blades are for other hobbies.
14.3.2. Really? You never use precision/hobby/X-Acto knives?
Sure I do. I prefer scalpels for most "precision knife" tasks, but I do have a couple Wiha precision knife handles in my "saw box" along with several tubes of various saw blades and a tube of super heavy duty scraper blades. I don't have any of the smaller (#1 or #2) handles.
14.3.3. You have 5 tool drawers labeled "tweezers"? That's a lot of tweezers! What's up?
In keeping with the multi-use nature of the workspace, these tweezers support a variety of hobbies and repair work. That said, most of them get used for electronics. Sometimes having the right tweezers transforms a frustrating task into an easy one, and I think electronics repair and Assembly is one activity for which this is especially true.
The first three drawers contain tweezers with conventional tips (smooth & serrated).
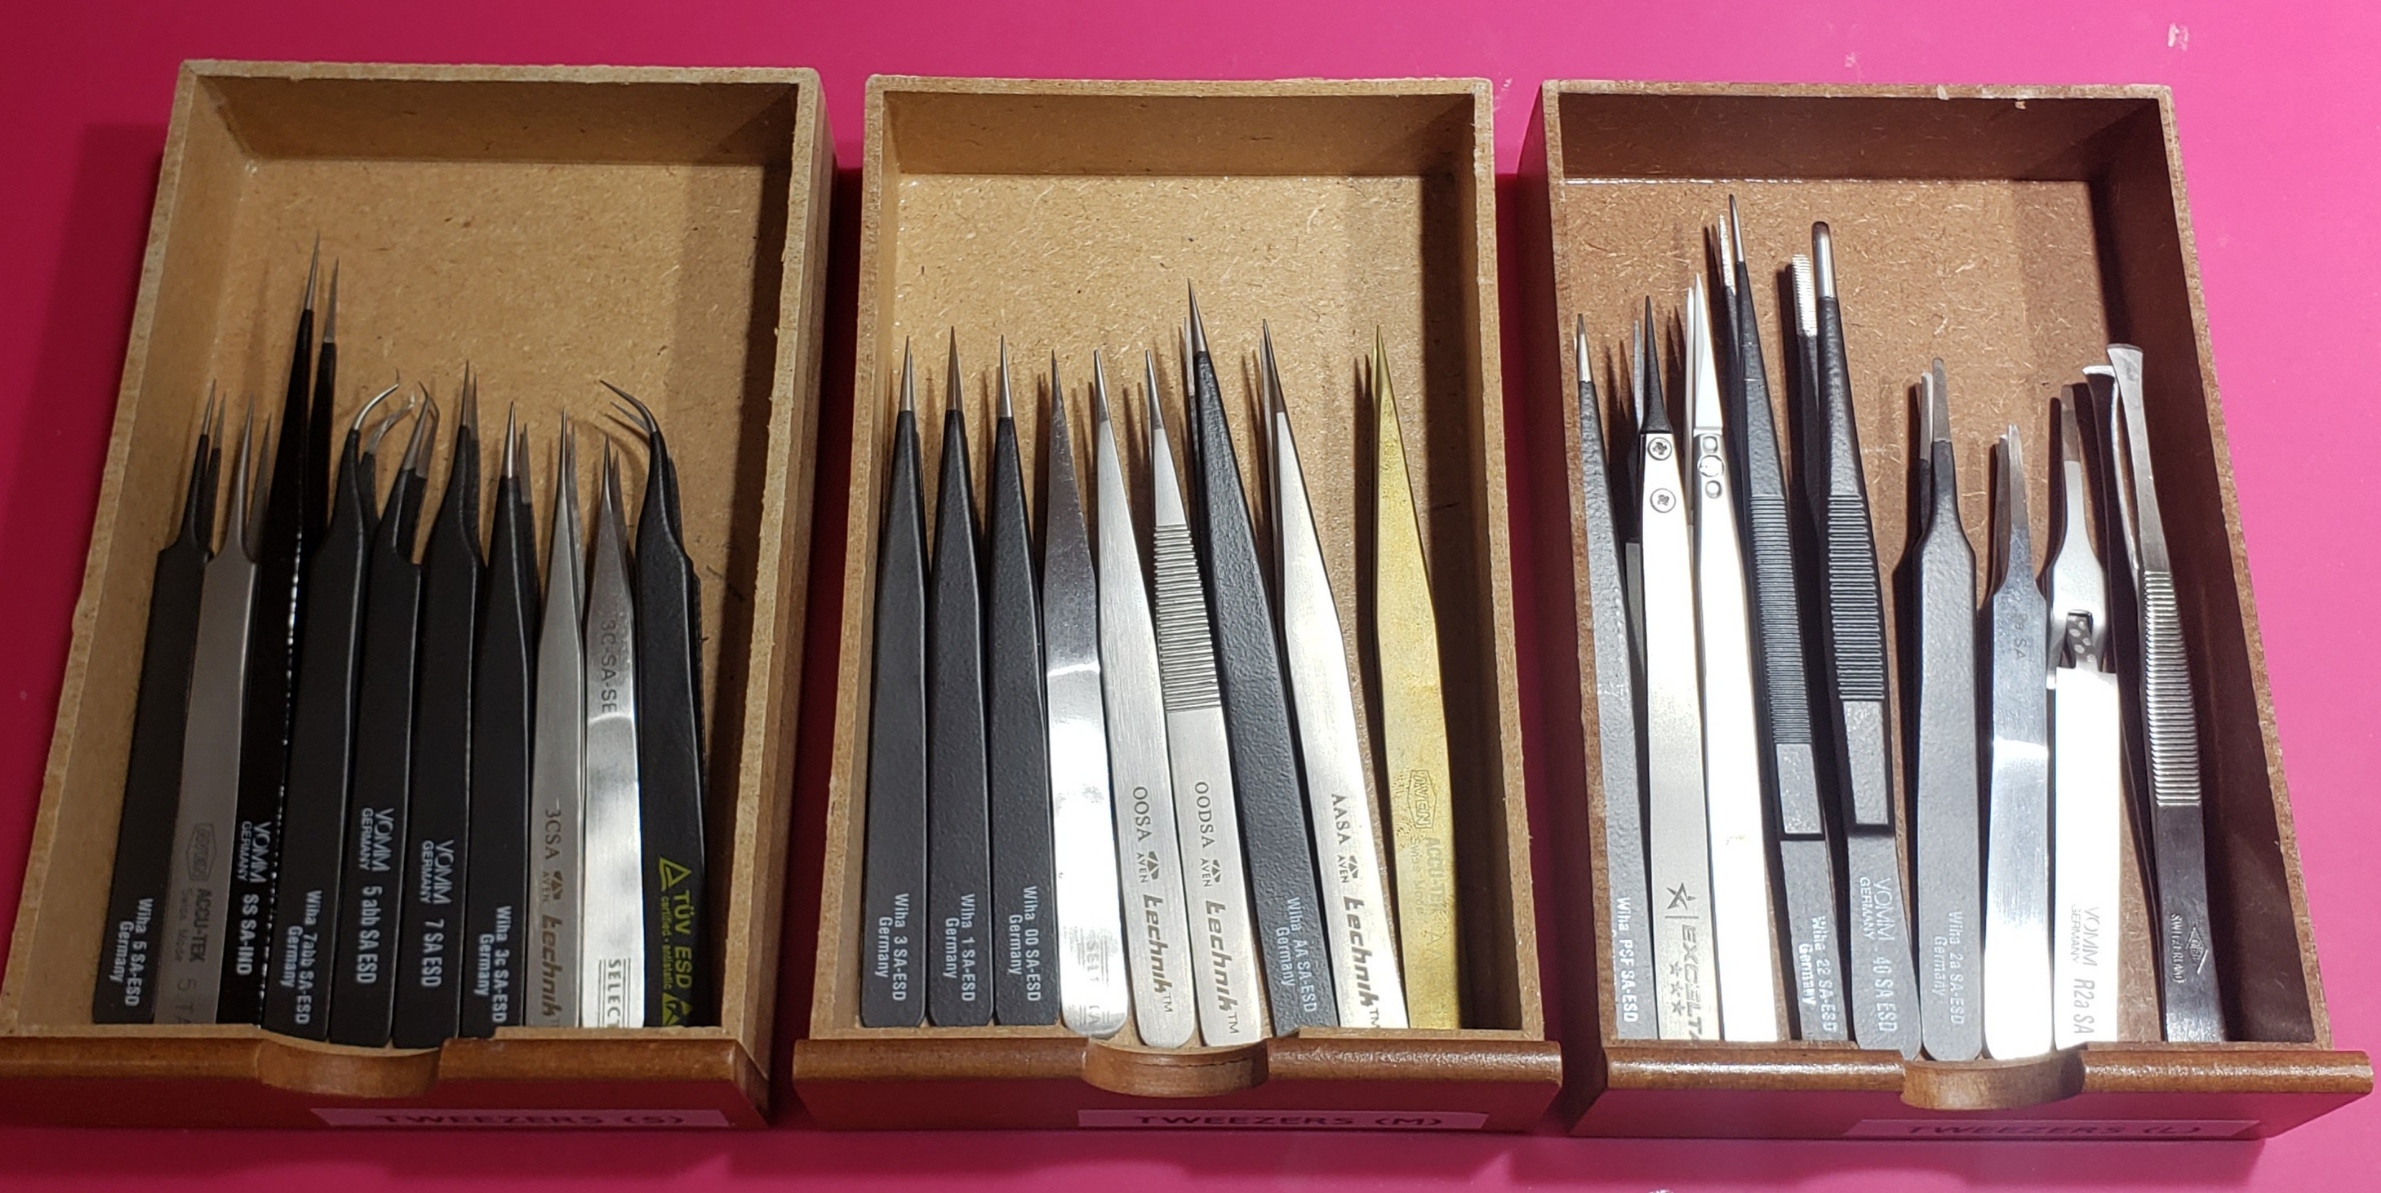
In most cases duplication of tip size is due to tip texture (smooth vs serrated) or tip material:
- Stainless Steel
- Most high-end tweezers use special stainless steel alloys to provide good chemical resistance and anti-magnetic properties.
- Brass
- These can't cause sparks and are less likely to damage softer metallic objects.
- Titanium
- Far better chemical resistance than stainless steel but just as durable. Completely non-magnetic. Super light, low actuation force.
- Cubic Zirconia
- Super hard, high heat resistance, extreme chemical resistance, non-magnetic, non-conductive, poor conductor of heat. You can put the tips in a torch flame. Can damage softer materials, and can shatter stressed glass on contact. Brittle and can can chip or break. Tips are replaceable.
- Carbon Fiber
- Slightly conductive making them naturally ESD safe. Very poor heat conductor, but only rated to about 250 degrees Fahrenheit. Quite rigid, but not as hard as stainless – making them great for precise handling of small, delicate stuff. They are also not as durable as metallic tweezers. Tips are replaceable.
The last two drawers are for tweezers with unconventional tips or some other oddity.
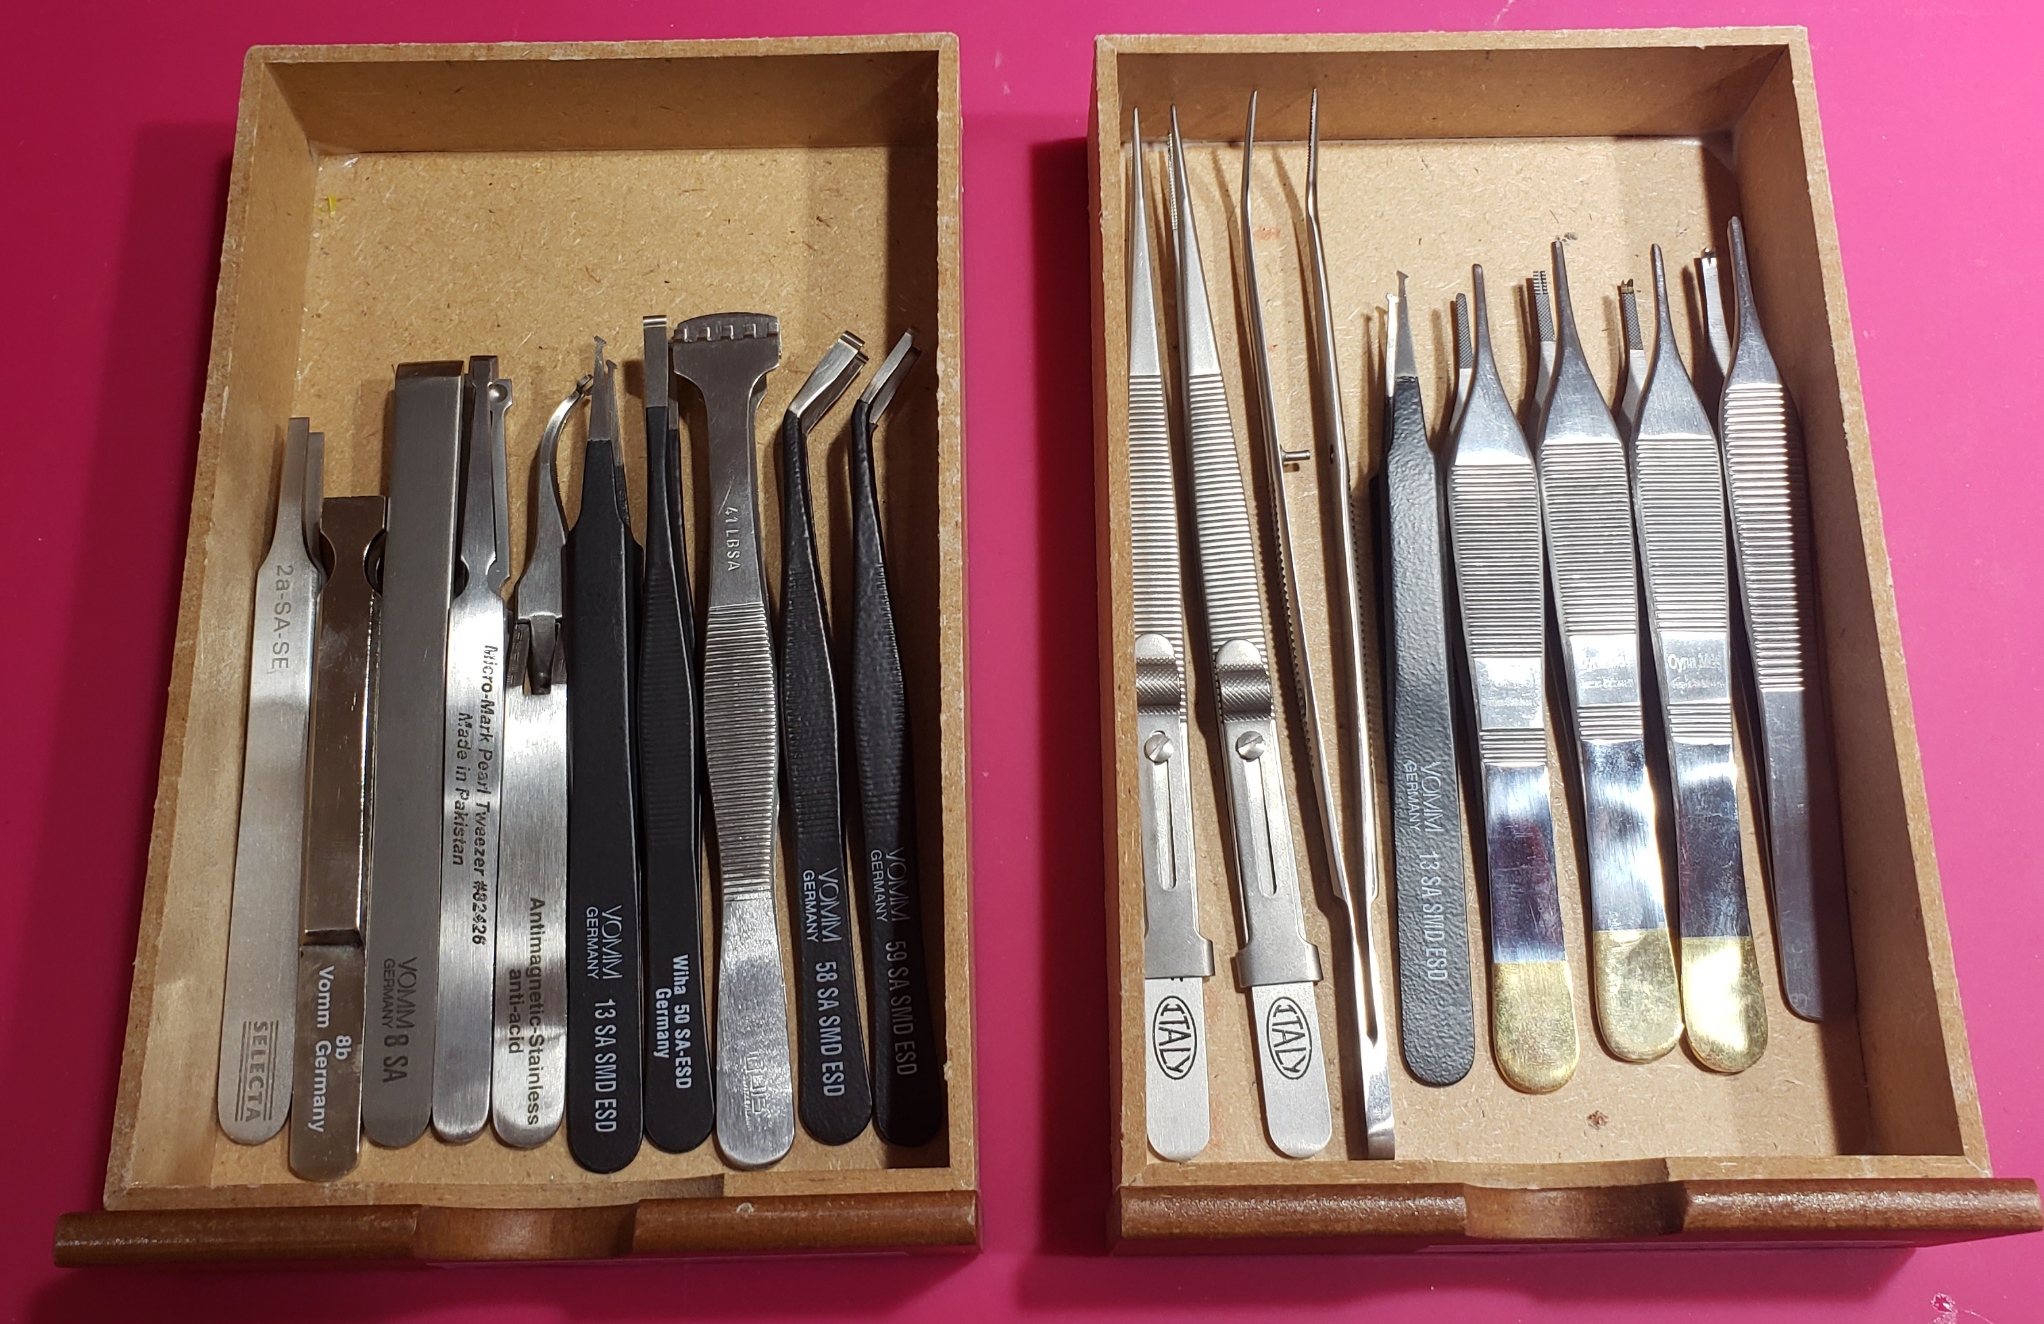
These usually have special uses:
- Perl tweezers
- Have concave indentations on each face to hold spherical objects like beads.
- Pin tweezers
- Have round tips to hold cylindrical objects like lock pins or small tubing.
- Wafer tweezers
- Have a large flat edge like a pancake turner to hold a semiconductor wafer.
- SMD tweezers
- Have a sloped, flat tip to grab SMD parts.
- Tissue tweezers
- Some have serrated, carbide inserts to better hold tissue, suture, etc… Some also have very specific "teeth" at the tips to grasp things like surgical sutures.
- Paper tweezers
- These have mirror smooth tip surfaces that mate over a large, very flat surface. Often paper tweezers will have carefully rounded off edges so as not to indent or cut soft materials. They are used by archivists, archaeologists, and philatelists to manipulate delicate paper items – like old postage stamps or ancient bits of papyrus.
- Clamping tweezers
- More than just "reverse tweezers". These are designed to provide a very secure, hands free grip. Used by jewelry makers to rigidly hold work pieces while soldering, engraving, or working under a torch.
- Forming tweezers
- More like pliers in the form of tweezers. These are designed to bend and shape materials. Used extensively by jewelry makers, but I mostly use them to form leads for soldering.
- Cutting tweezers
- Used to cut small stuff – tiny wires, little bits on plastic models, etc…
14.3.4. Tweezers advice?
- Get familiar with standard, Swiss nomenclature for tweezers sizes and shapes. Once you find the ones you like, you can then shop across manufactures for similar products.
- Don't waste cash on super expensive tweezers you plan on abusing. Instead go for modestly priced instruments that you feel you can replace without
breaking the bank.
- Example: Cheap titanium tweezers for hot work while soldering are a good choice!
- For high temperature tweezers, you can find better selection at stores catering to jewelry makers.
- For gripy tweezers, check out stores catering to medical products
- Example: I have some Adson dressing forceps I use all the time to grab the edge of microSD cards
- High quality (expensive) vs low quality (inexpensive) tweezers
- High and low quality tweezers may be quite similar when new. Over time lower quality tweezers tend degrade faster:
- Tips may become warn or pitted.
- Tips may bend or deform.
- Tips fall out alignment.
- Activation force may drop quite a bit over time until the tweezers no longer open by themselves.
- If the tweezers have broad tips and strong/short legs, then lower quality tweezers might be a fine choice.
- When trying a new low cost brand, test drive a sample for a few weeks before you buy more. The only way to tell if they will hold up is to use them.
- Sometimes spending more for higher quality up front is less expensive.
- High and low quality tweezers may be quite similar when new. Over time lower quality tweezers tend degrade faster:
- For soldering, I find SMD tweezers with angled, flat tips very handy for placing parts on solder paste. It is worth it to spend a bit on a pair.
- Ceramic tip tweezers are really cool when you need to move something around inside a puddle of molten solder.
- Don't forget about ESD safety.
- Try out tweezers with and without grips to find out what you like.
14.3.5. Tweezers hacks!
14.3.5.1. Fine tipped tweezers tips broken off?
Quality tweezers with broken/blunted tips deserve to be reborn as quality tweezers with blunt tips – or even as forming tweezers. Get out that Dremel and reshape the tips. Then use the tweezers to grasp a bit of folded over sandpaper, so the grit touches the faces of both tips, and pull the paper out of the tweezers. Repeat this until the tips mate perfectly. Then do it again with finer and finer sandpaper until you have the tip surface texture you want.
I have turned OOSA & 2a pattern tweezers into forming tweezers with very good results.
14.3.5.2. Don't be afraid to make what you need!
I transformed a pair of very expensive, Swiss made tweezers into fine paper tongs. I started with a pair of 2a pattern, titanium tweezers. It took me a couple hours to shape and polish the tips. Frankly I think the results are superior to high end paper handling tongs costing hundreds of dollars.
14.3.5.3. Tips don't meet uniformly across the entire tip!
Common causes:
- The legs of low force tweezers bend inward giving them "knock knees". Normally this causes the tips not to meet at the very end, but back from the tip. If they bent this way, then bending them back is of little help. Just correct the tips at the current bend if it seems stable.
- One of the tips has twisted. Frequently happens from grasping something and twisting the tweezers like a screw driver, or because one tip got stuck in a crack or hole and twisted when worked free.
- One of the legs twisted or warped. This is more common with inexpensive tweezers, and is frequently due to a bad weld at the back of the tweezers.
Use the tweezers to grasp a bit of folded over sandpaper, so the grit touches the faces of both tips, and pull the paper out of the tweezers. Repeat this until the tips mate perfectly. If the tip texture is too rough, then repeat with finer sandpaper.
14.3.5.4. Tips have an overbite or sidebite!
Get some sandpaper, and reform the tip edges. For severe cases, use a Dremel. Finish up with very fine sandpaper, or a Dremel polishing wheel, to get the surface texture you want.
14.3.5.5. Broad tips are no longer sharp!
This is especially an issue for pattern 2a tweezers. Hold the tweezers jaws closed, and sharpen the tips as you would a knife. I use sandpaper, but a knife sharpening stone works just fine too. Move to finer and finer sandpaper/stones until you have the texture and sharpness you are looking for.
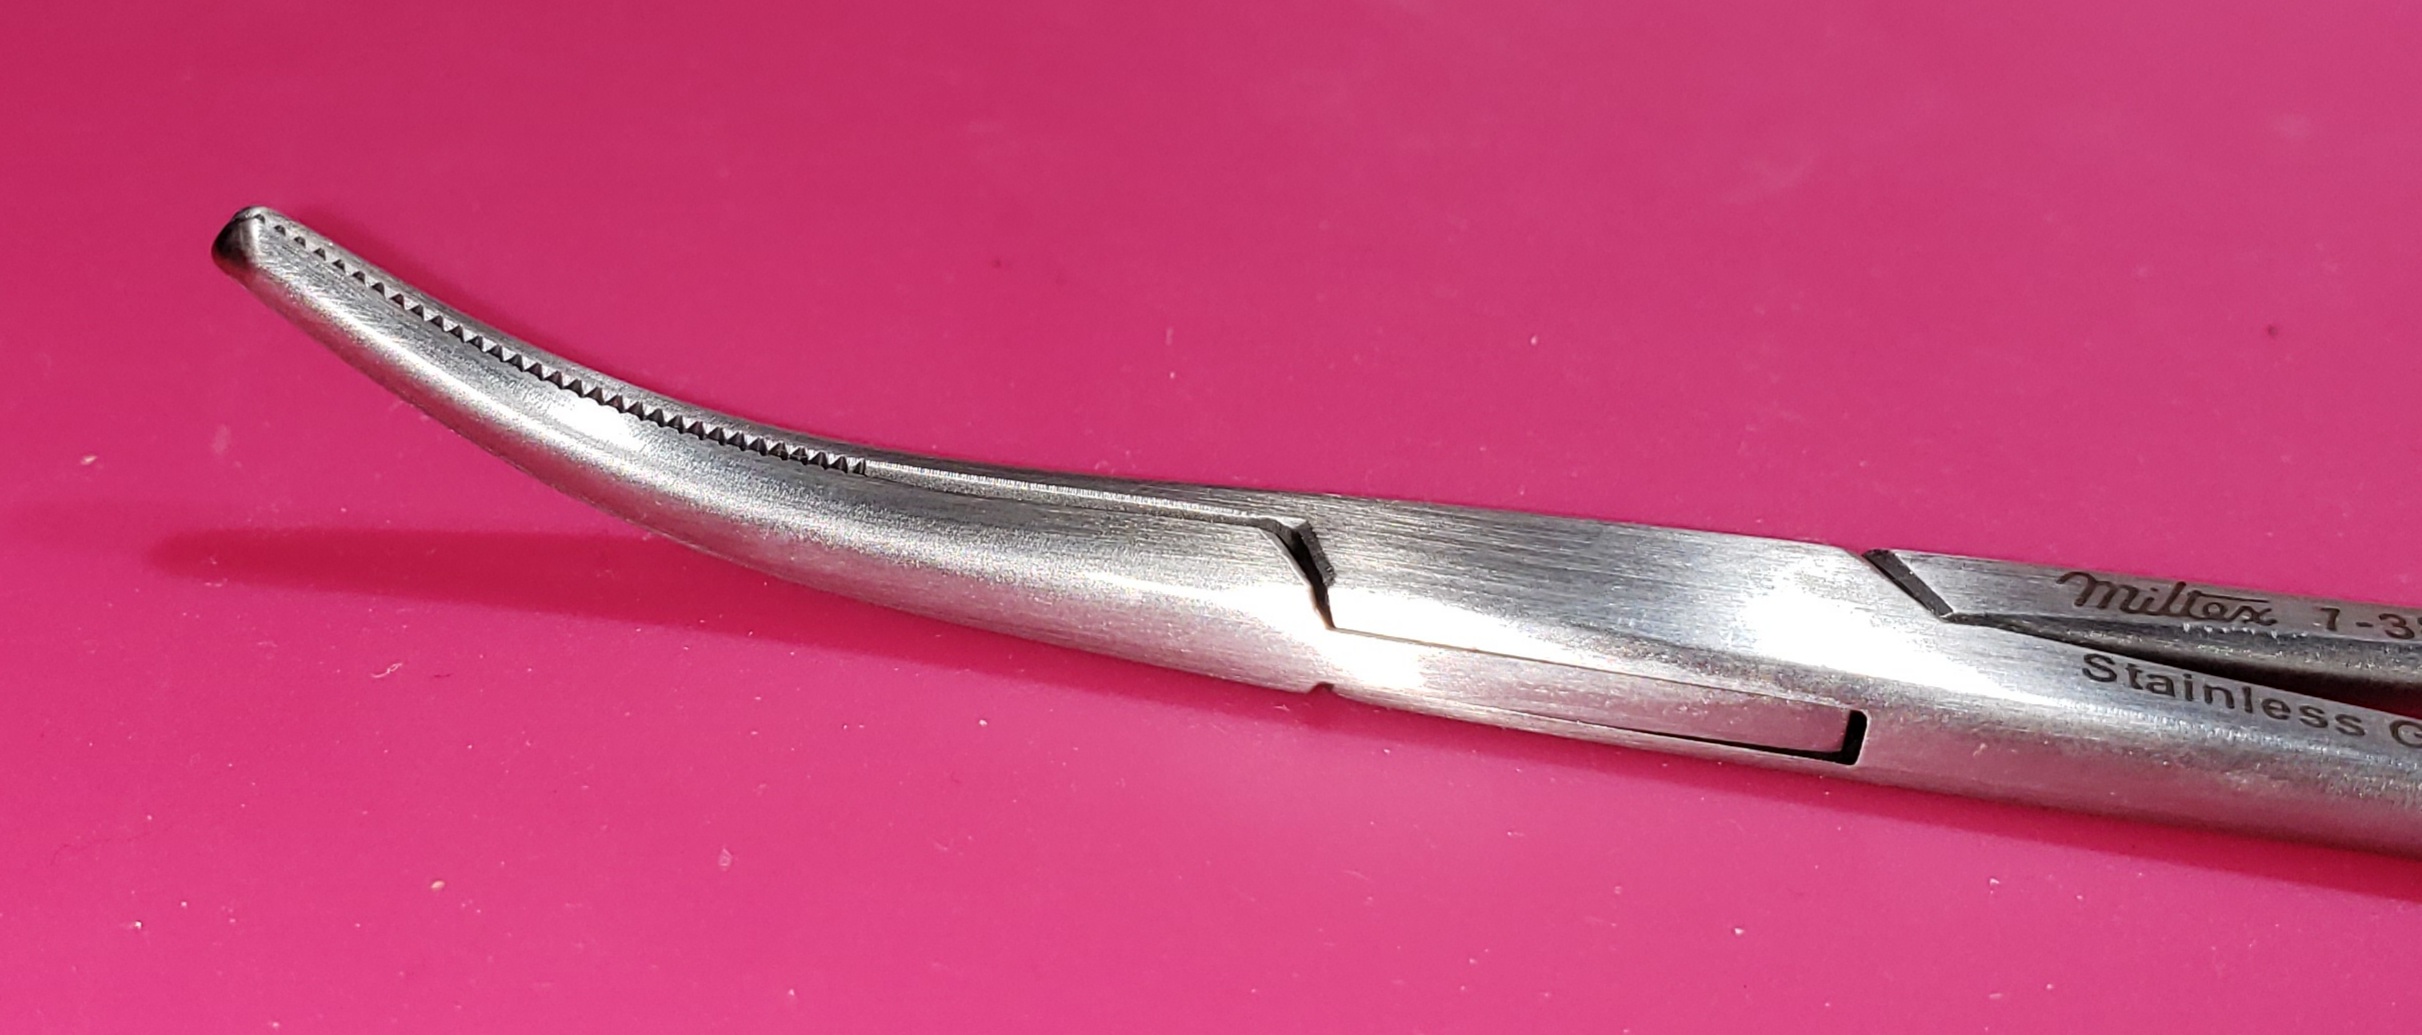
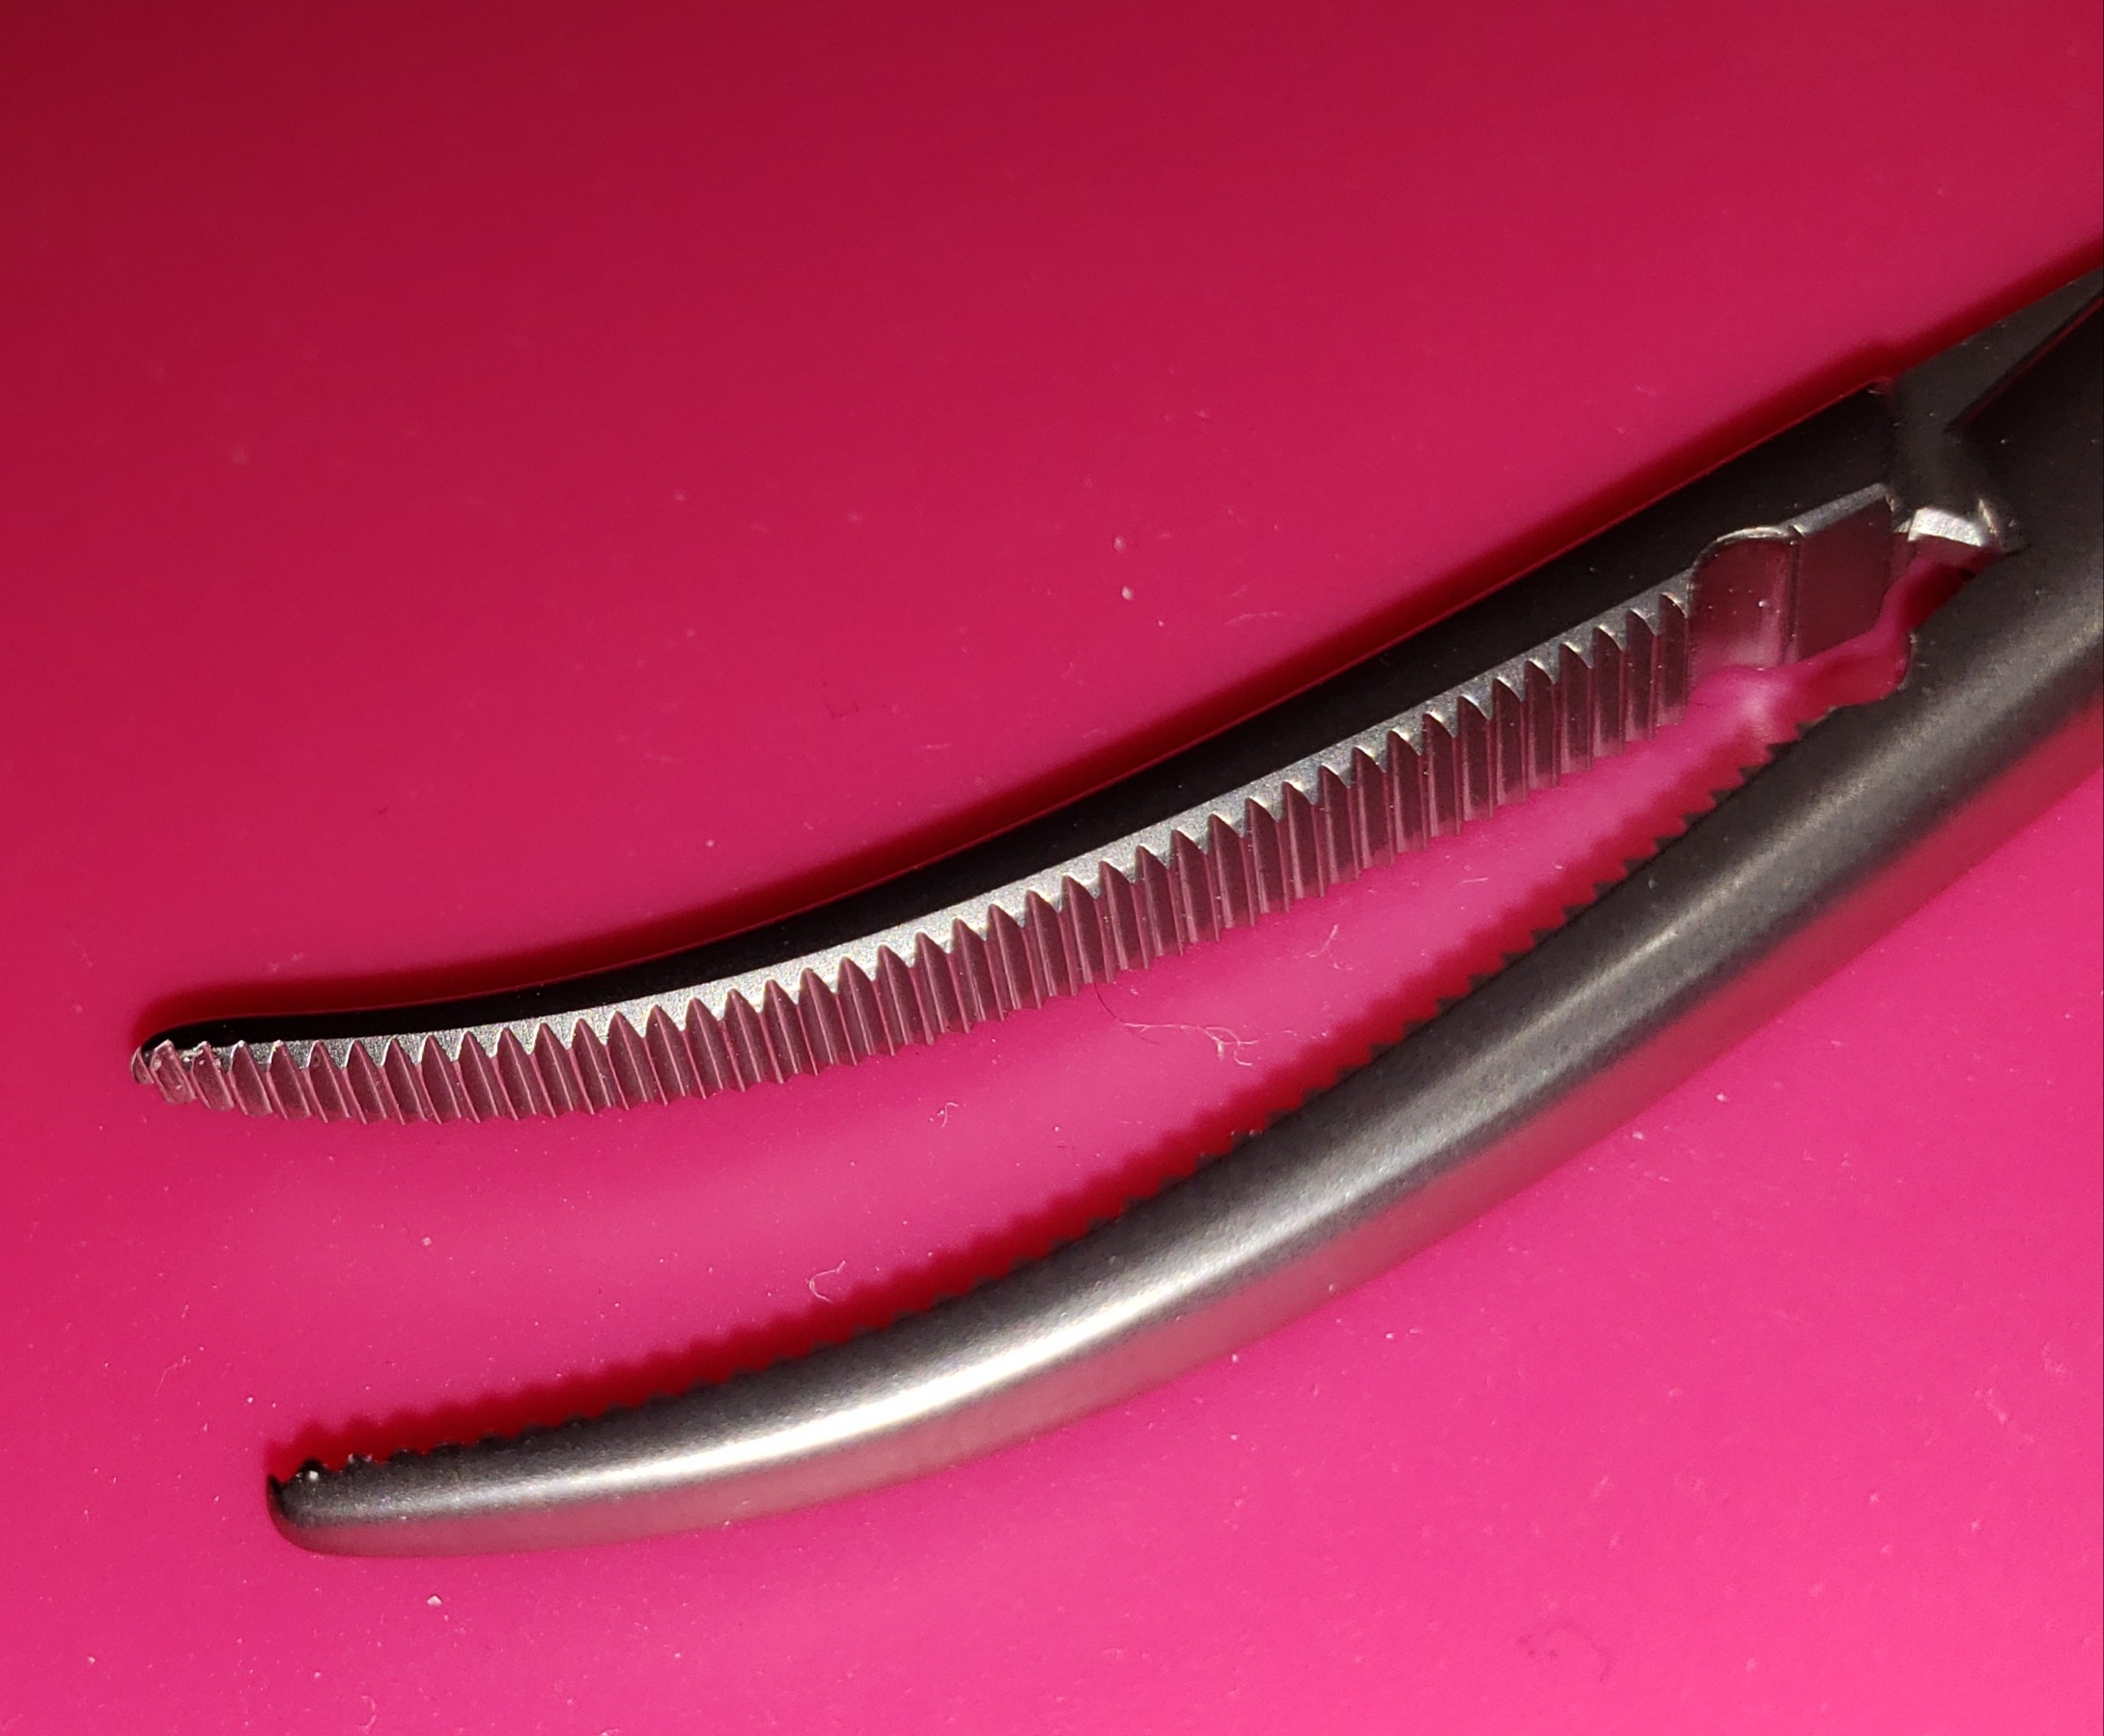
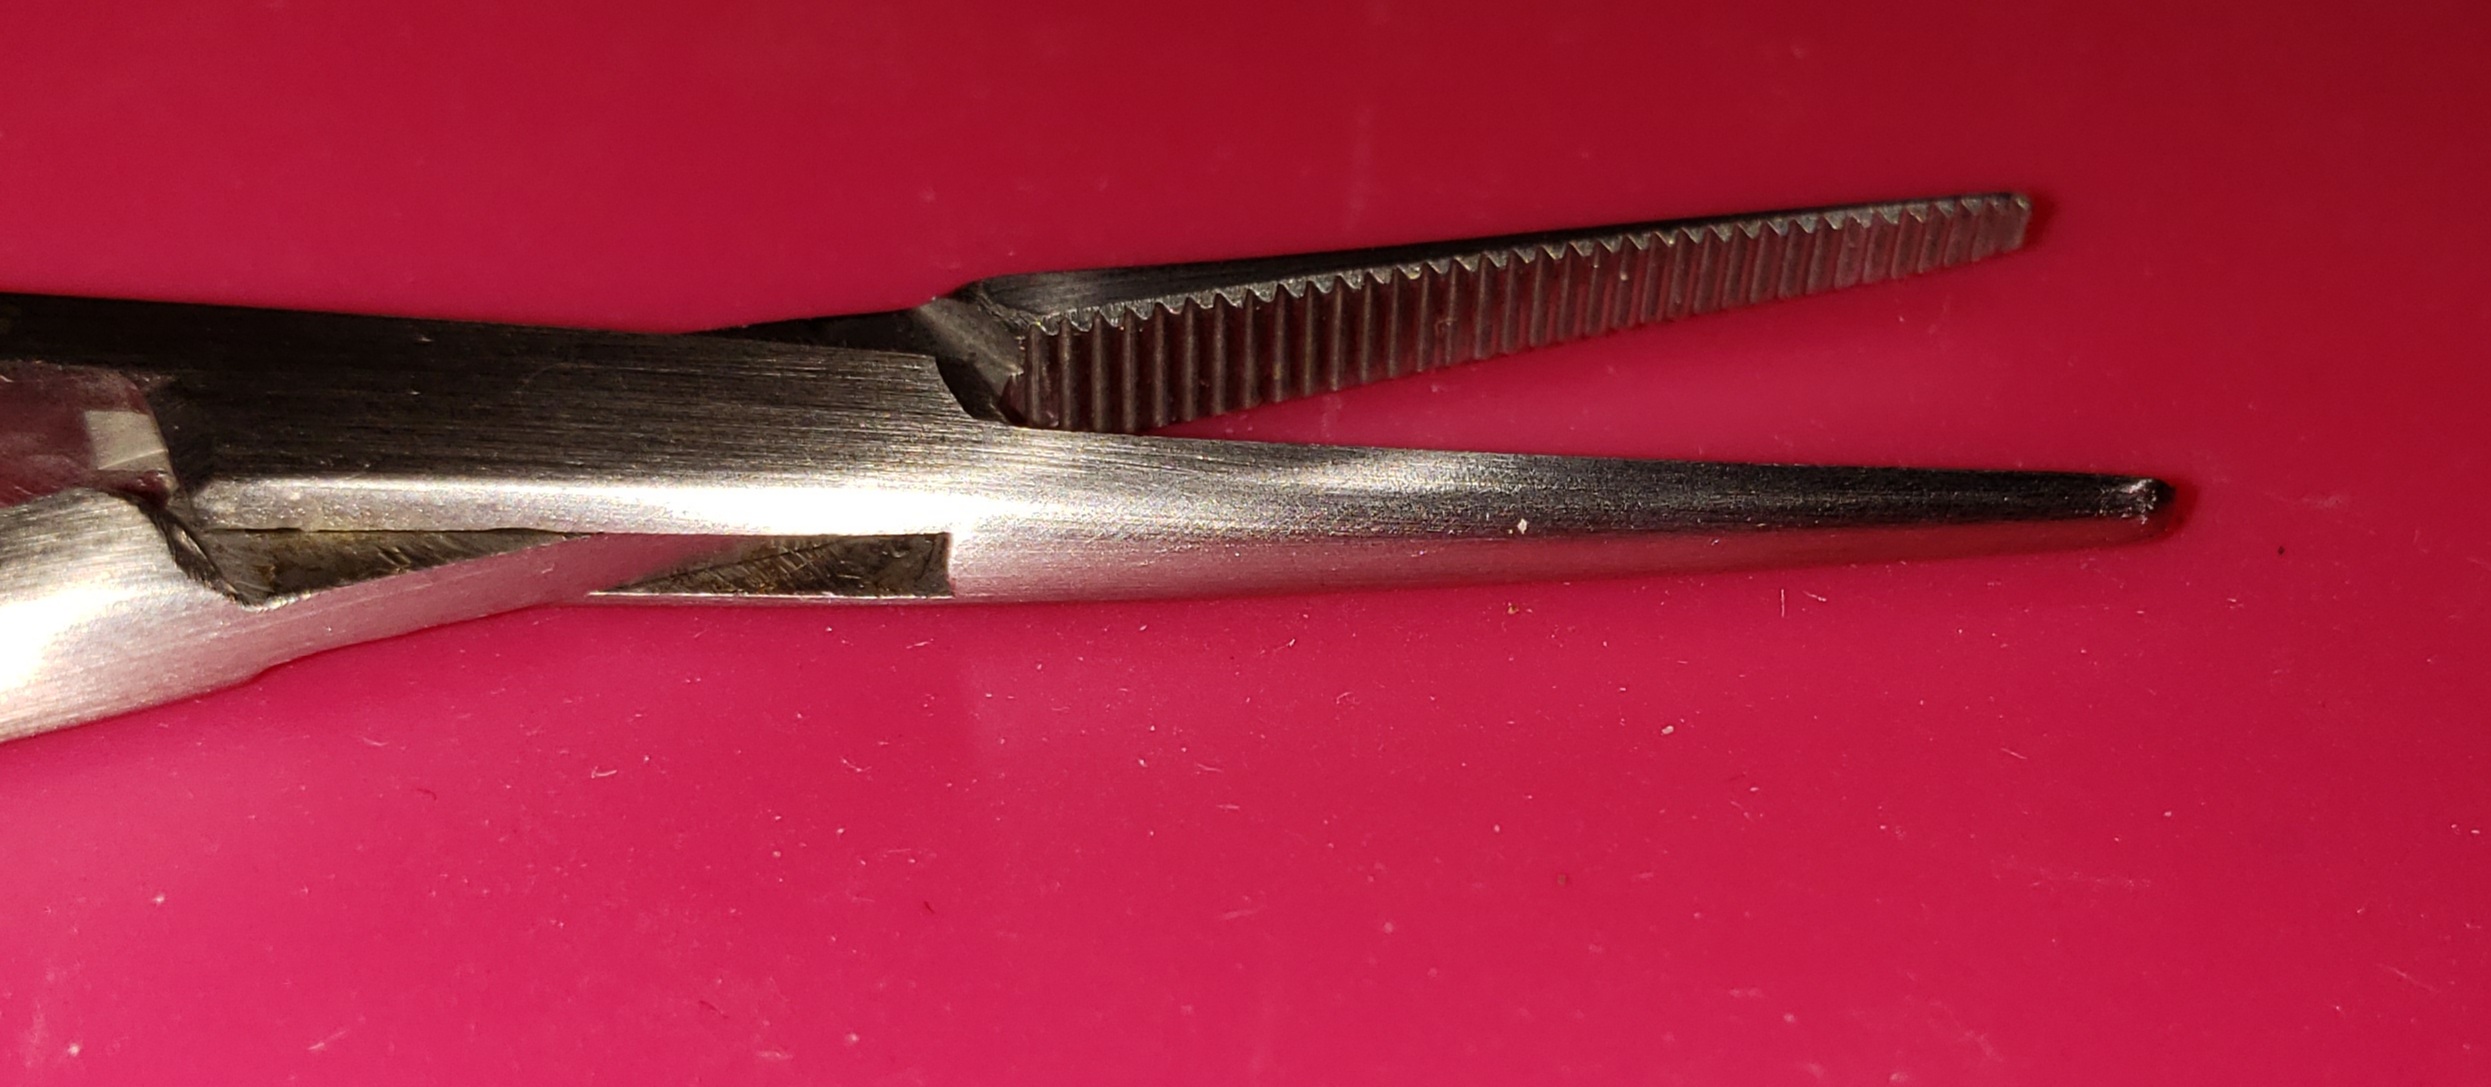
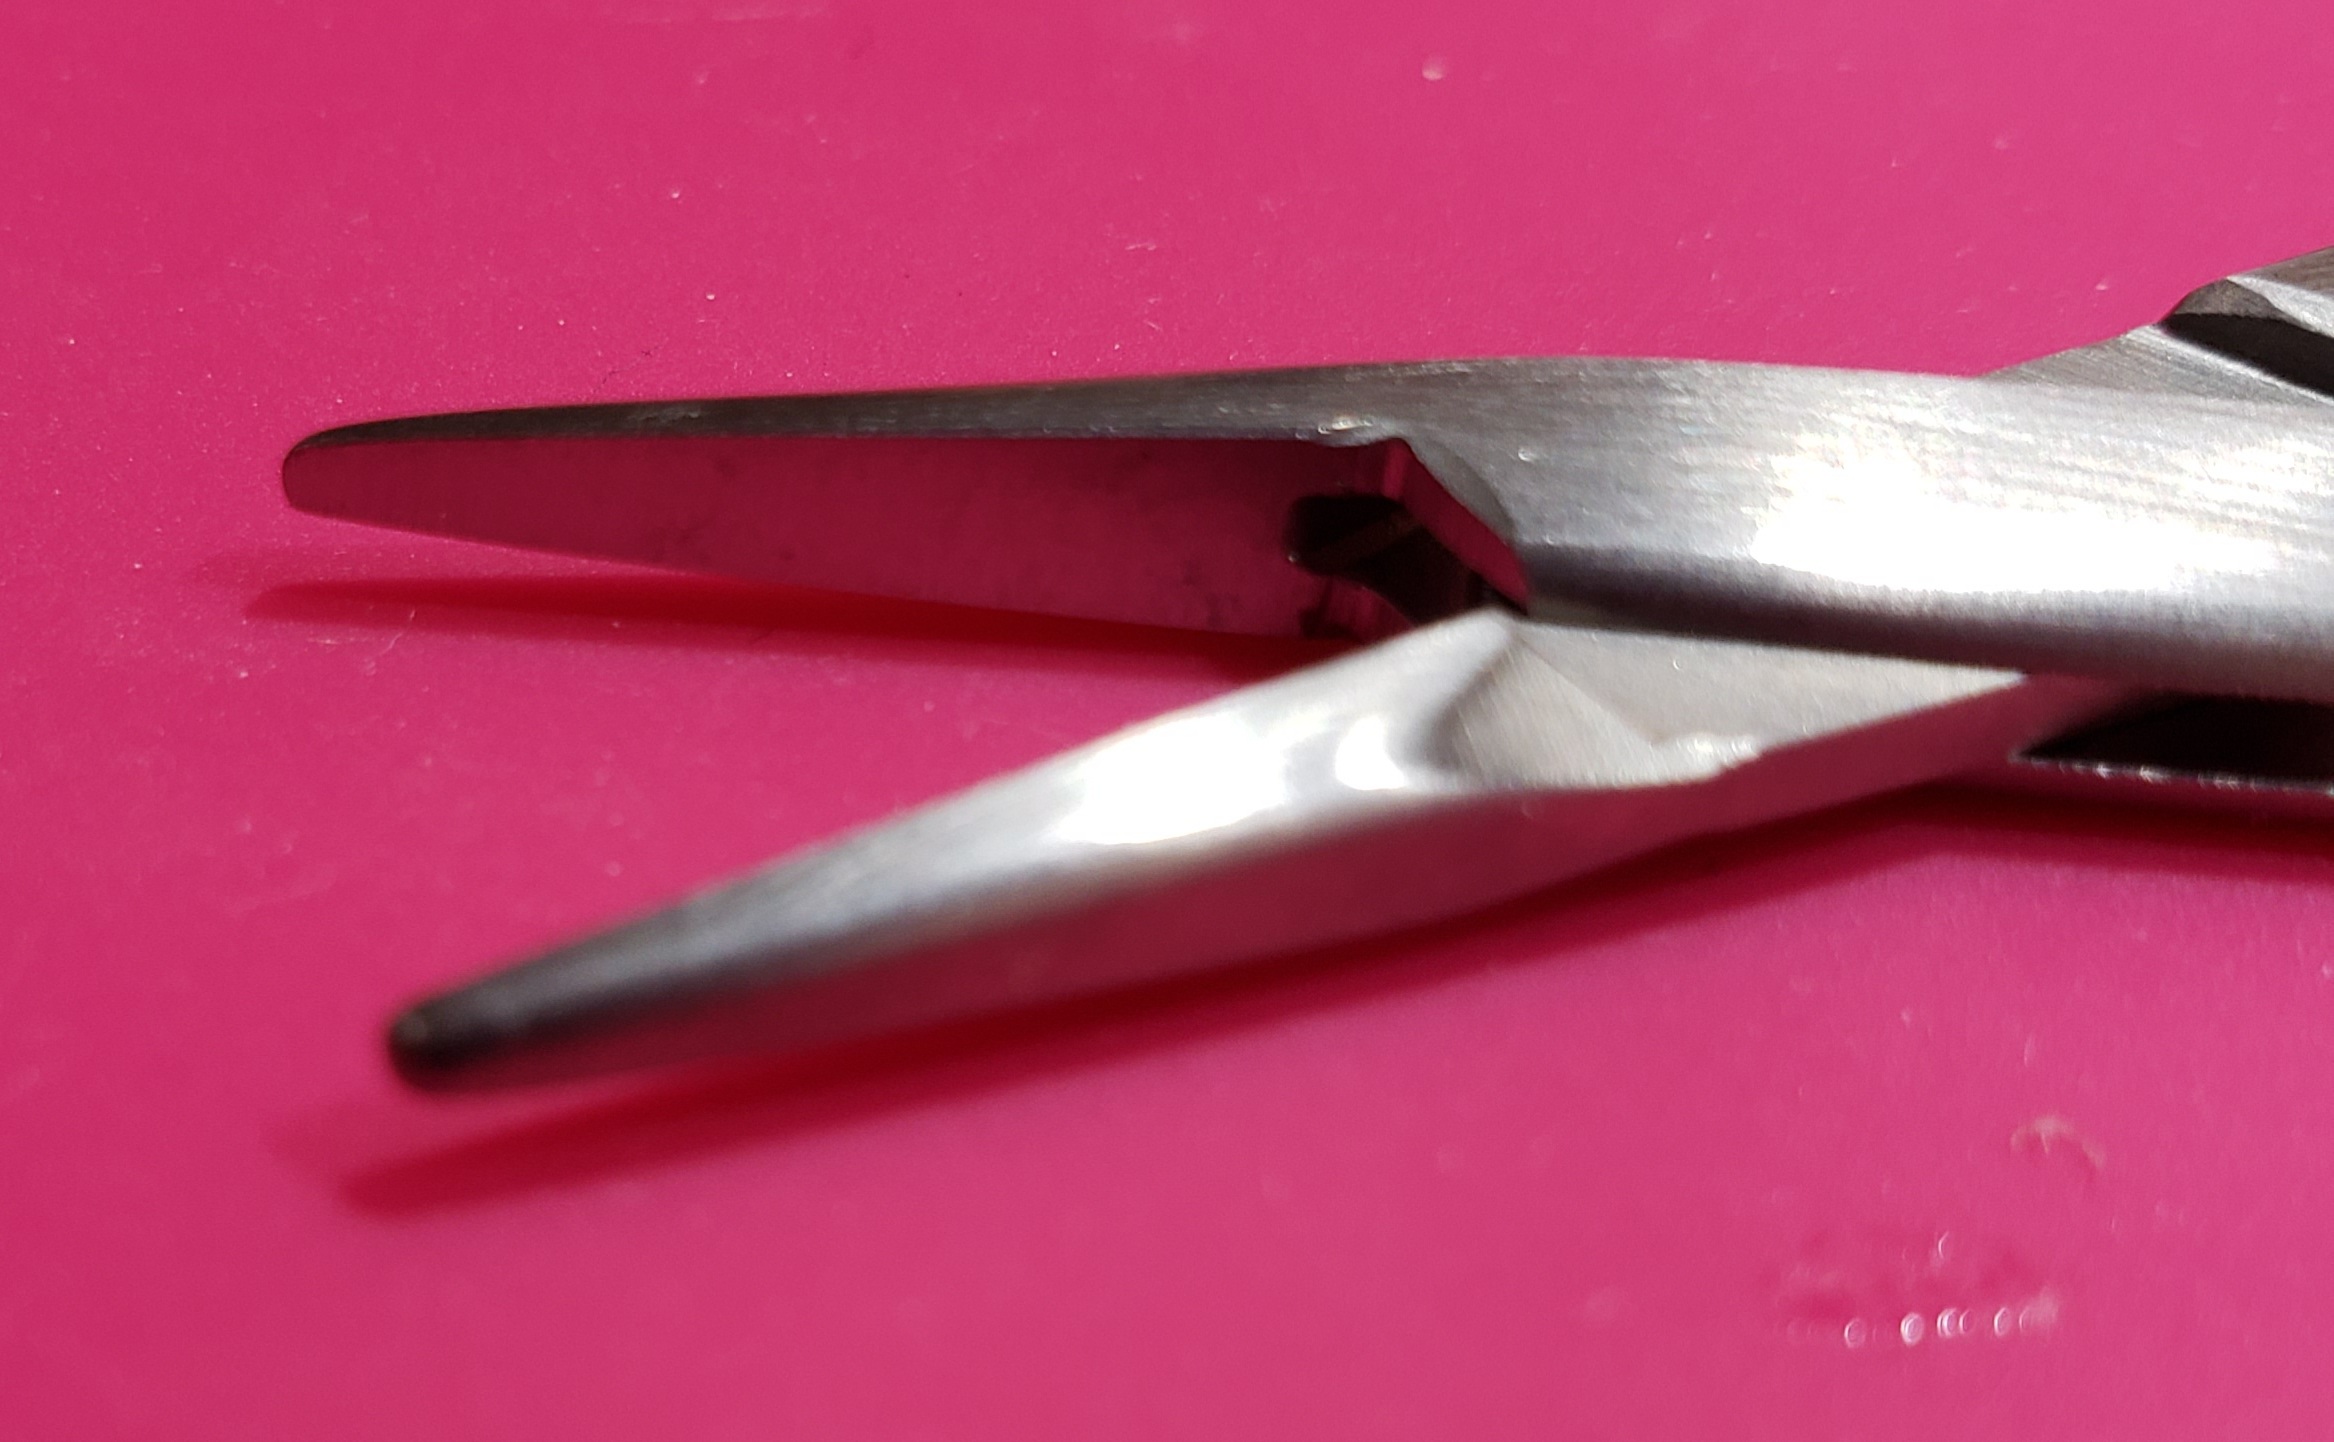
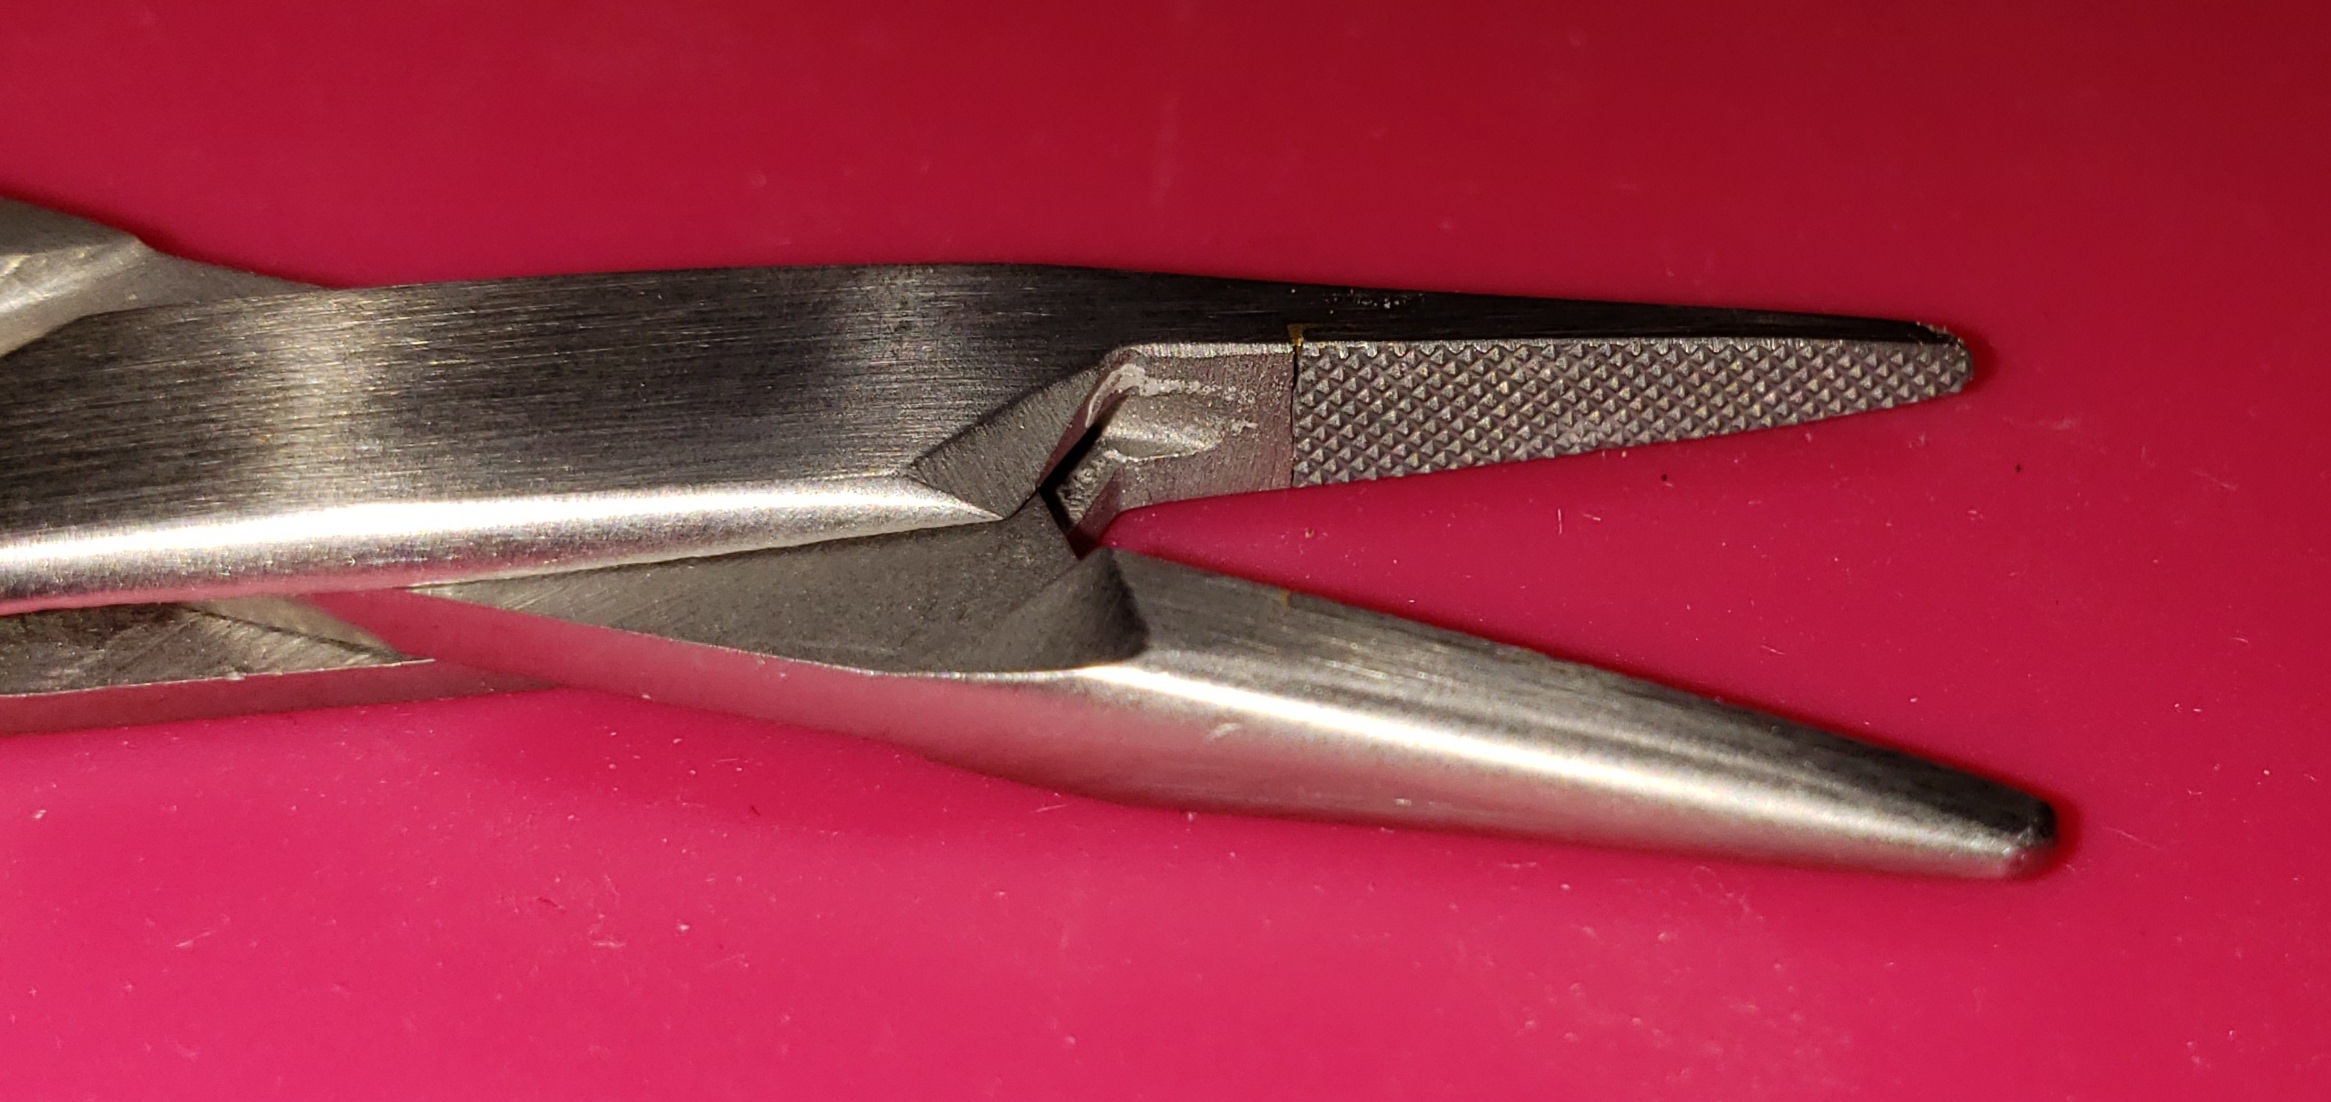
14.3.6. Electronics Pliers & Cutters
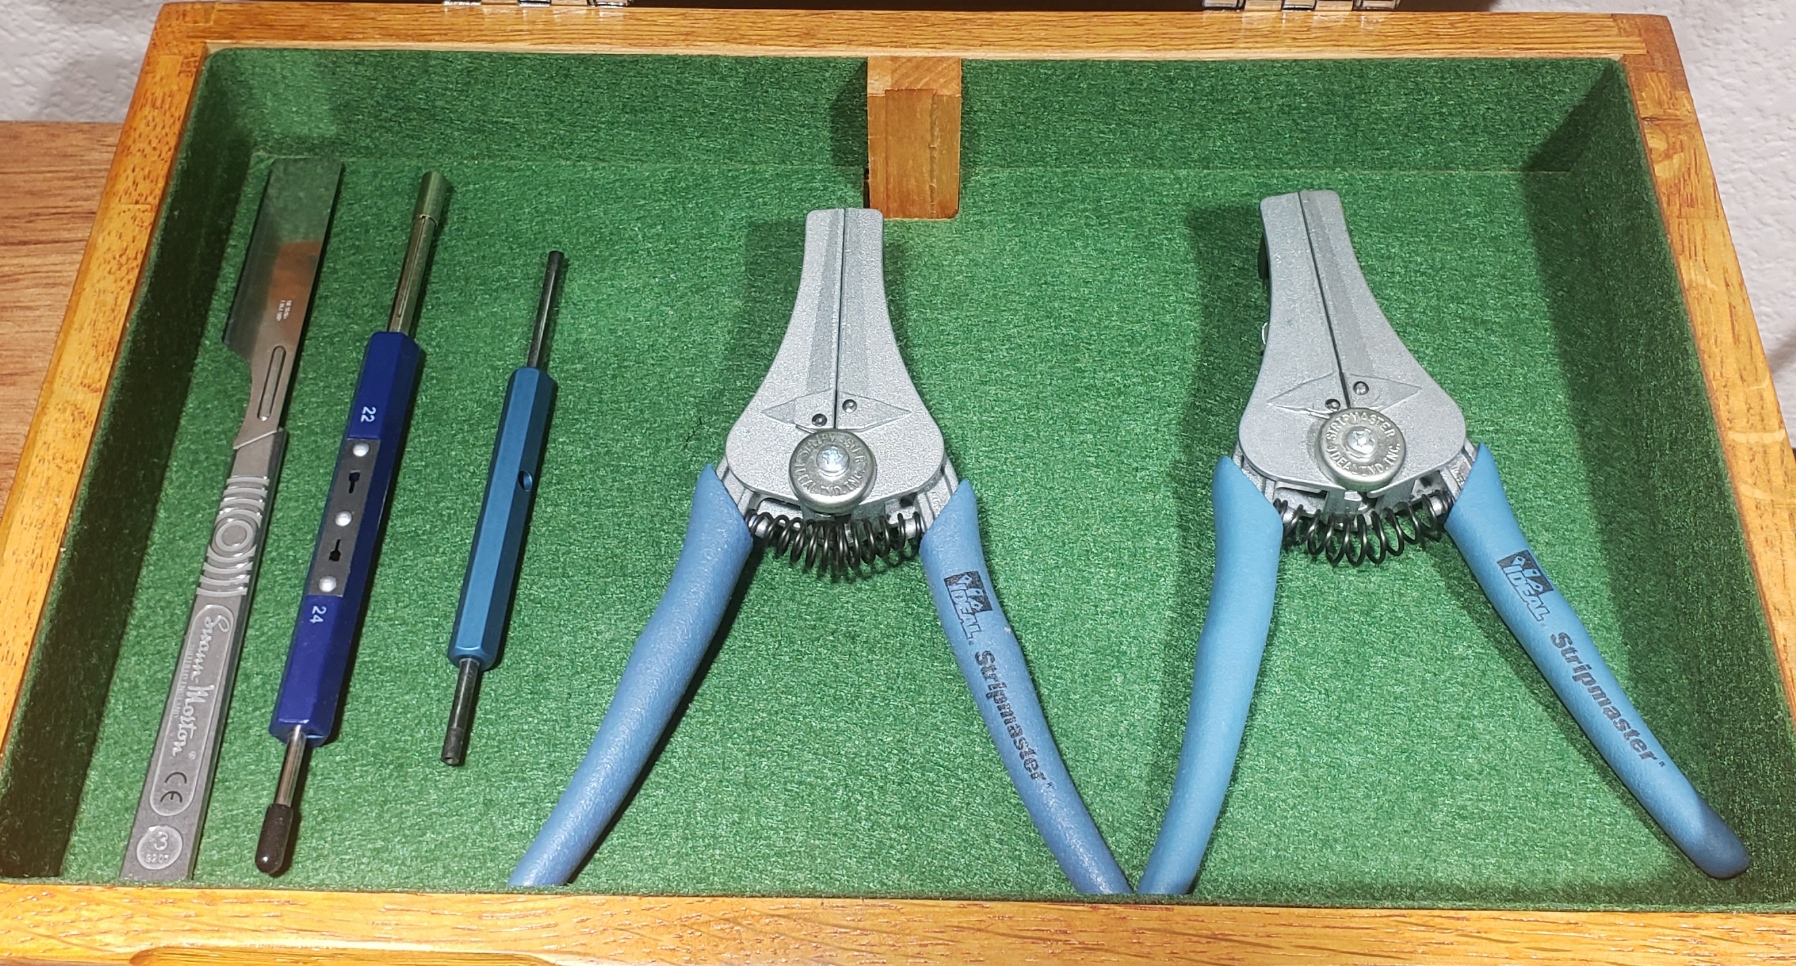
I look for comfortable handles, good opening springs, smooth operation, clean machining on the jaws, and well aligned jaws. For pliers, I test alignment by making sure the pliers can evenly mash a piece of 34 gauge copper wire across the jaws. I do this test multiple times across different parts of the jaw faces. For cutters I hold them up to a back light, and make sure I can see no light between the edges. Then I make test cuts on a bit of solid, 34 AWG wire all along the cutting surfaces. If the cutters have a specification for hard wire, then I make several cuts on a bit of hard wire with them and then do the then wire test again. All of my smaller cutters and pliers live in the Gerstner chest on my soldering station.
First we have the pliers:
Standard cutters:
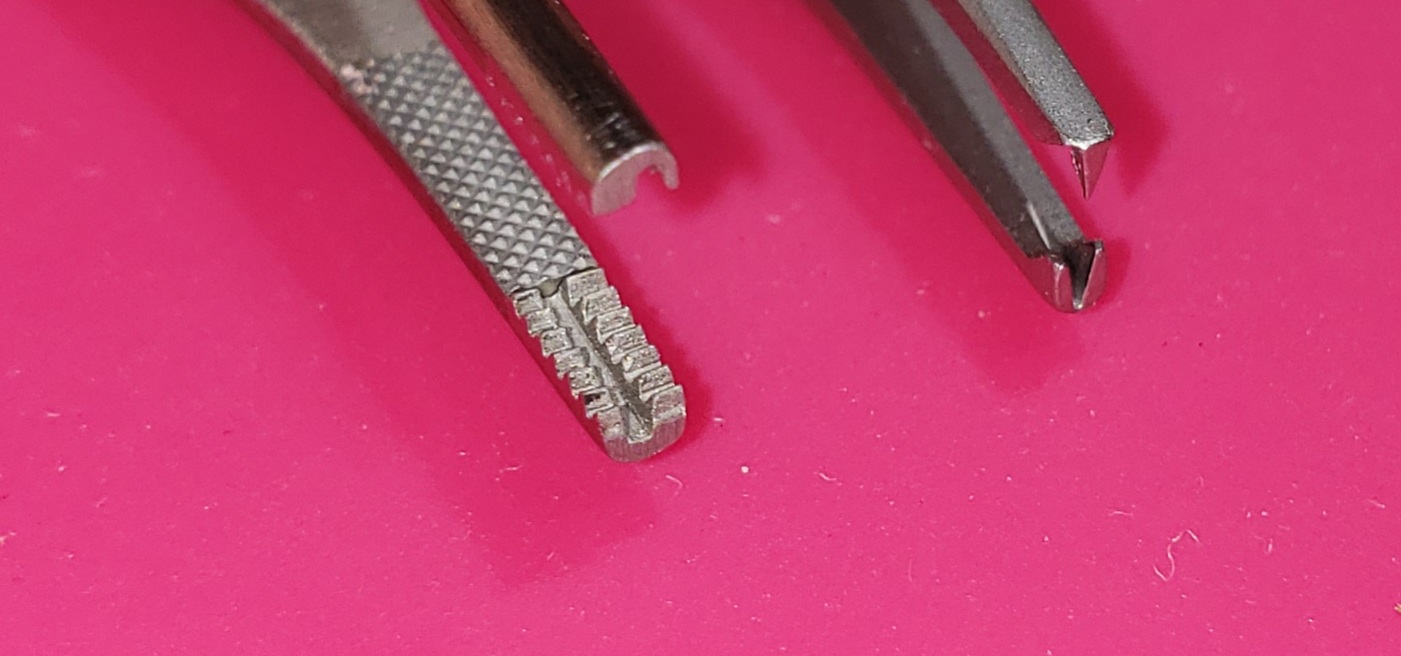
More exotic cutters. The Swanstorm is an amazing cutter with a pointy tungsten carbide head that can really get into tight spots. The larger Knipex is also tungsten carbide, but is more of an industrial "masher" kind of cutter – it's not precise, but it can handle thicker, harder stuff. The Erim, light blue, is a wire stripper that I have modified into an end cutter – it never worked well as a stripper. The stripper on the right has a scissor like action between the stripper notch and the pivot, and is pretty handy for snipping off bits of wire after stripping.
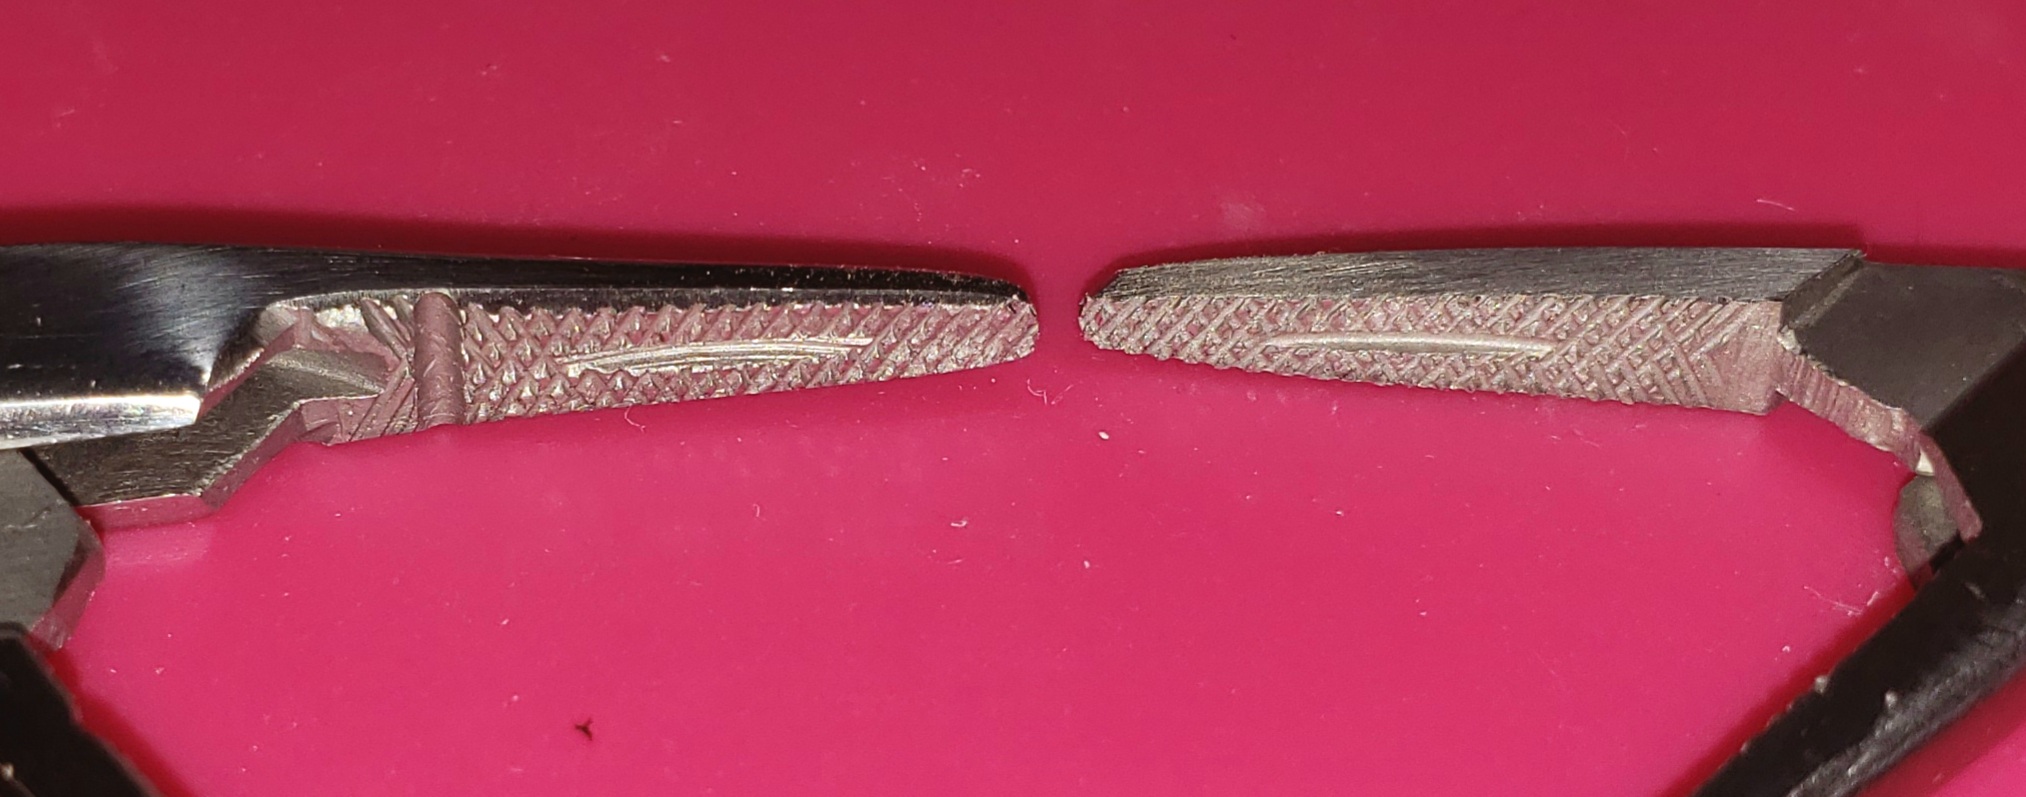
14.3.7. Wire Strippers
For the most part I use a couple of 20 year old "Ideal Stripmaster" strippers I keep in the top of the Gerstner at my soldering station. I have replacement blades, but have never had to change them out. They cleanly cut insulation, and then automatically pull it away from the wire. I have no experience with similar products from other vendors as these were the first ones I purchased!
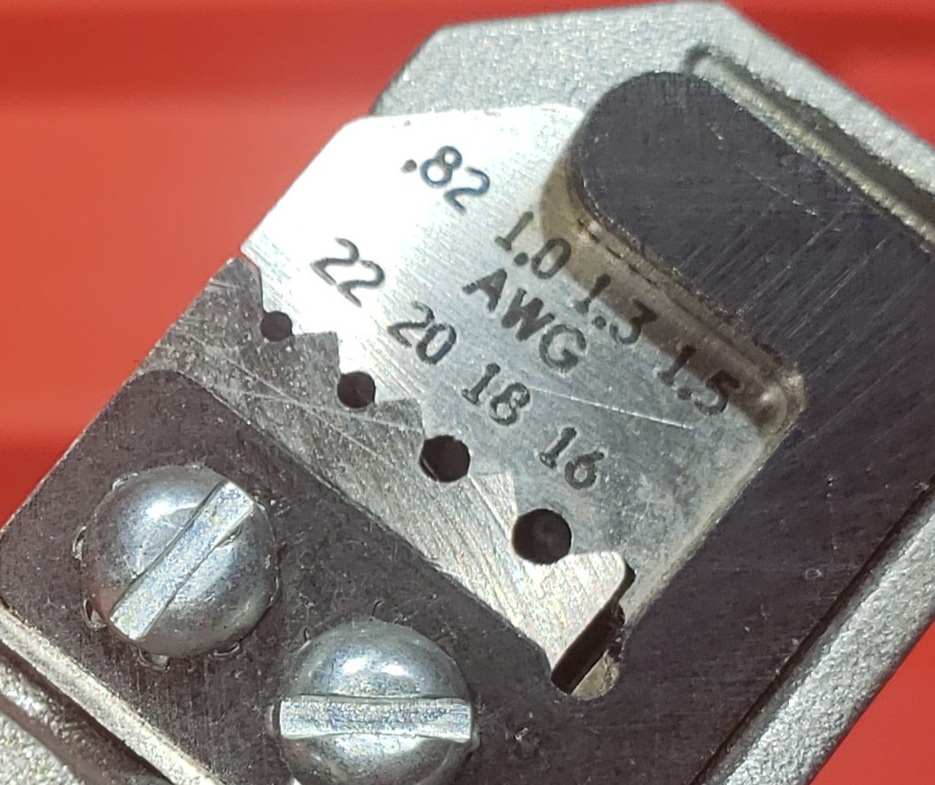

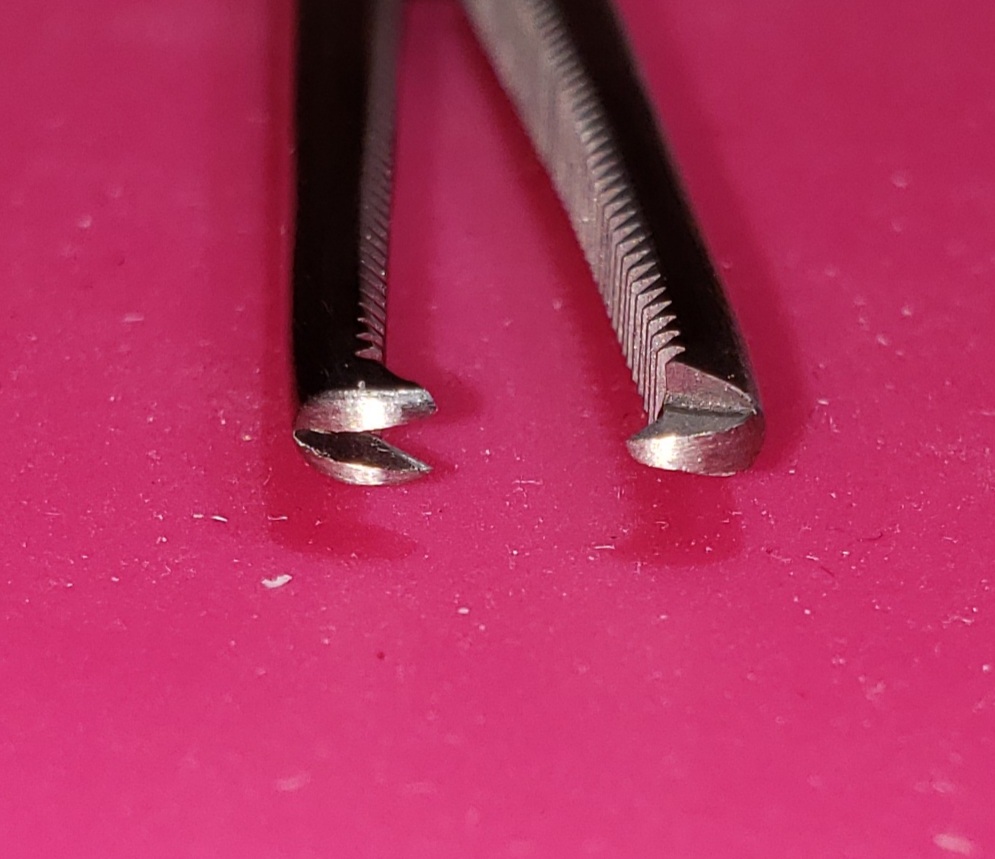
I also have one of those "notched scissors" strippers, and I find myself using them when I need to strip an unusually long bit of insulation off of a wire. They work well enough. You can see them on the right in the following image:
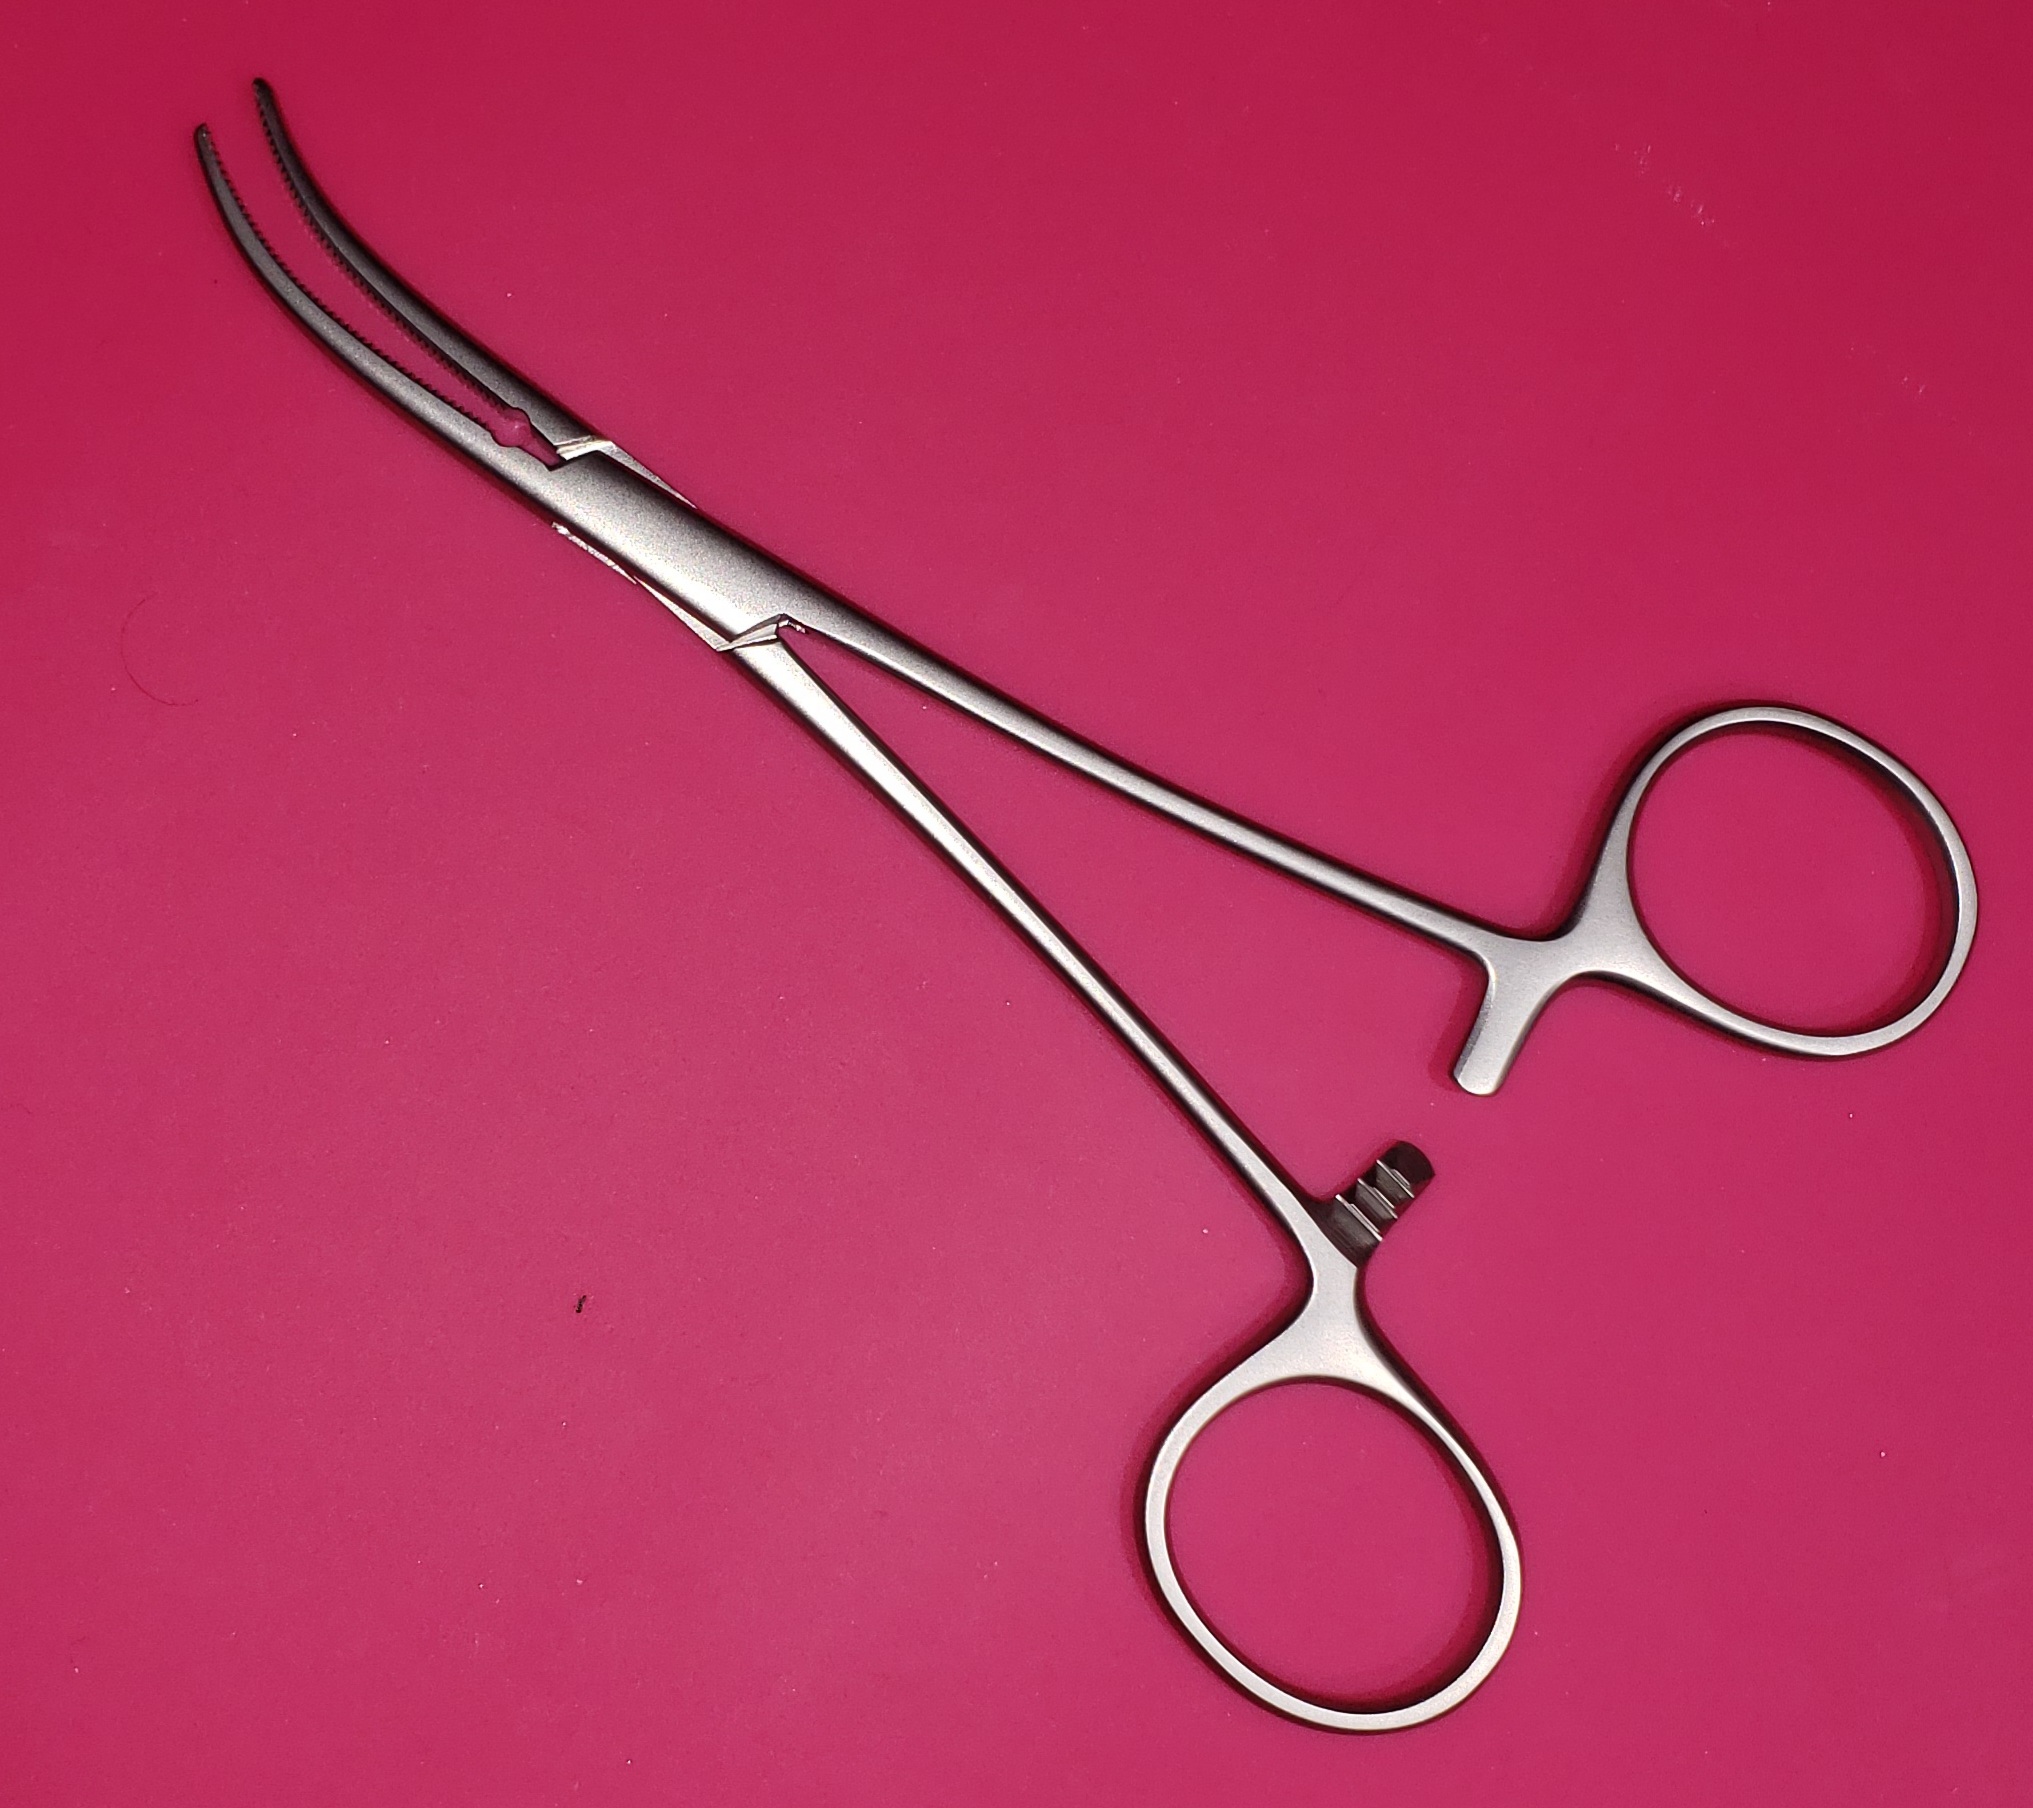
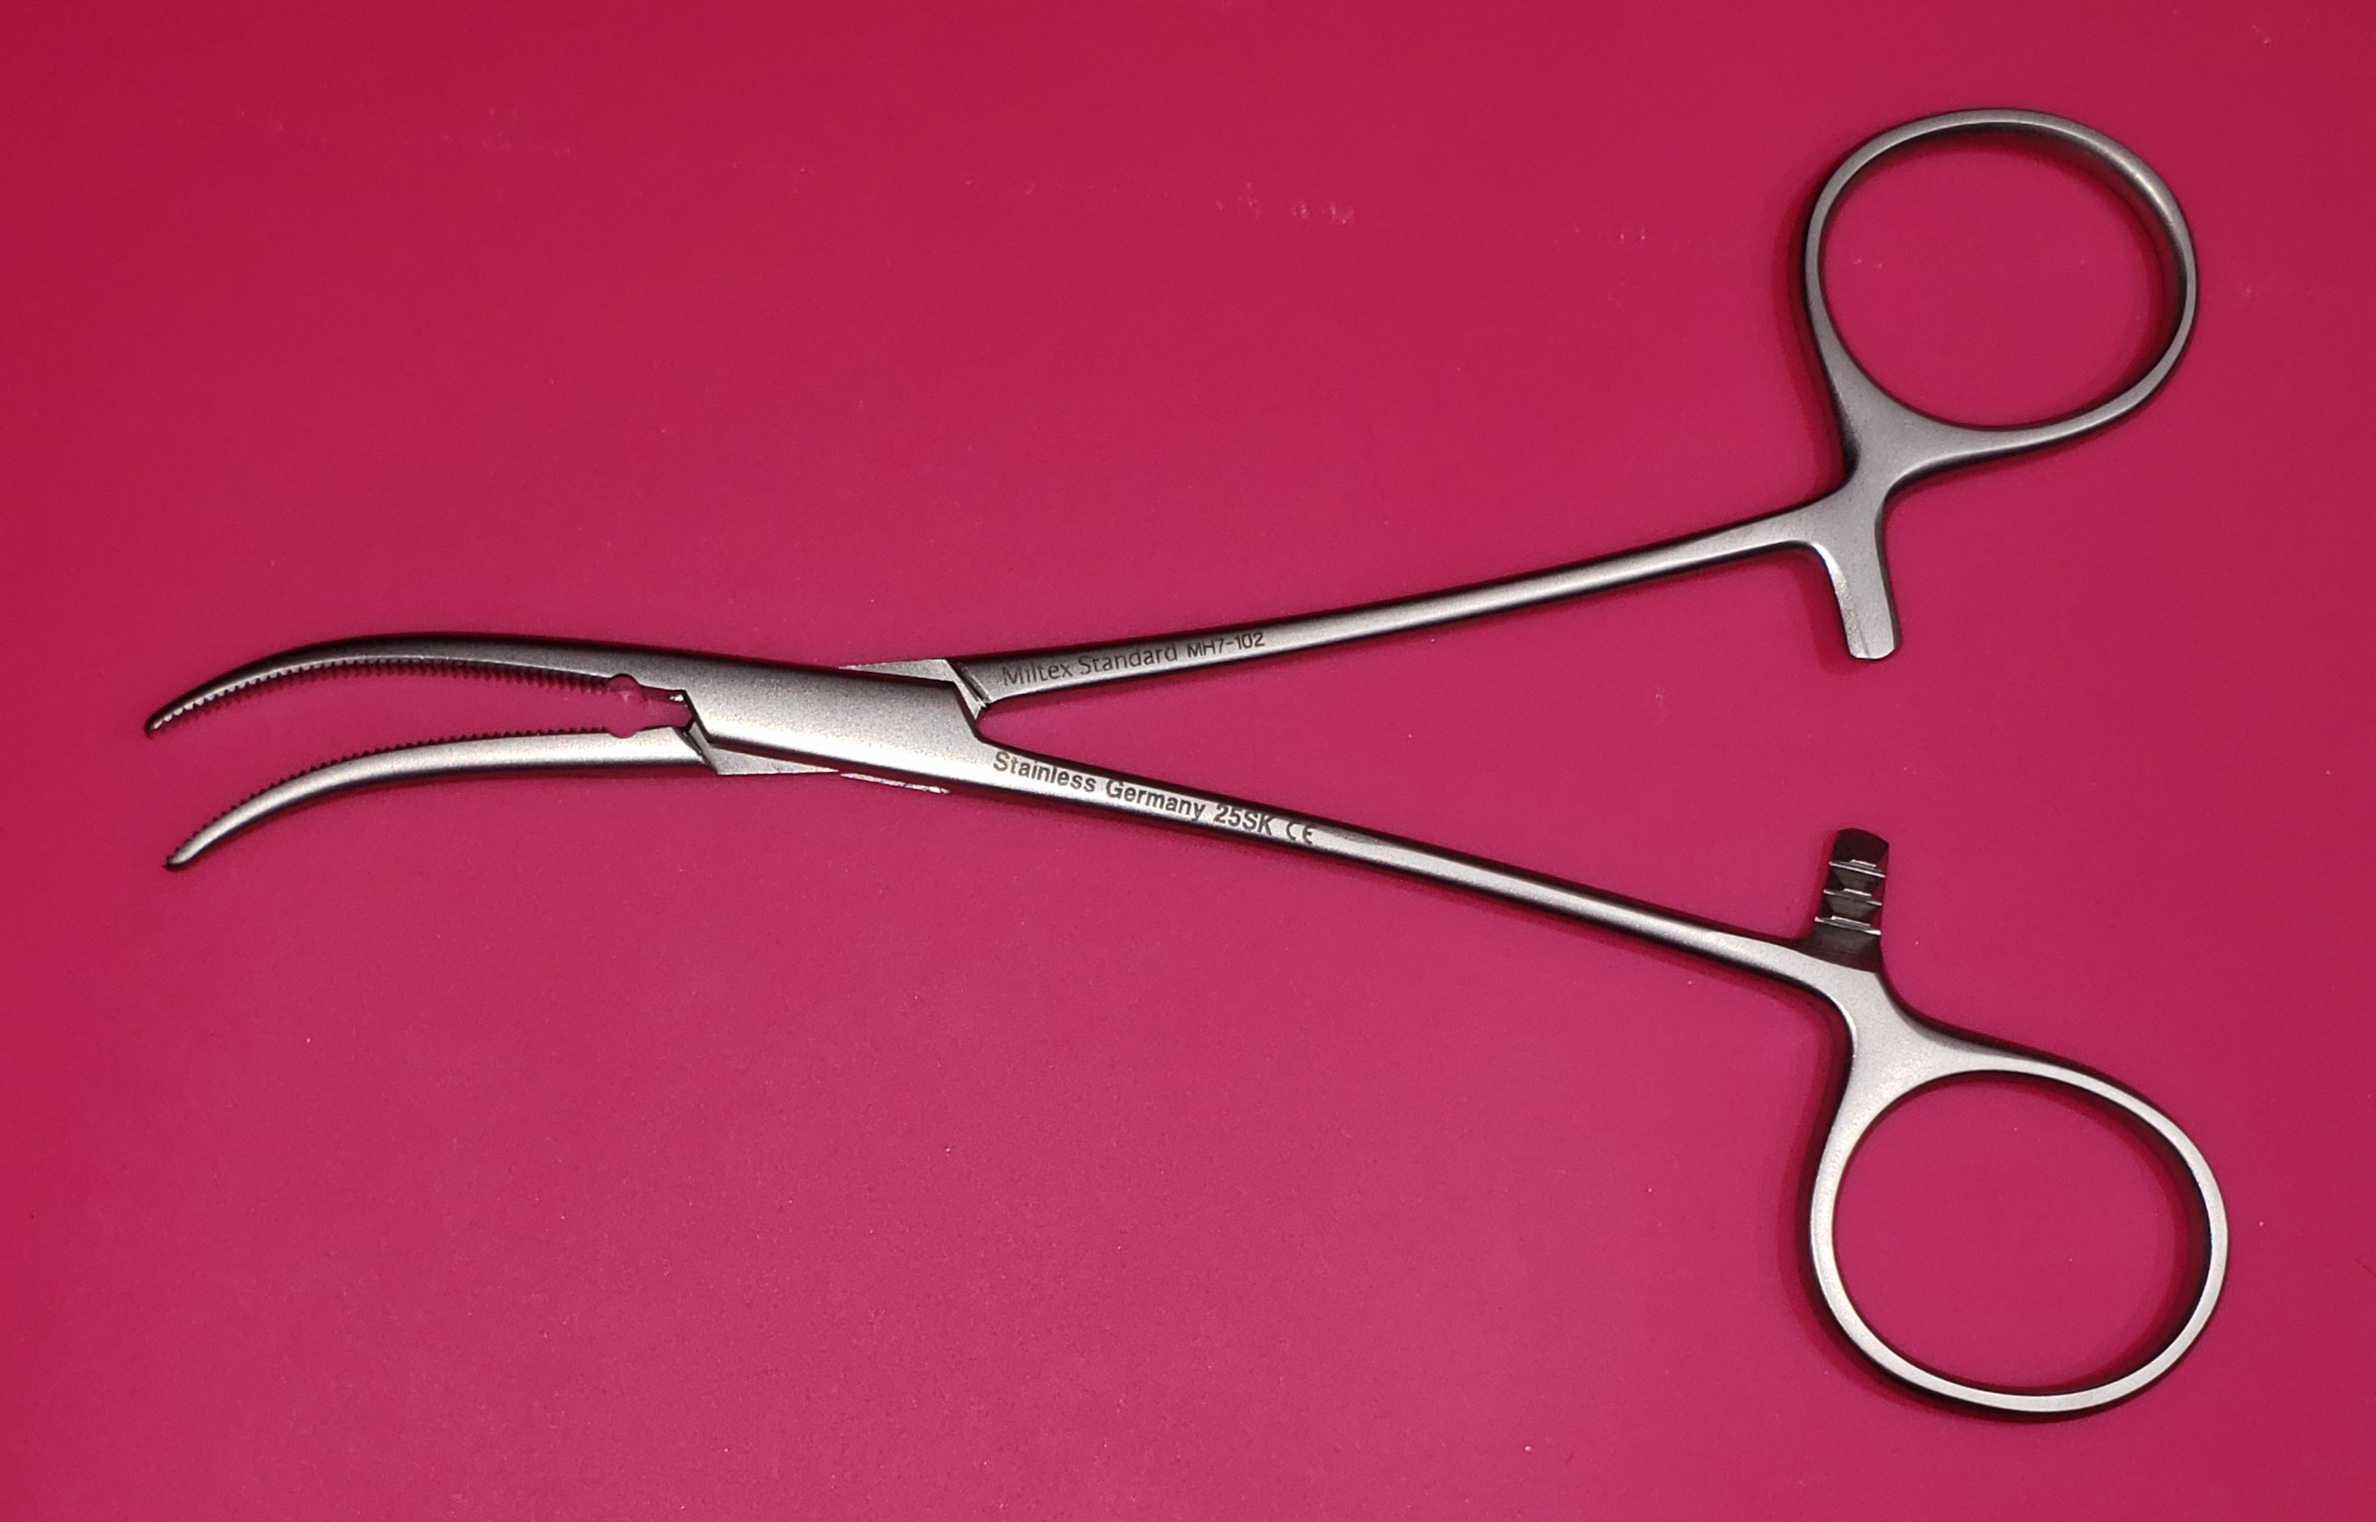
14.3.8. Needle Nose Pliers & Hemostats
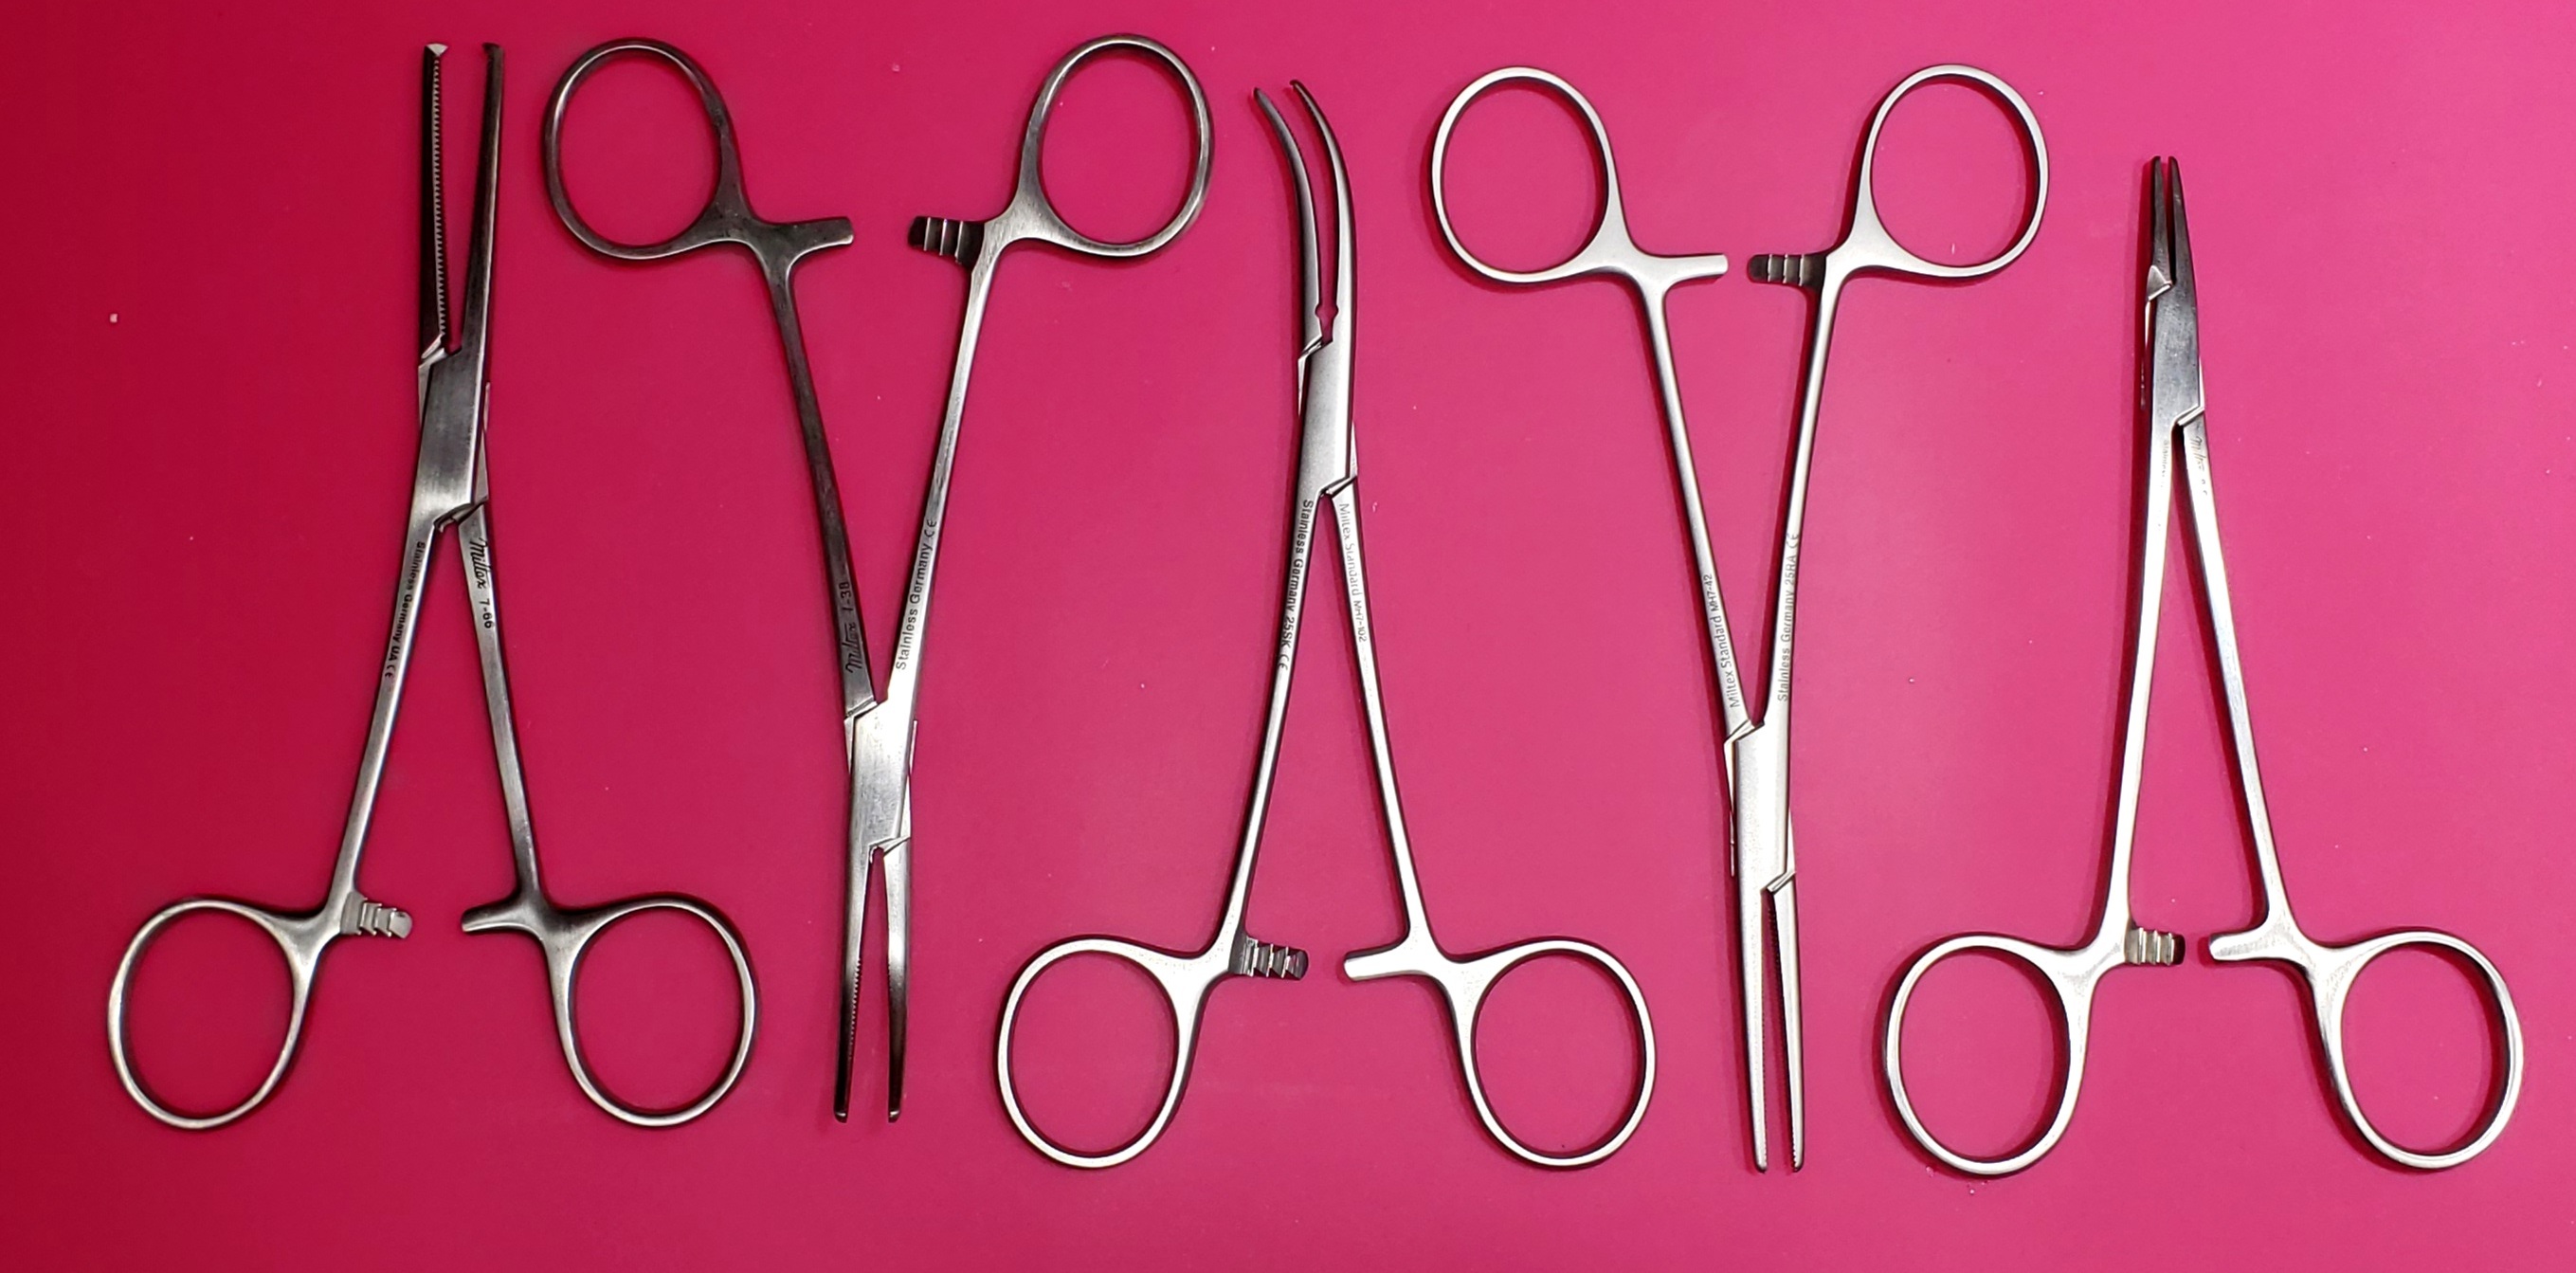
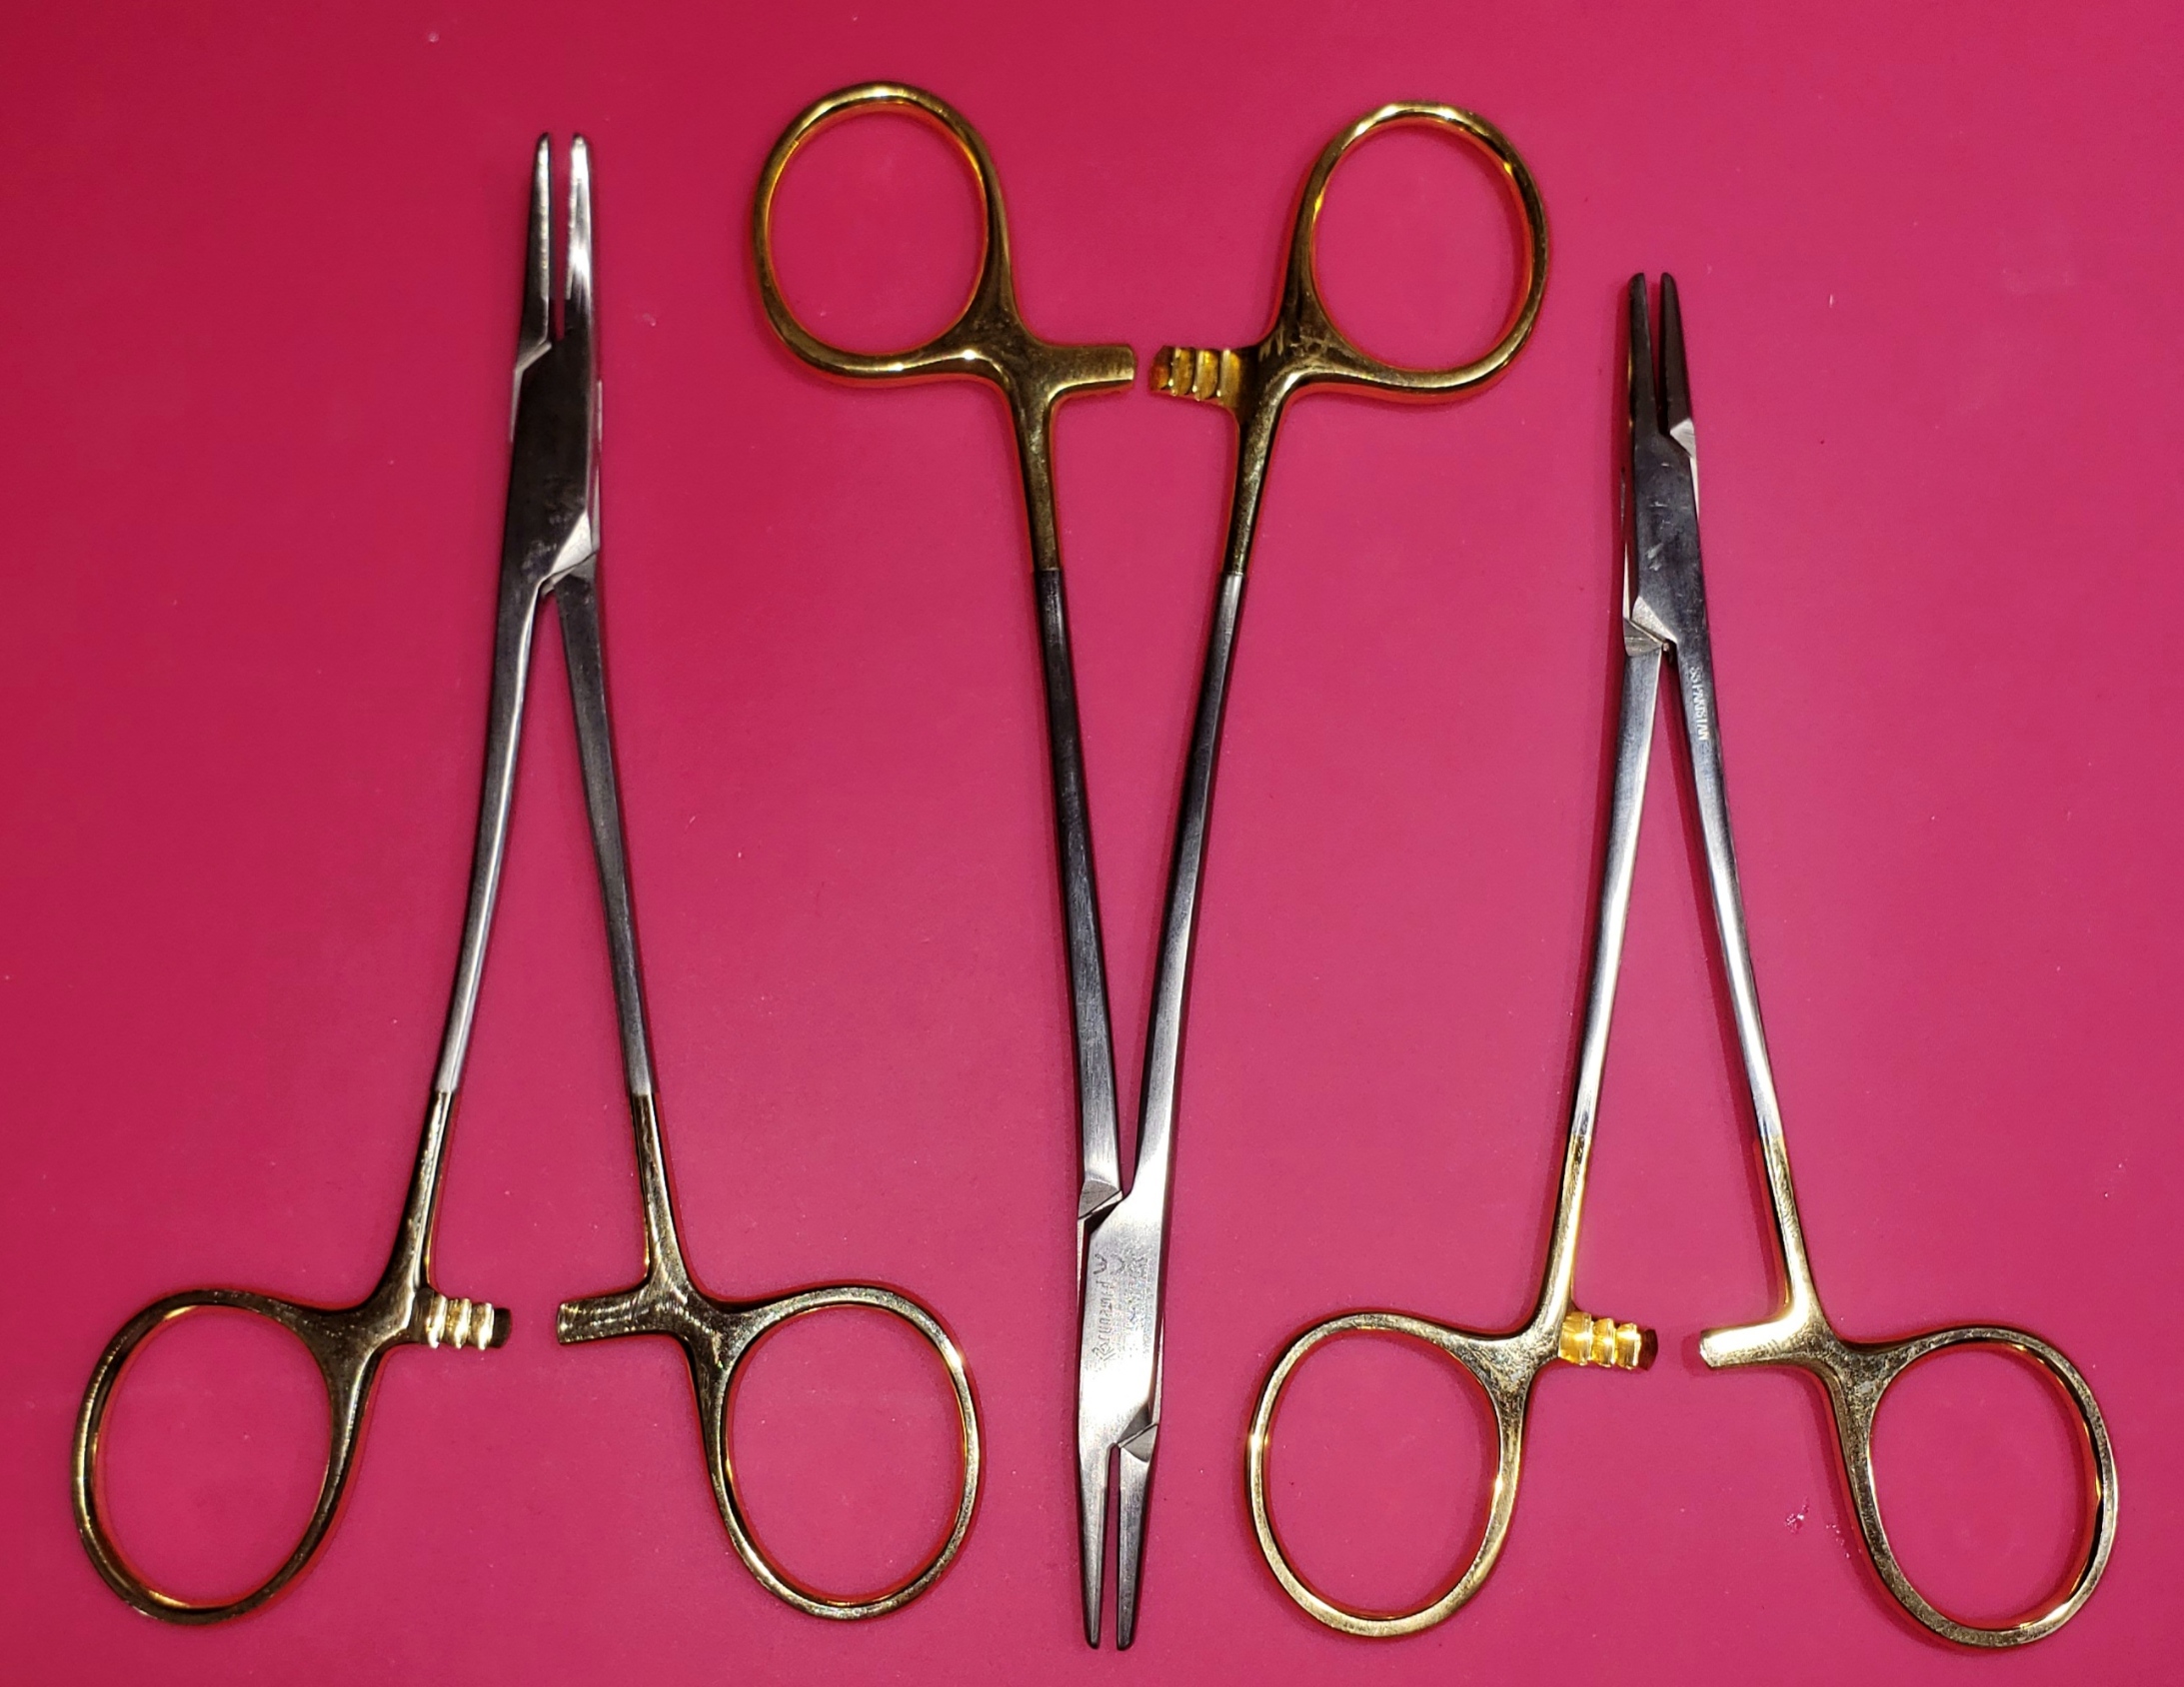
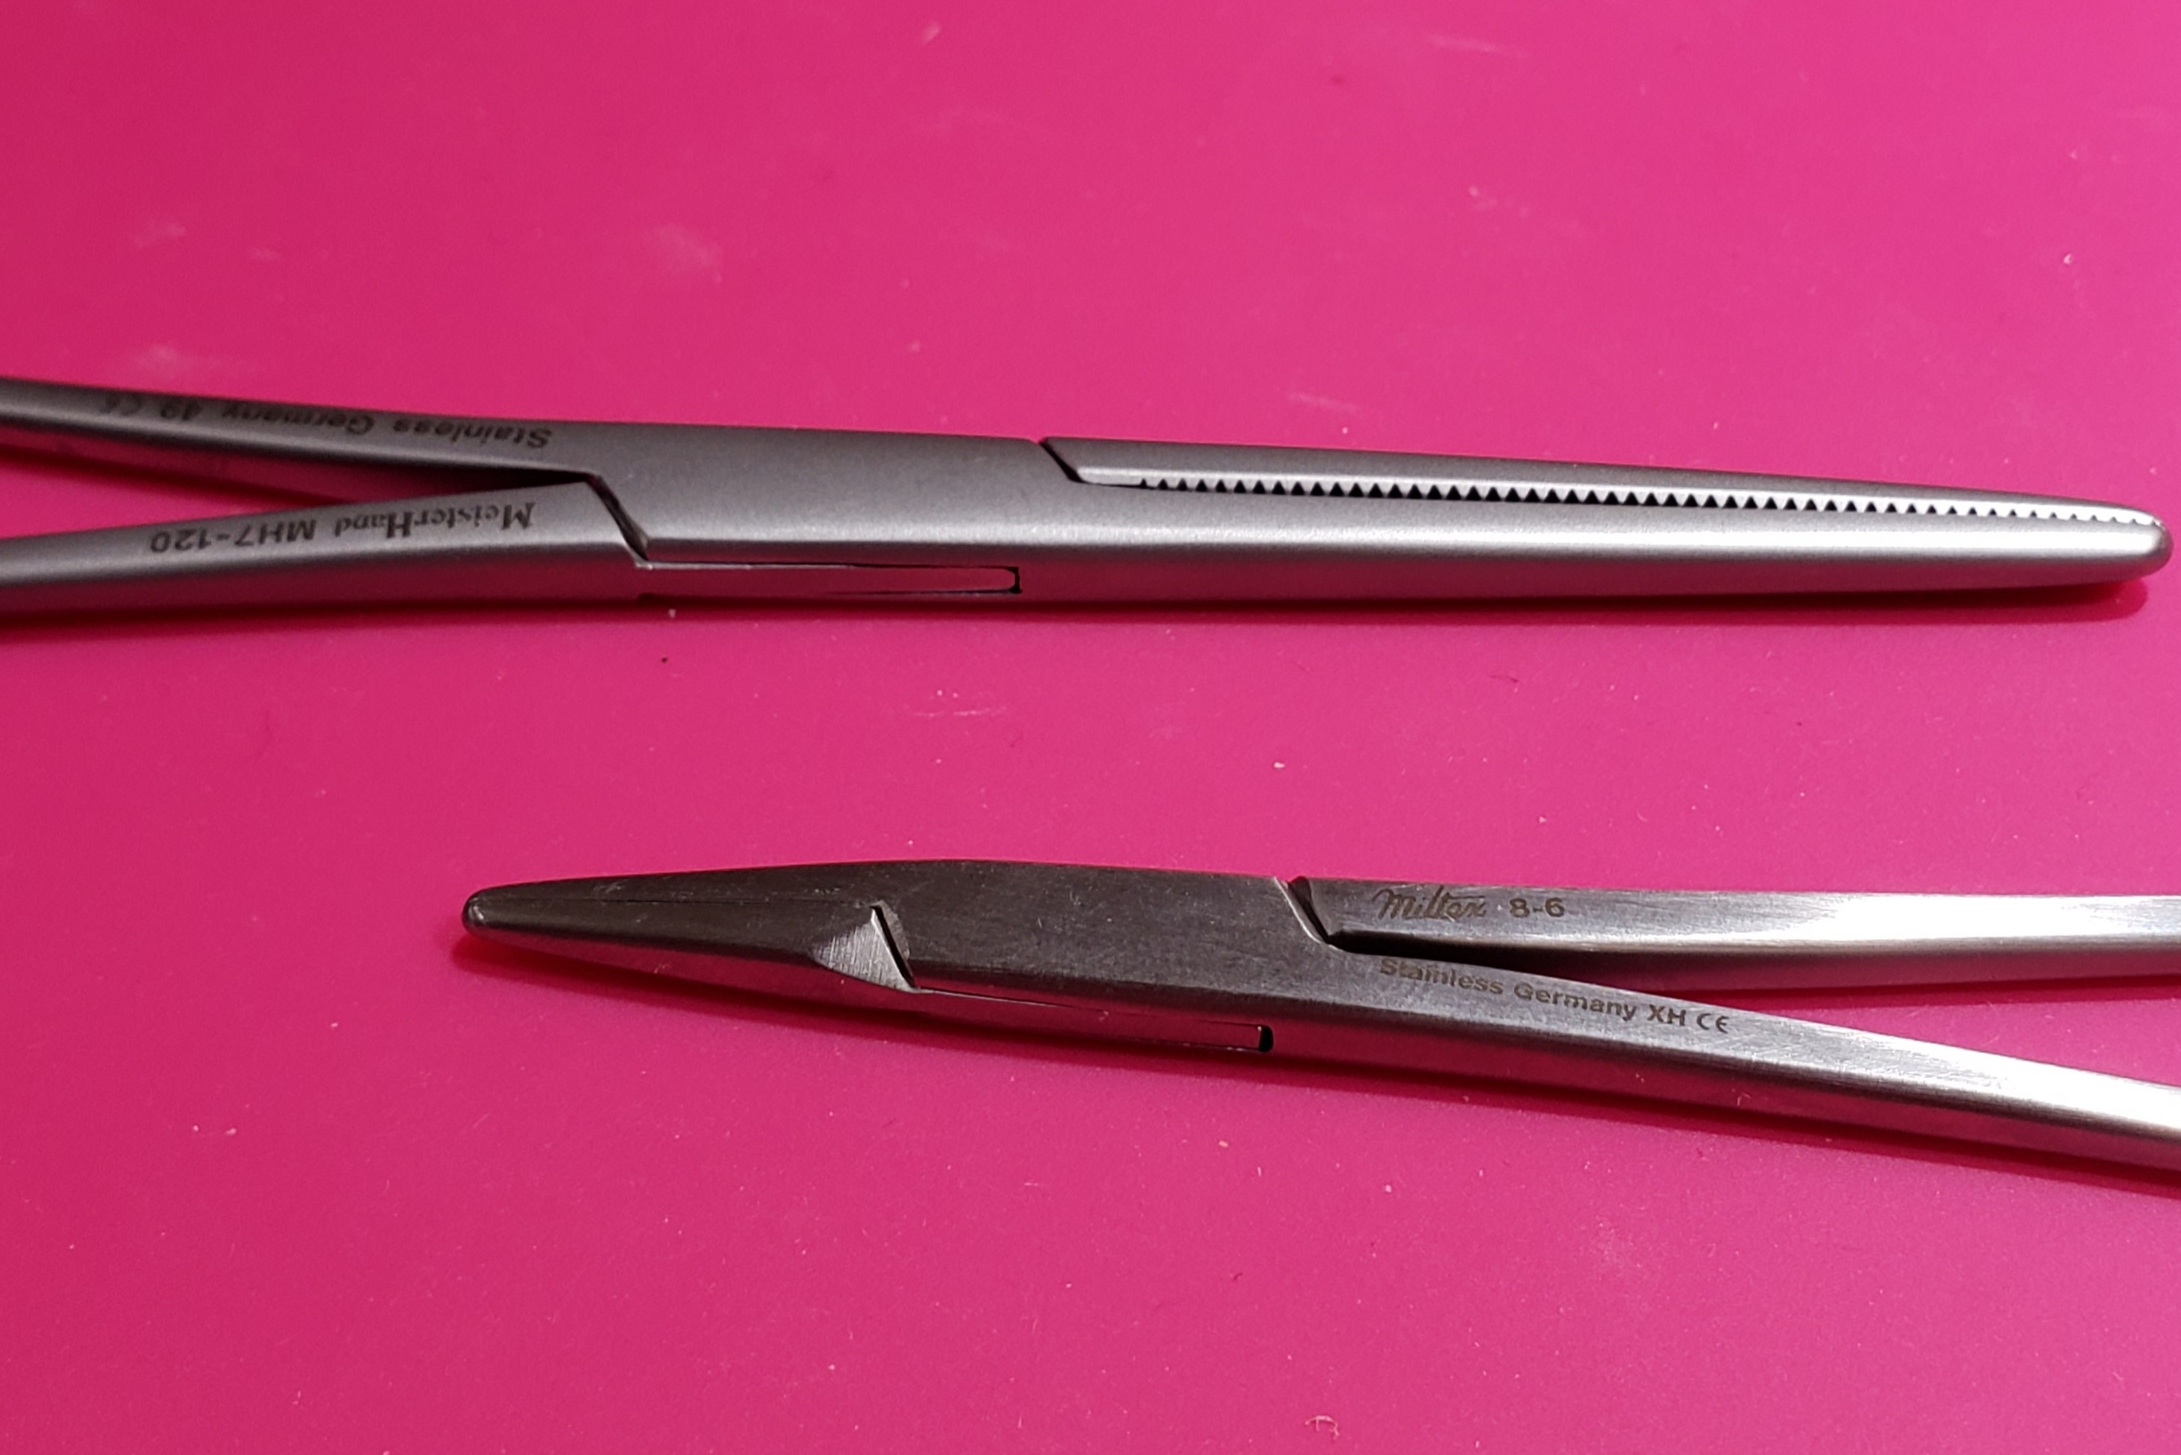
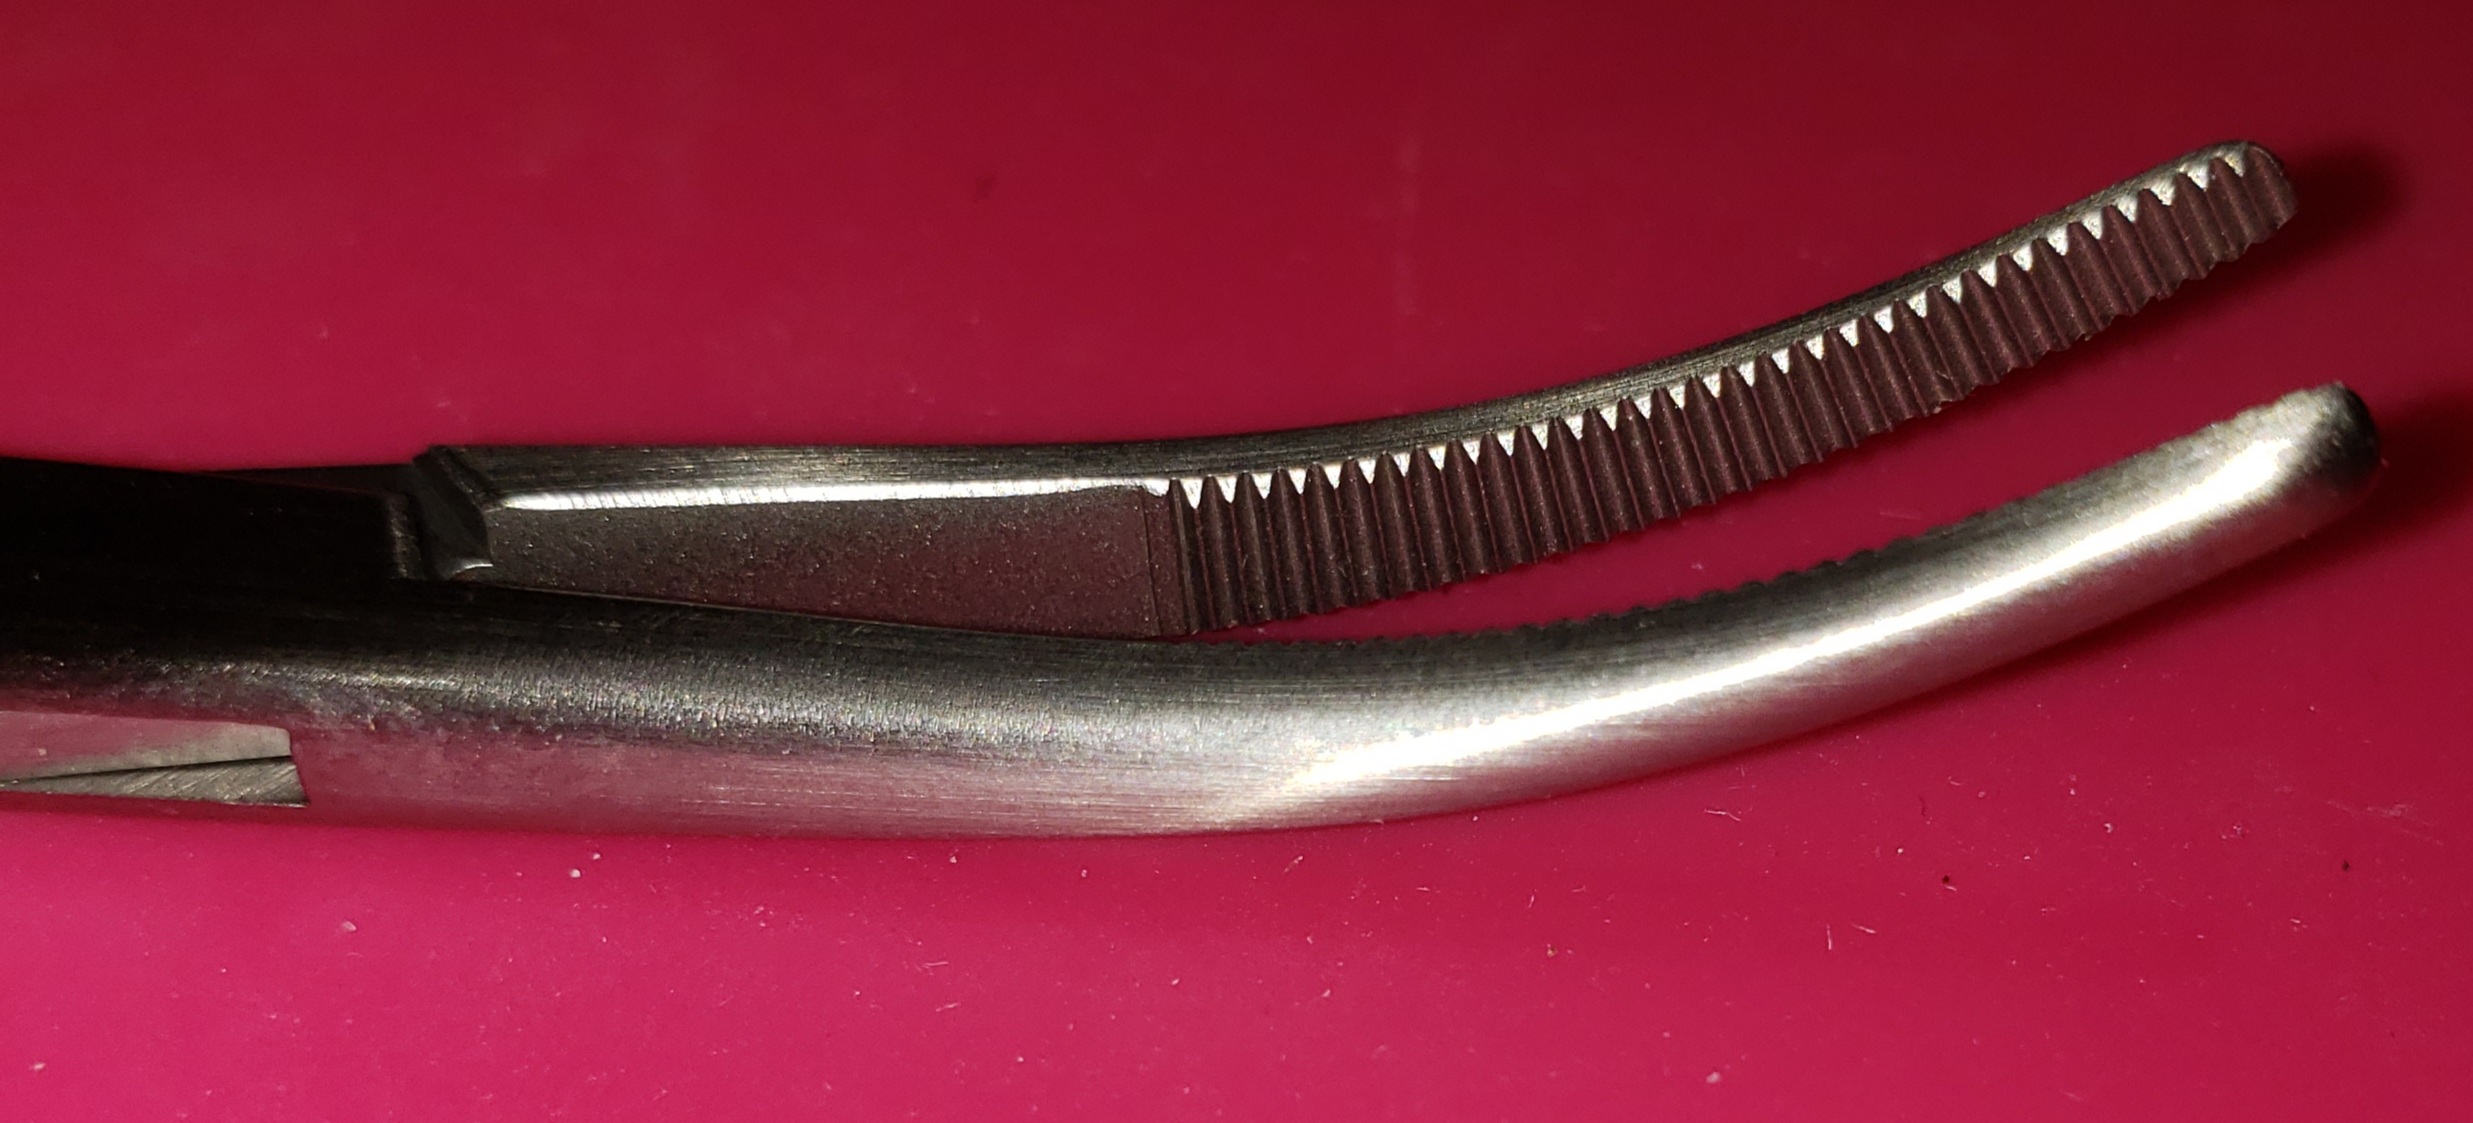
I don't own any long, needle nose pliers for electronics work. I've had really bad luck with them. Especially the longer ones. They tend to get bent out of shape over time. The thing is I almost never need the jaw to be that long, I just need to get the tip someplace hard to reach. So what I really need is shorter, stronger jaws attached to long handles. That's why I use hemostats instead of needle nose pliers for electronics work.
The following two images show the hemostats that live in the drawers on my soldering station. These are all 5.5 to 6 inches in size, but have different jaws. The ones on the left are older, high quality instruments. The ones on the right are modern, inexpensive hemostats with tungsten carbide inlays in the jaws. I have probably half a dozen more in tool boxes and drawers.
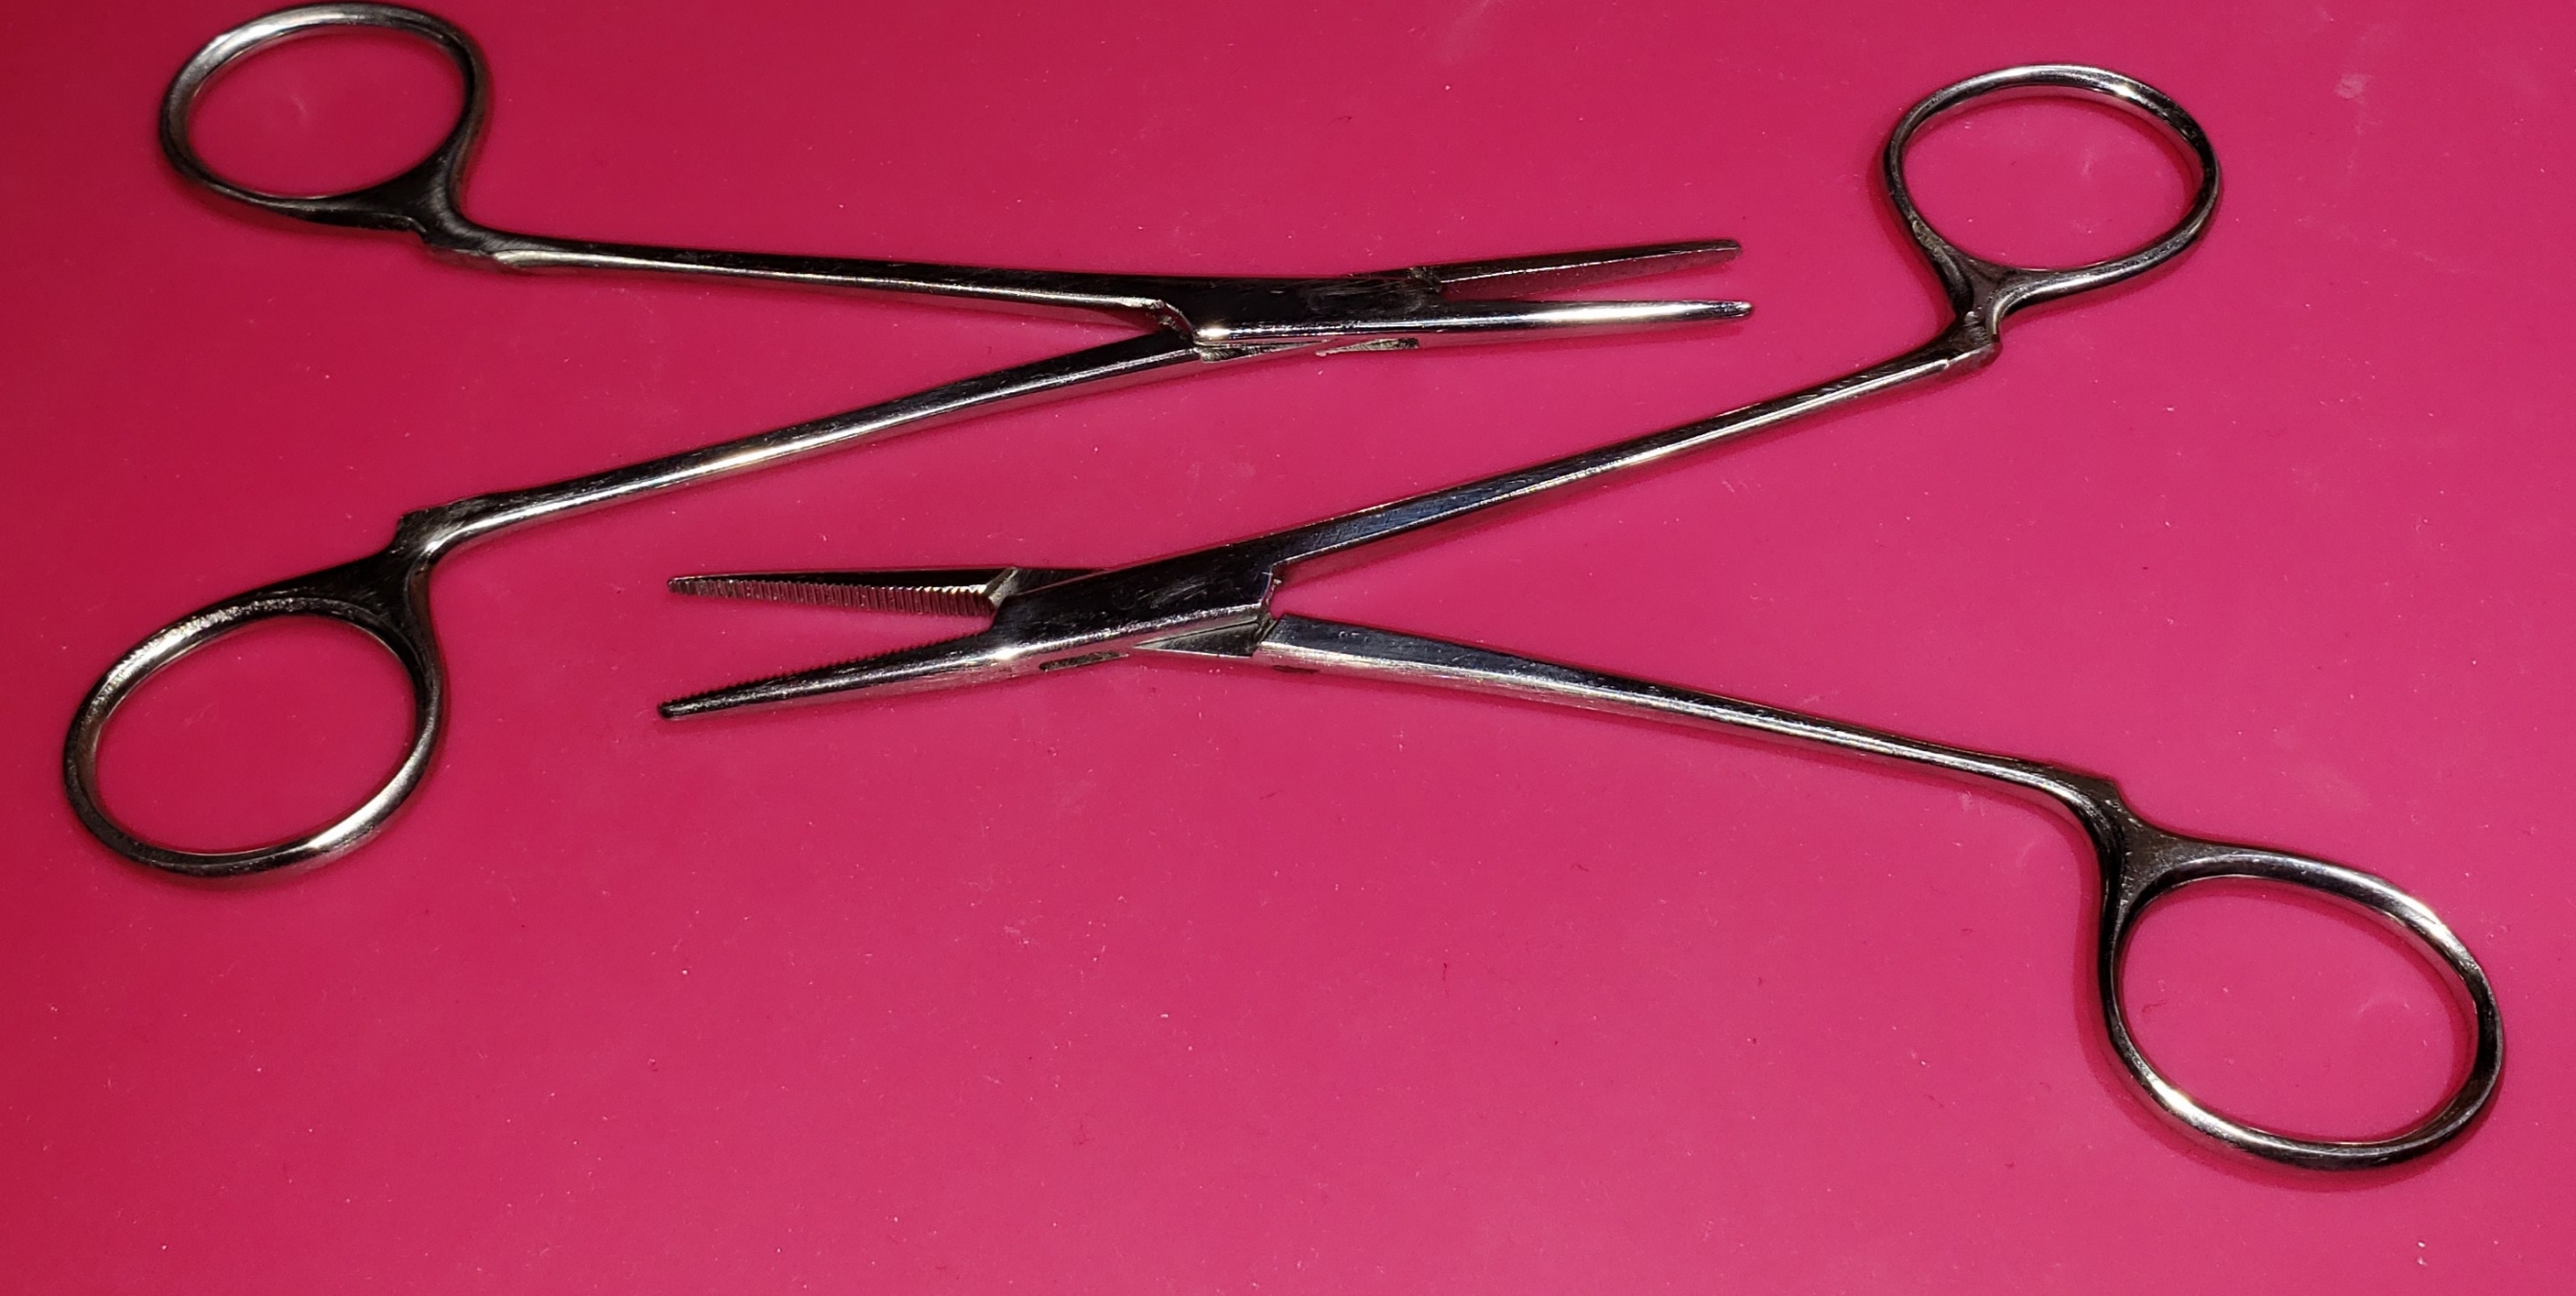
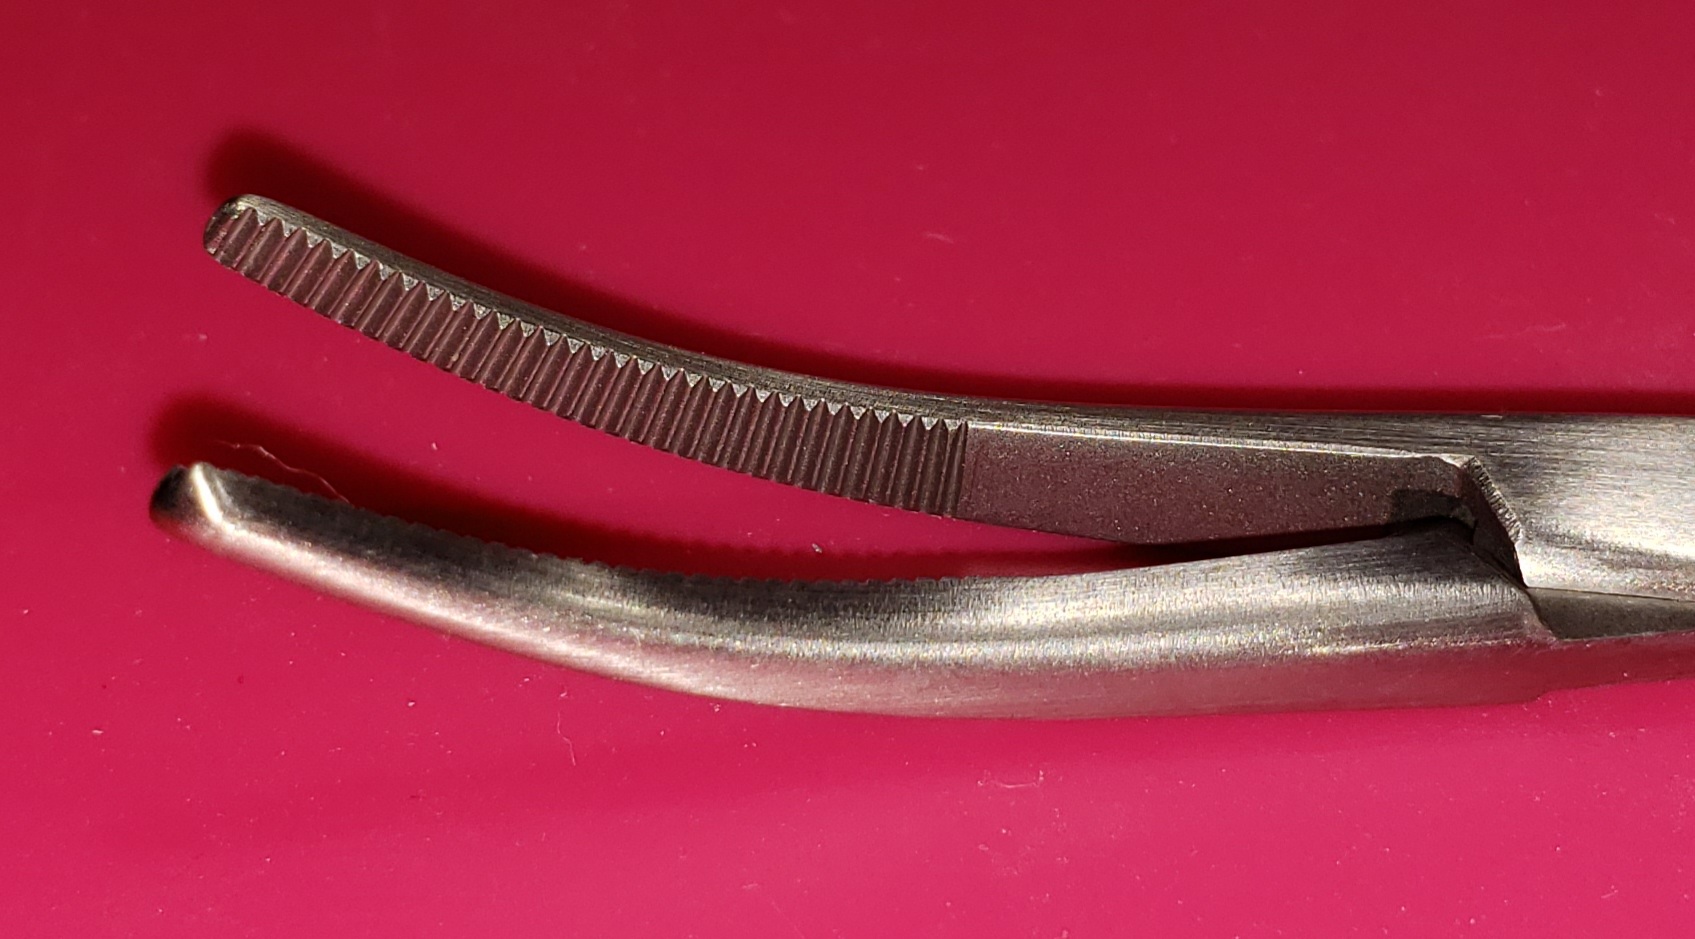
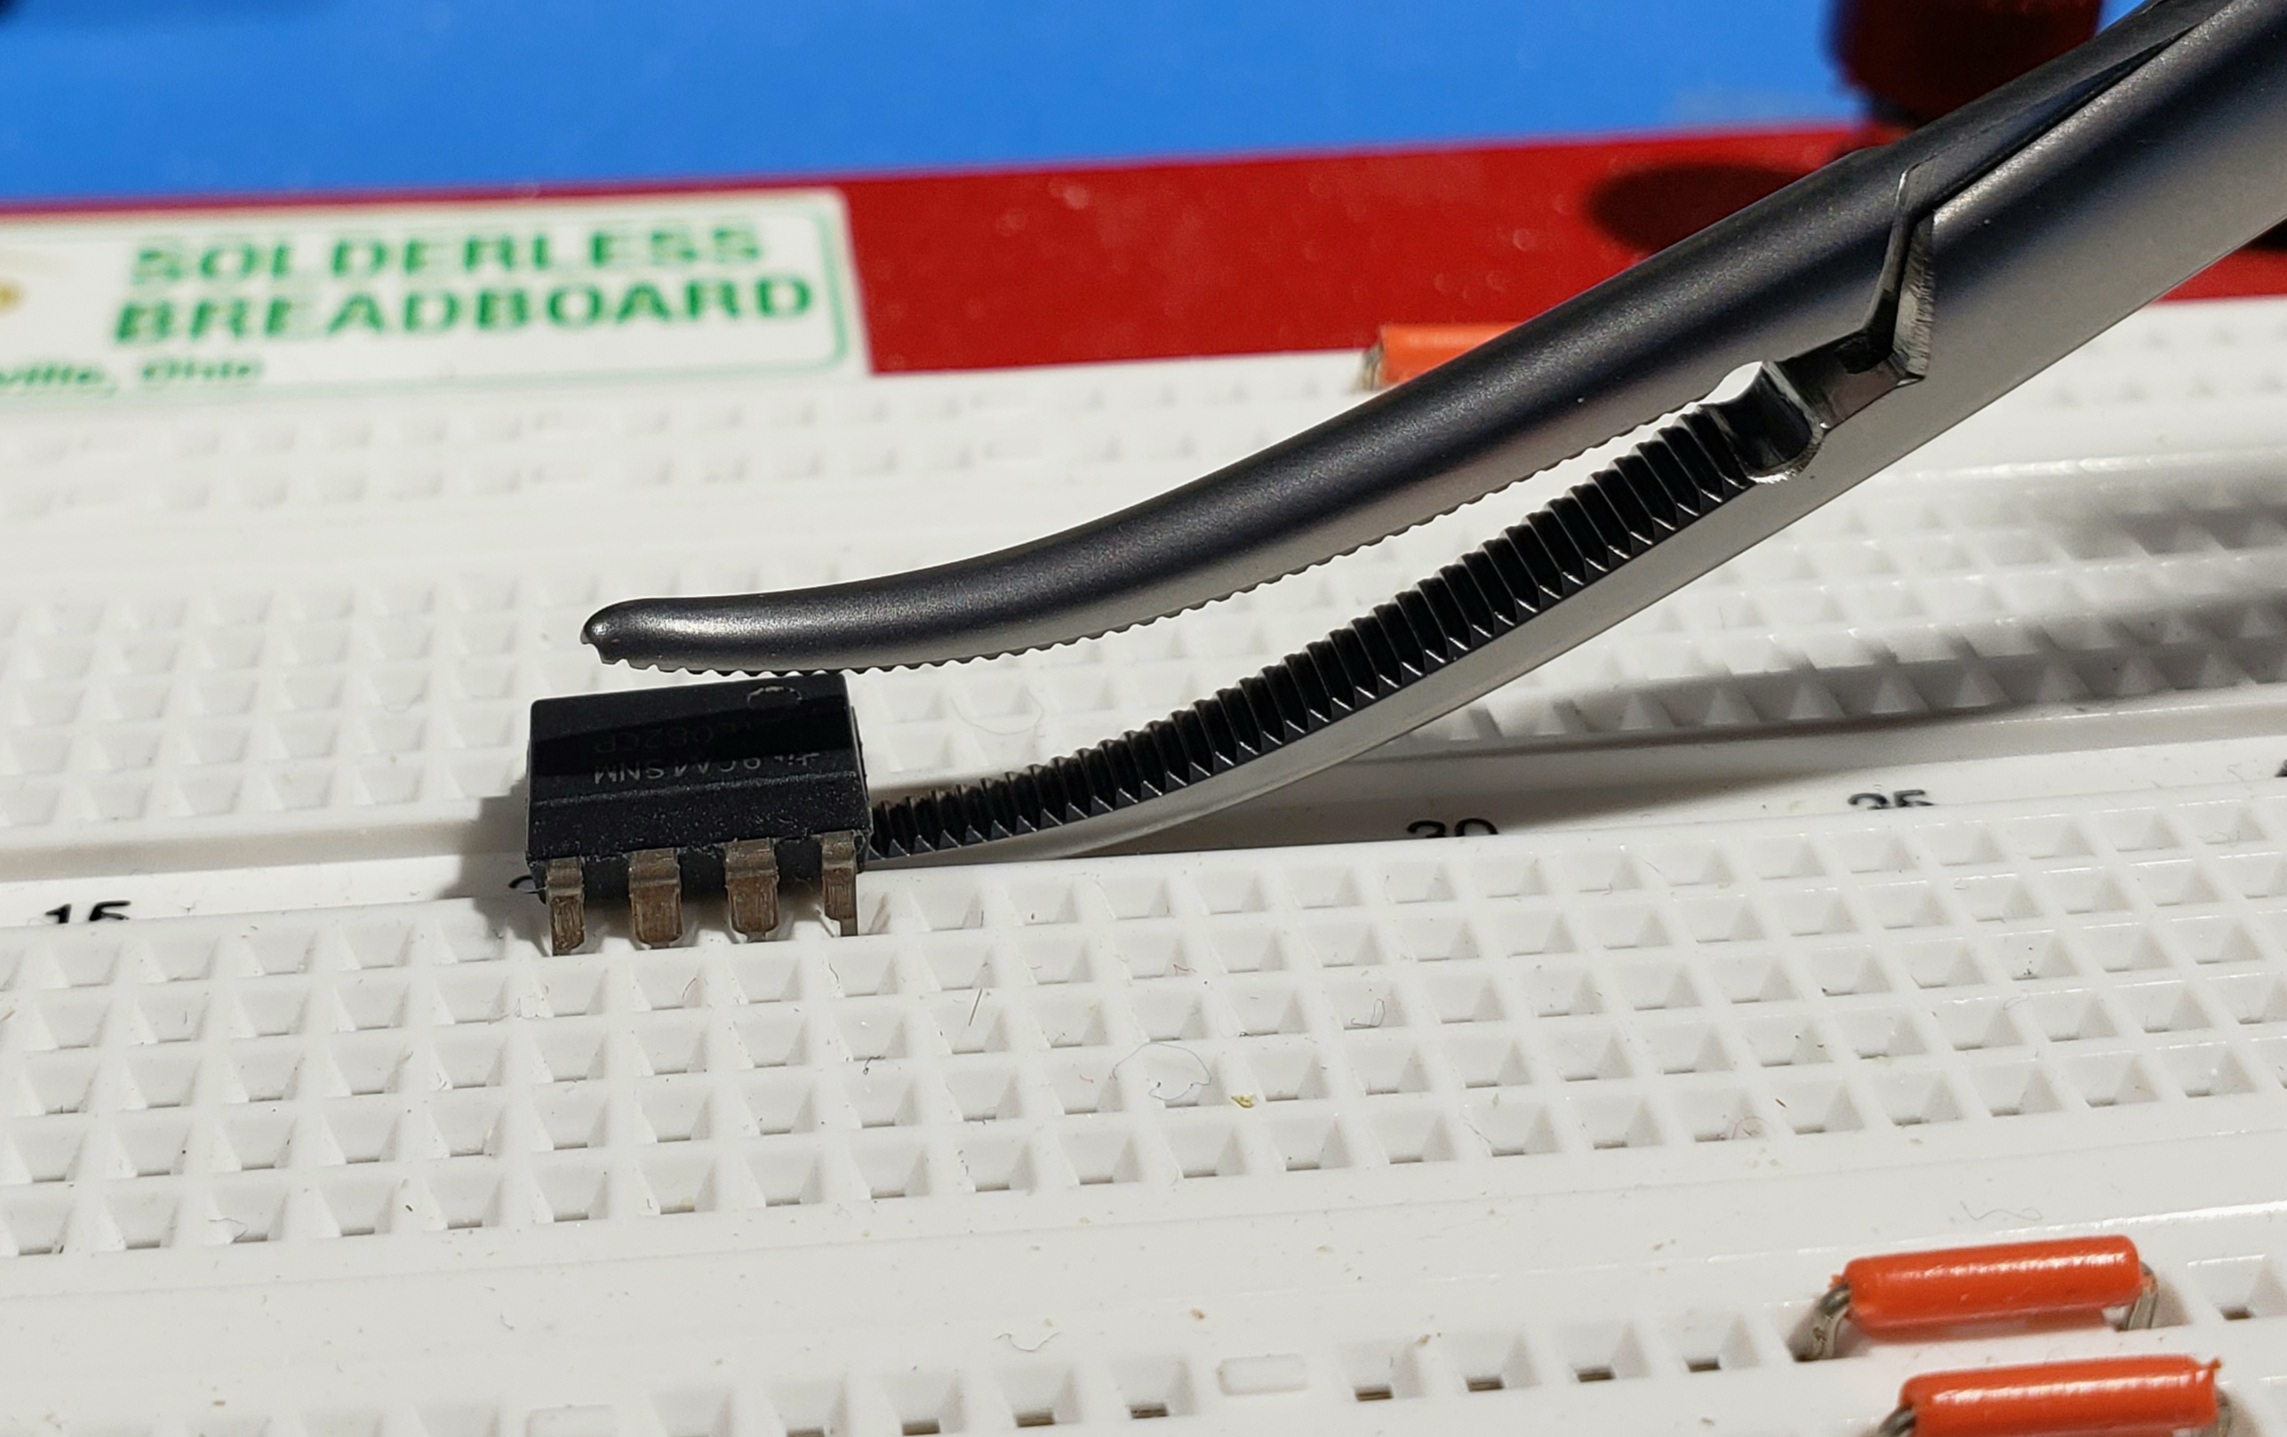
One thing about hemostats is that they lock. Sometimes that's annoying. So one day I took my Dremel rotary tool and cut off the lock on a hemostat. It changed my life. Seriously, there is nothing better for pushing components and jumper wires into a solderless breadboard – or pulling stuff back off when you are done. The two below were inexpensive hemostats I purchased for a class at university in the early 1990's. I modified them soon after purchase, and they are still going strong today:
14.3.9. Hemostat Advice?
14.3.9.1. Finding Products
- Before you buy anything, shop around! Check out the full catalog of a few dental and surgical suppliers. There are so many specialized instruments to choose from, and sometimes one of them has a perfect bench application.
- When searching for products, note that many instruments I lump into the category "hemostats" are frequently listed as "forceps" or "pliers".
14.3.9.2. Quality
- Quality
- Match quality to your use case. My disposable ones are great for breadboarding, but not for working with hard materials.
- Don't be fooled by vendors advertising an instrument as "made with German steel". While these instruments may be made with quality steel, they may also be quite poorly manufactured.
- Don't be fooled by vendors advertising "OR Quality" or "OR Grade". That's just marketing.
- Gold handles don't mean anything when it comes to quality. On the value products, that coating will rub off quickly. In my toolbox the gold handles are all on value brands. :)
- For use with harder materials, or just for longer wearing jaws, look for hemostats with tungsten carbide inserts in the jaws.
- The product names frequently contain "TC" or "T/C", but not all products with "TC" in the name are tungsten carbide! Verify the description really indicates Tungsten Carbide.
- Oddly enough TC products may be economical options. TC instruments from some of the inexpensive brands are quite nice, and compare very favorably to non-TC, but deferentially hardened, products from more expensive sources.
- One word of warning is to avoid lower cost TC instruments with specialized teeth – like 1x2 tissue jaws. Low cost manufactures have a hard time getting these right.
- For larger, stronger frames look for "bone" or "orthopedic" products.
- Another source for stronger instruments are dental wire bending hemostats/forceps.
- They have very short, but wide jaws.
- Most of them come with TC inserts.
- Be careful with these! The long handles and short jaws develop tremendous pressures – you can easily take a bite out of a penny!
14.3.9.3. Jaw shape
- Straight
- just like straight pliers
- Bent
- Just like bent, pliers
- Bent Flat (Dandy)
- The bend is in the plane of the handles. These are sometimes called "Dandy Forceps".
Dandy Forceps are fantastic for getting under a component on a board, and prying it off.
14.3.9.4. Serrations
- Normal
- Orthogonal to the jaws – the way pliers are normally serrated.
On quality instruments, these serrations will follow the curve of the jaws.
On quality instruments, these serrations should line up perfectly, and the outside edges are usually beveled:


- None
- Instruments are available without serrations. For example the "Webster Needle Holder".
- Diamond
- These are frequently seen on needle holders. Because of the size, they tend to be easily damaged. For this reason prefer TC instruments if a diamond pattern is required.
- Other parallel serrations
- Parallel serrations are found in several other patterns. Typical options are serrations on a diagonal, or at 90 degrees from Normal.
- Thread & needle channels
- These are orthogonal to the jaws, like normal serrations, but deeper. Some groves are for holding things – like a suture needle. Other groves are to allow things to pass – like suture thread.
- Needle groves
- Usually parallel to the jaws.
- Exotic Additions
- In addition to typical serrations, some jaw patterns add additional traction elements. For example, offset pattern serrations with groves. As another example, some instruments have "fangs" in a 1x2 or 2x3 pattern. These are frequently called "tissue forceps".


These fanged instruments are handy for removing wires and small components – especially when pulling stuff out of a solderless breadboard.
- Beyond serrations
- Many instruments have jaw specializations that go beyond simple "serrations". For example, here is a cylinder hemostat designed to hold on to the end of round probes.

14.4. PCB Support
14.4.1. Stickvice
The Stickvice is by far my favorite solution for holding PCBs for soldering. Mine is modified a bit. I have put the stock, nylon pads on the bottom of the vice and two PTFE pads on the top. This allows me to position the PCB at about 25mm or 32mm above the surface of the table. This is just enough space to allow for most of the taller components I work with. The design of the Stickvice is such that moving the board horizontally is just a matter of sliding the whole thing on the table – I prefer to move the board instead of my microscope head. Flipping over the PCB is as simple as flipping over the Stickvice, or squeezing and flipping over just the PCB. Lastly, with the modifications I have made, it is easy to move the PCB into a vertical position for soldering troublesome components.
Note the Stickvice is easy to hack. The only modification I feel is essential is to replace the stock nylon jaws with the high temperature PTFE ones – at least if you plan on using a soldering iron near the jaws. If you work on bigger PCBs, then you can replace the Stickvice bar with one of any length you require. I stacked PTFE and nylon jaws to add height to my Stickvice, but you can also just use standard stand-offs to do the same.
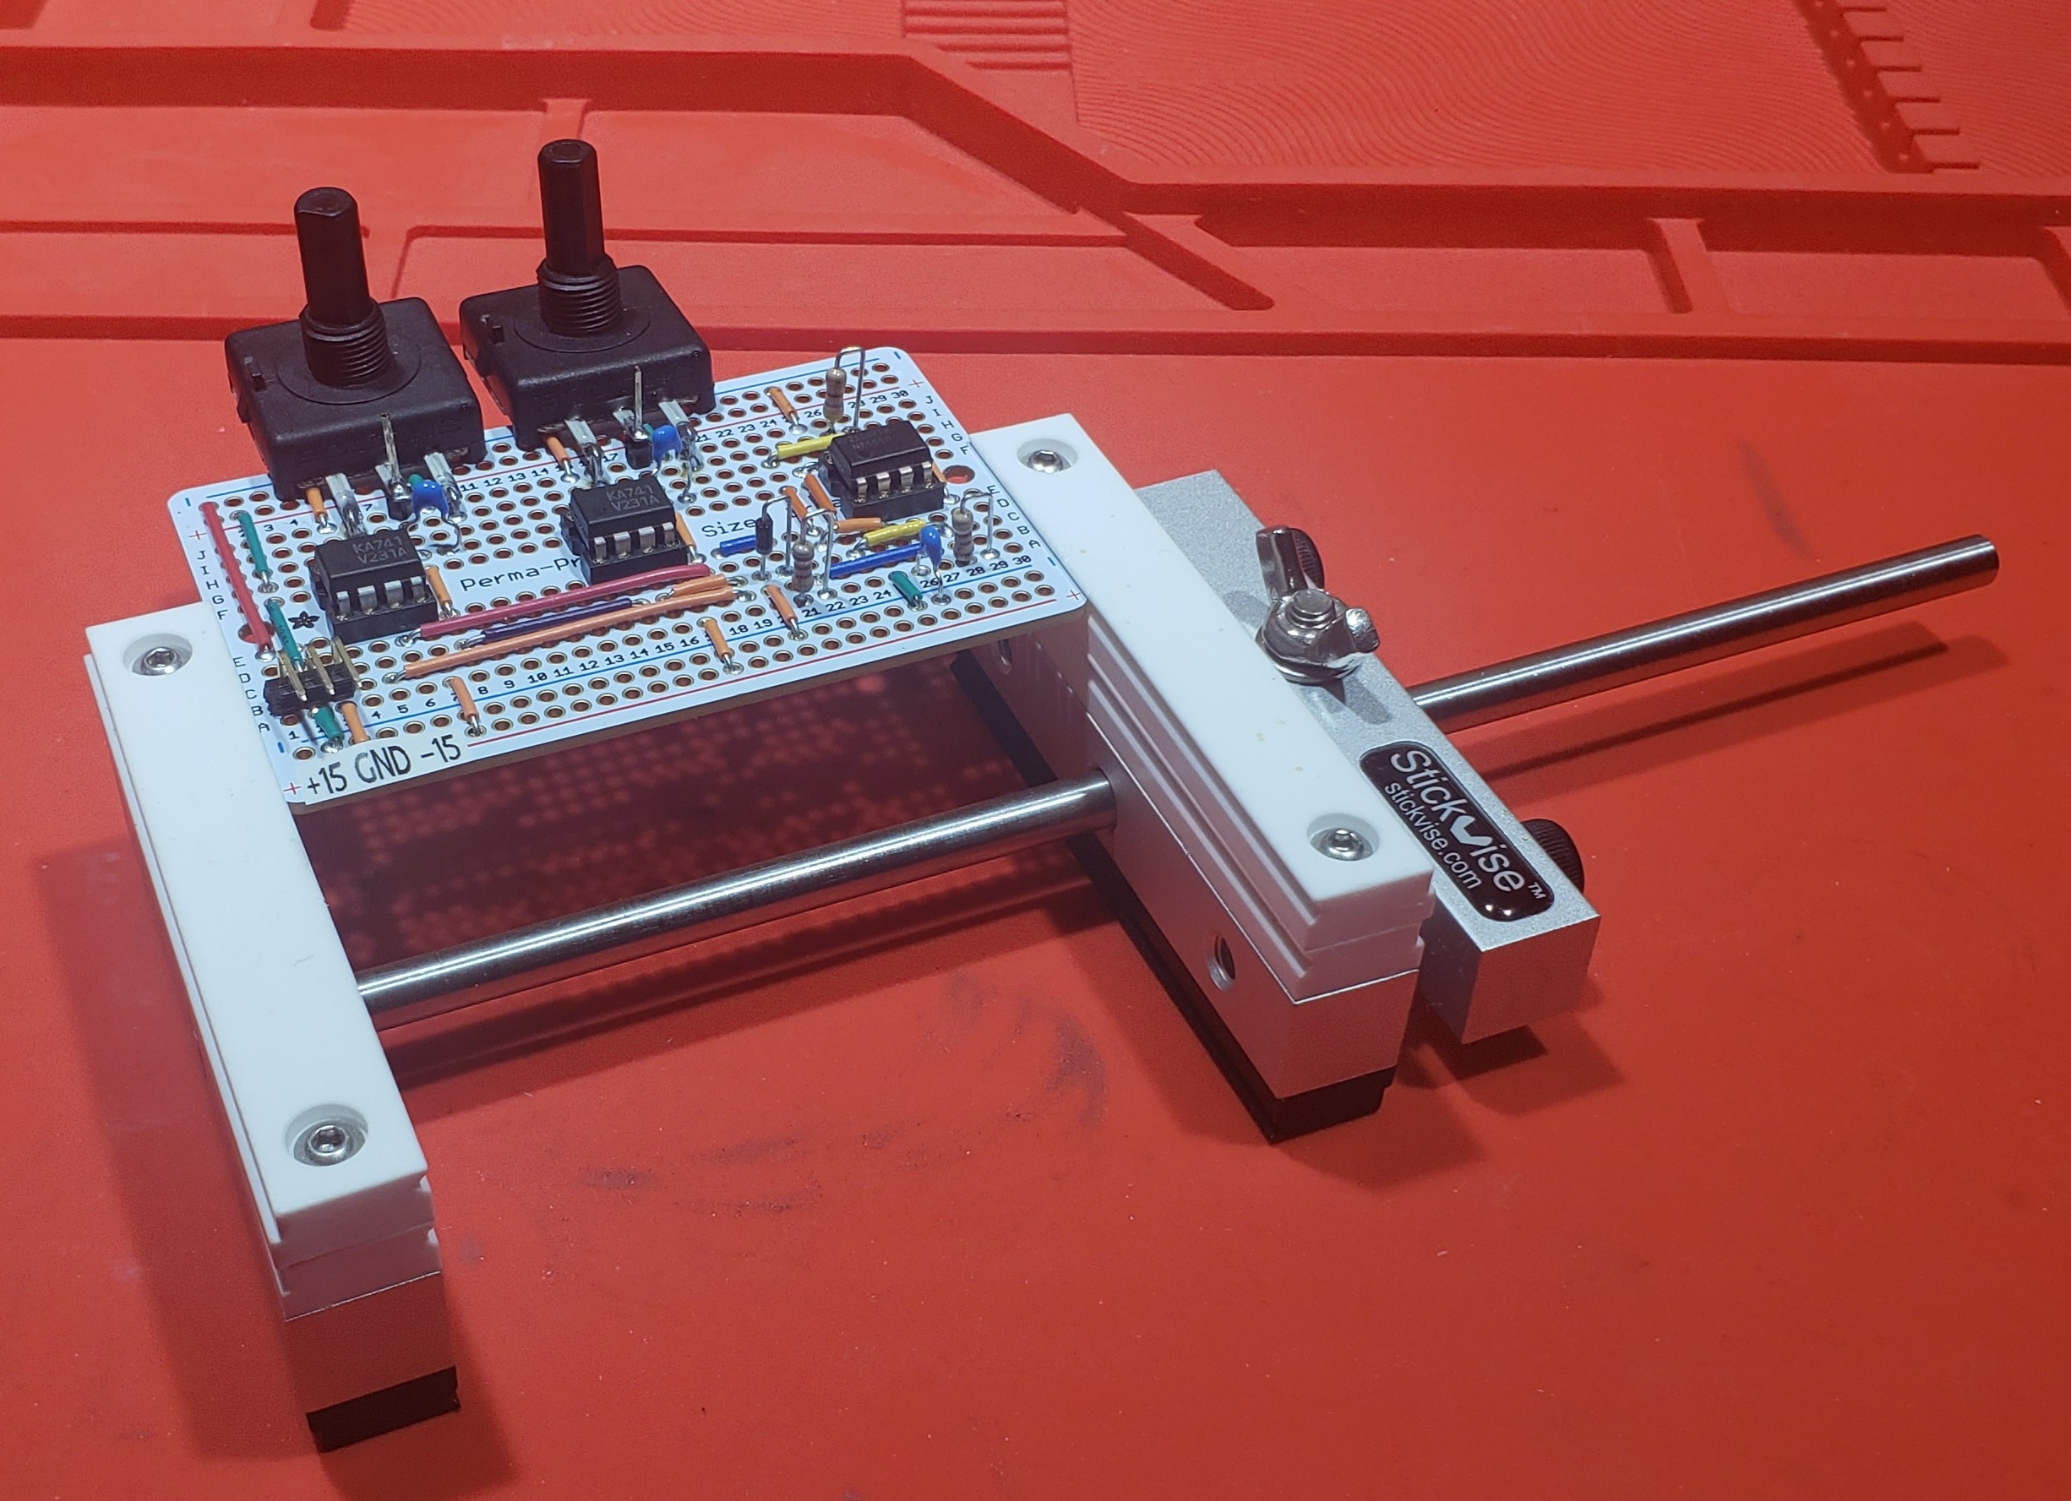
The Stickvice lives in the Gerstner chest on my soldering station:
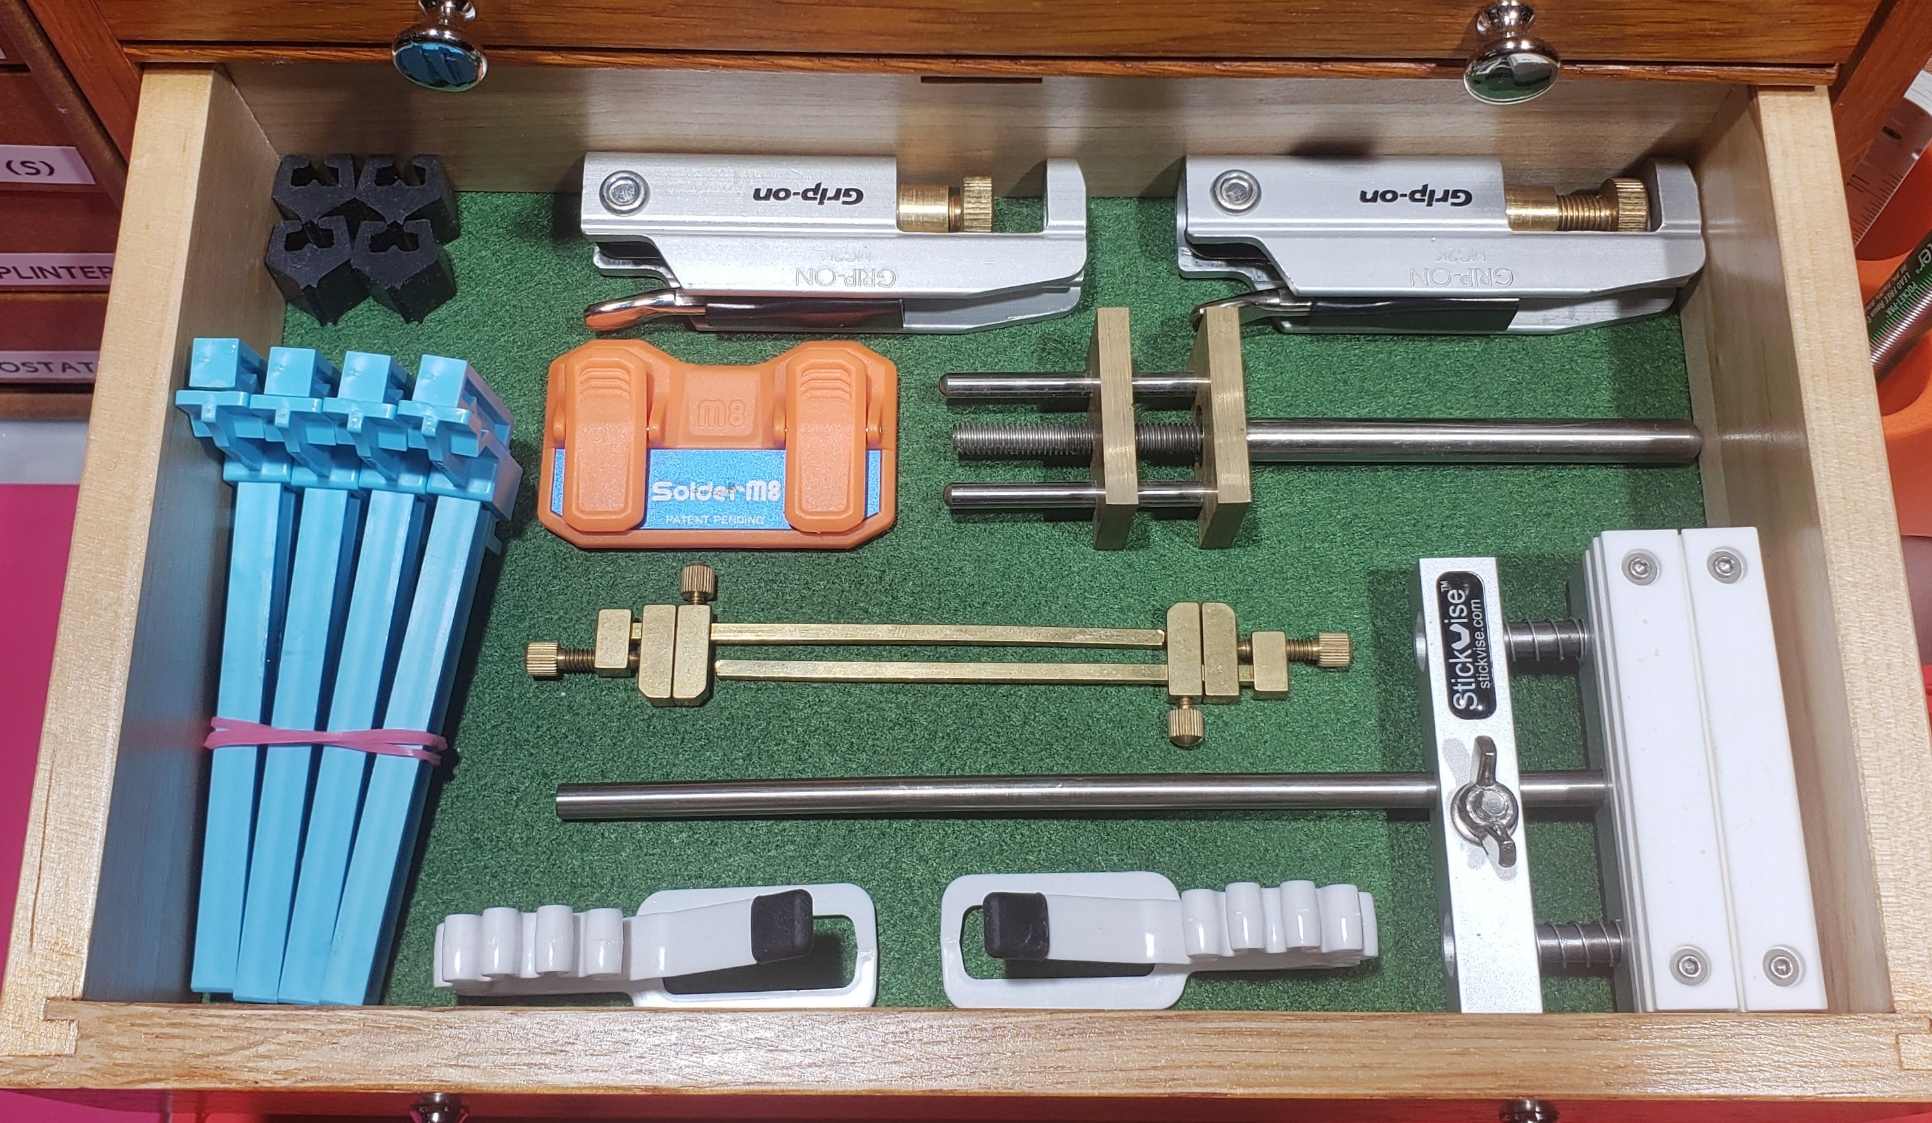
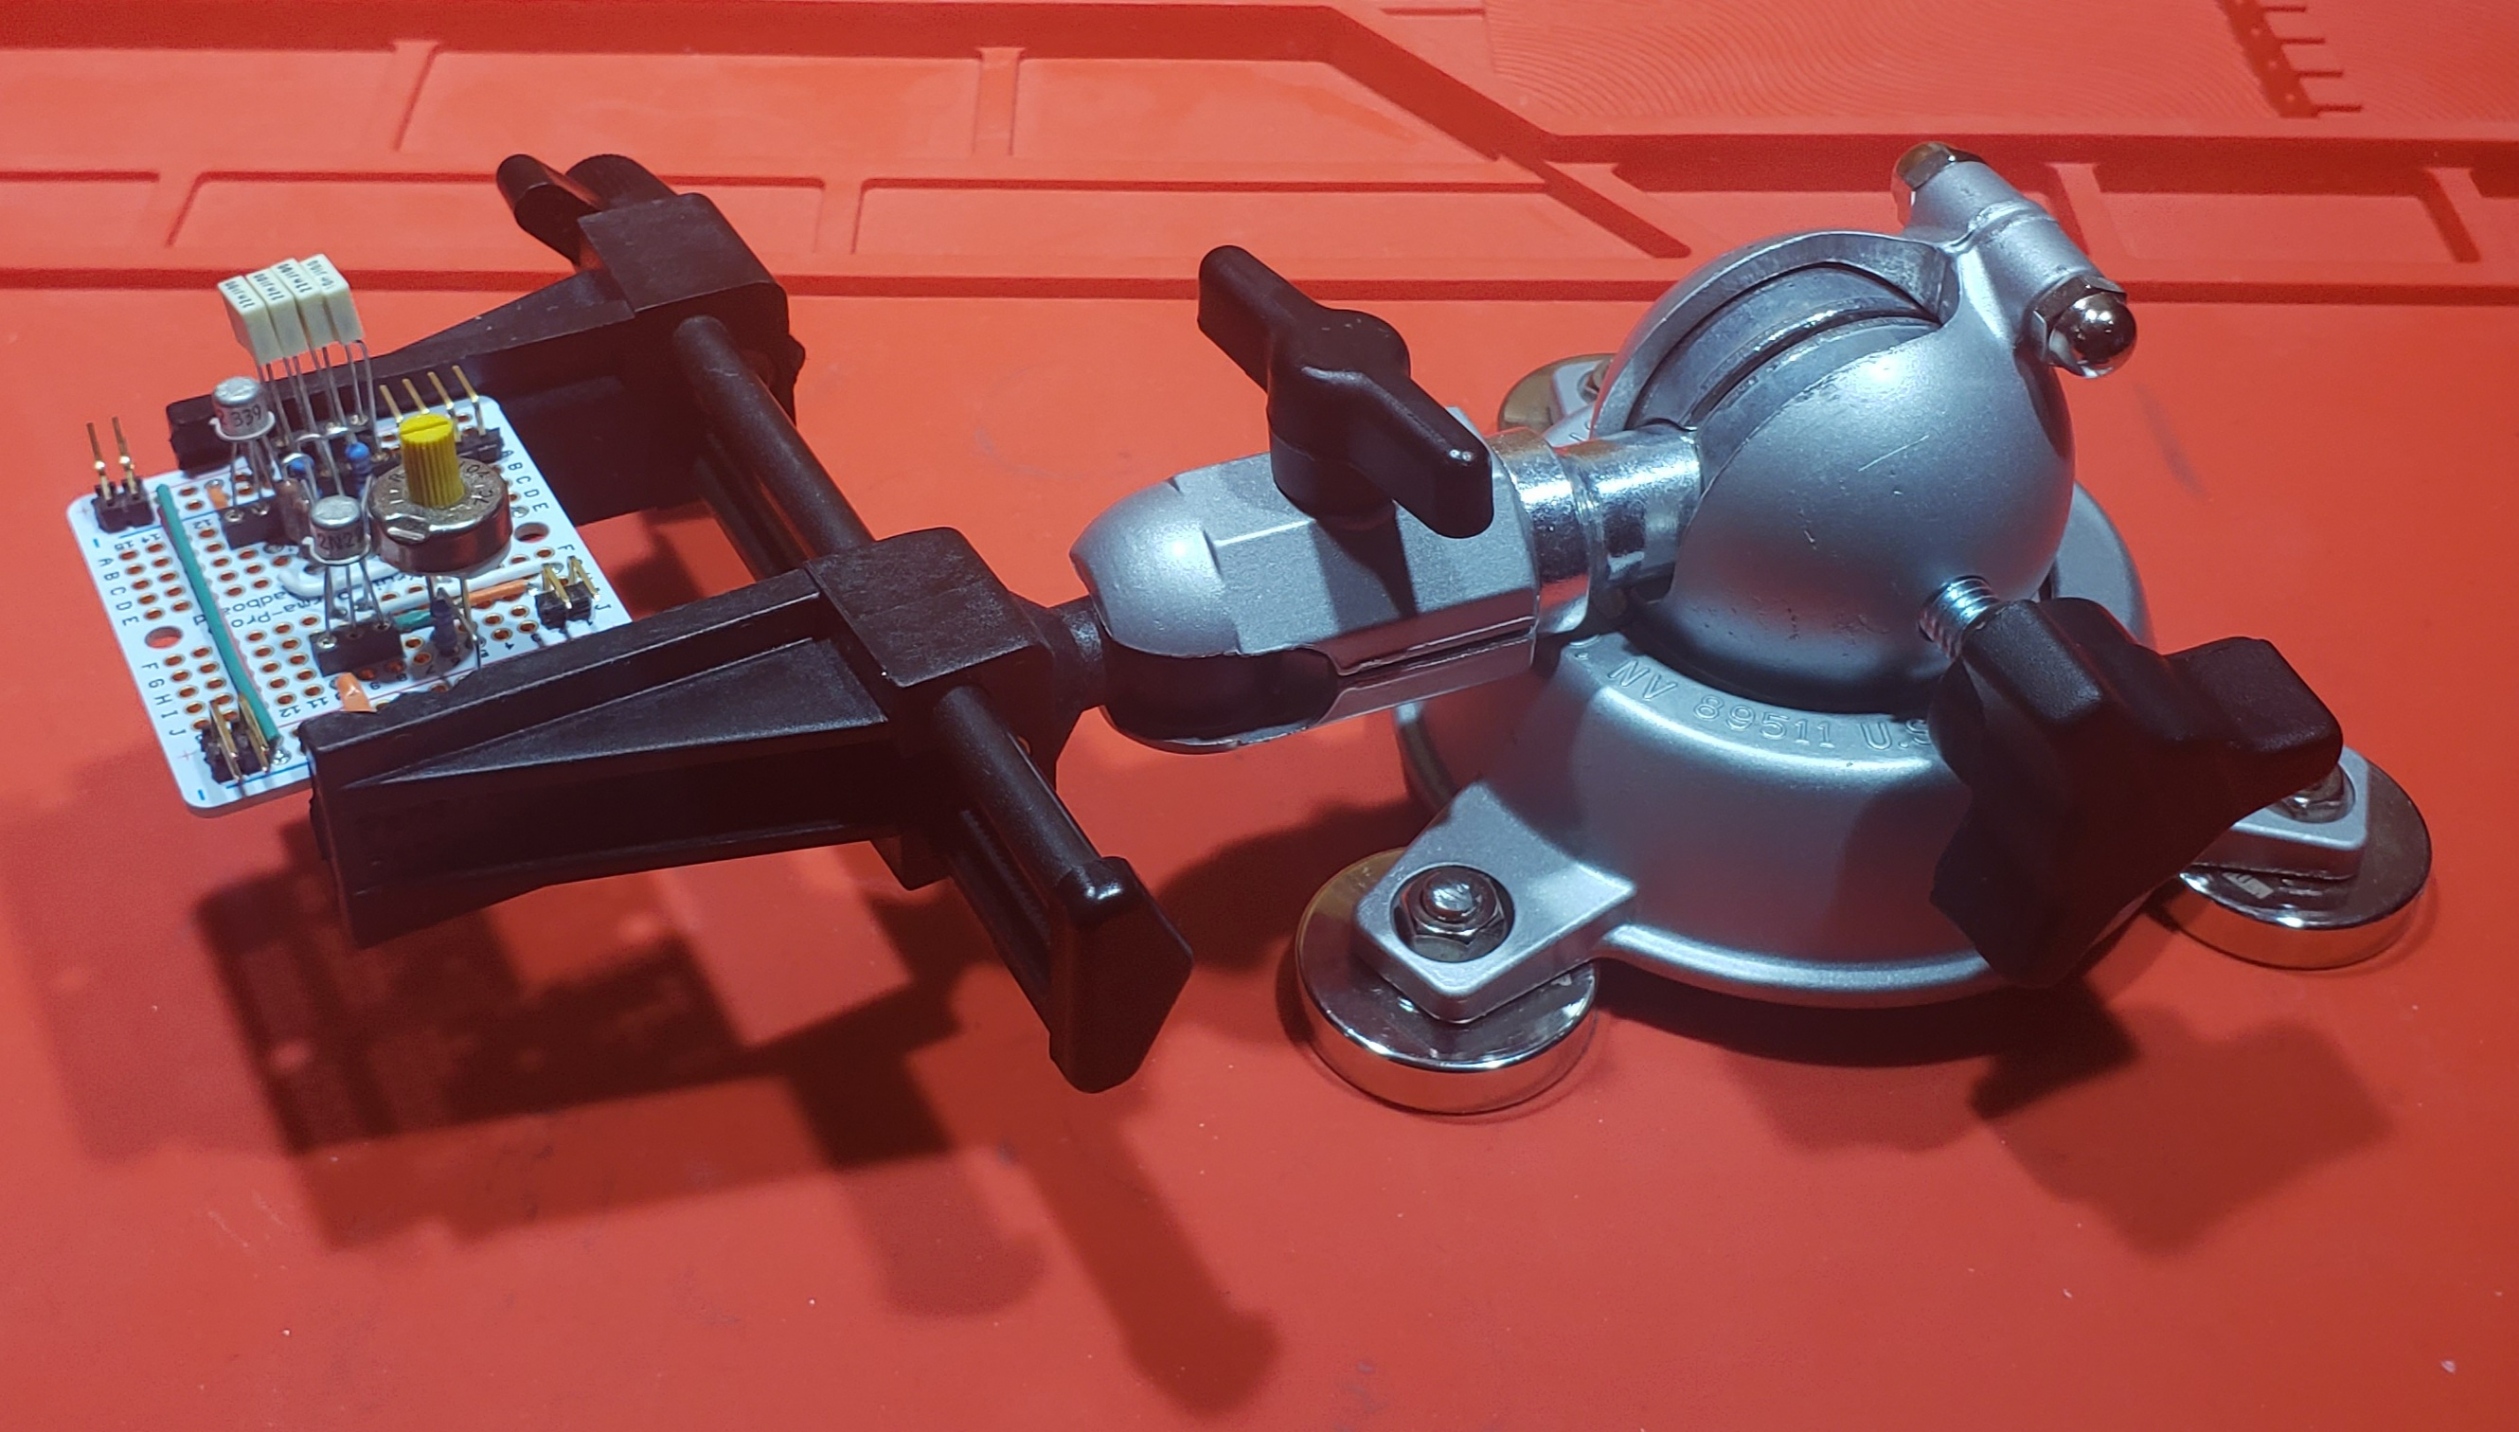
14.4.2. PanaVise
I have a Low-Profile Base (305) to which I have attached magnetic feet via the base mounting holes. For this base I have two heads.
The first is the "Junior Head" (203). Note this is the modular junior head for the 300 series base, and not the integrated solution that includes a head. This solution will hold a board about 73mm wide. When flat, as shown in the image below, the board is about 25mm above the table surface. By loosing the knob one may flip the board over, or position it at any angle between zero and ninety degrees.
The jaws are reinforced thermal composite plastic capable of withstanding a sustained 350 degrees Fahrenheit and intermittent heat up to 450 degrees. So it can take the occasional bump with the soldering iron.
The second head is the "Junior Mini Circuit Board Holder Head" (217). This head can holder larger PCBs up to about 114mm in width. Like the 203, it allows the board to be held horizontal to the work surface about 25mm above, and allows adjustment of the angle up to ninety degrees. This head is quicker to adjust to the size of the PCB, and has a quick release – adjusting the 203 can be a pain. Another advantage of this head is that it comes with silicone rubber standoffs if the board has components that hang over the PCB edge.
The vice base is stuck to the metalic strip on other bench right beside the soldering station. The vice heads live in the Gerstner chest on my soldering station:
14.4.3. Hakko Omnivise
I use the Omnivise for PCBs too large for the Stickvice. I also normally use the Omnivise for one sided PCBs with components too tall for the Stickvice – the Panavise being used for tall, but smaller, two sided PCBs.
The Hakko Omnivise is a great product – I have four of them! They require the PCB have a bit of unoccupied space on the board edge – not usually a problem in my experience. One simply puts a bit of the PCB in the vice jaws, and tightens the screw. Note the vice only holds PCBs horizontally, but it can do so at one of five fixed heights: 72.5mm, 78mm, 84.5mm, 91mm, and 97.5mm. Note that 72.6mm is a bit higher than I normally prefer, so I have to bump my chair height up a bit to put the microscope at an ergonomic level. Smaller boards can be held with just one Omnivise as shown in the image below.
Larger boards can be held up with more than one vice. A typical motherboard might have one vice on each side. The 15 inch wide board in my old oscilloscope gets an Omnivise on each corner. The size of the PCB is really only limited by the size of your table.
Moving the PCB horizontally is a matter of simply sliding the vice on the table. This is simple when using one vice, but cumbersome with using more than one. Flipping the board over is a matter of loosening the vice, flipping the board over, and tightening it back up again – a bit fiddly, but reasonable when using only one vice.
The Omnivise is usable for holding PCBs for probing; however, it holds them a bit higher than typical solutions. It works fine with the sensepeek probes.
I have one Omnivise on my electronics workbench and three Omnivise units setting on my soldering station just to the right of the Gerstner chest:
14.4.4. Sensepeek PCBite
I really love the sensepeek solution on my main electronics workbench where I use it for holding PCBs being probed. The PCB holder and the probes are a fantastic solution for getting probes on point when debugging. I can't recommend the solution highly enough. It's awesome.
That said, I don't really use it for soldering because I find it a bit fiddly:
- I like to move a board around horizontally instead of moving my microscope head, and moving the PCB with the sensepeek involves moving the four posts simultaneously. Inevitably one of them snaps off the board, and must be reattached.
- Flipping the board over involves unclasping it from four posts, flipping over, and then clipping four posts back in place.
- It is unable to hold the PCB vertically – something I sometimes need to do for odd parts.
I do know lots of people who mainly work on one sided, surface mount designs who happily make use of the sensepeek for soldering. Unfortunately most of what I work on has two sides and bulky, through-hole components.
I use the Sensepeek probes with both the Sensepeek PCB holder and the Omnivise – Probably a 40/60 split between the two.
14.4.5. You have multiple PCB holding solutions. Which to you use?
14.5. Helping Hands
I work with a lot of through-hole components. Mostly things like PDIP packages, TO-92 packages, axial resistors, and small capacatators. I also occasionally work with larger through-hole components that are pretty awkward to solder. Things like large pots, transformers, coils, & electrolytic caps. As such, I find myself frequently needing a third, or fourth, hand to hold one of these things in place while I solder it down.
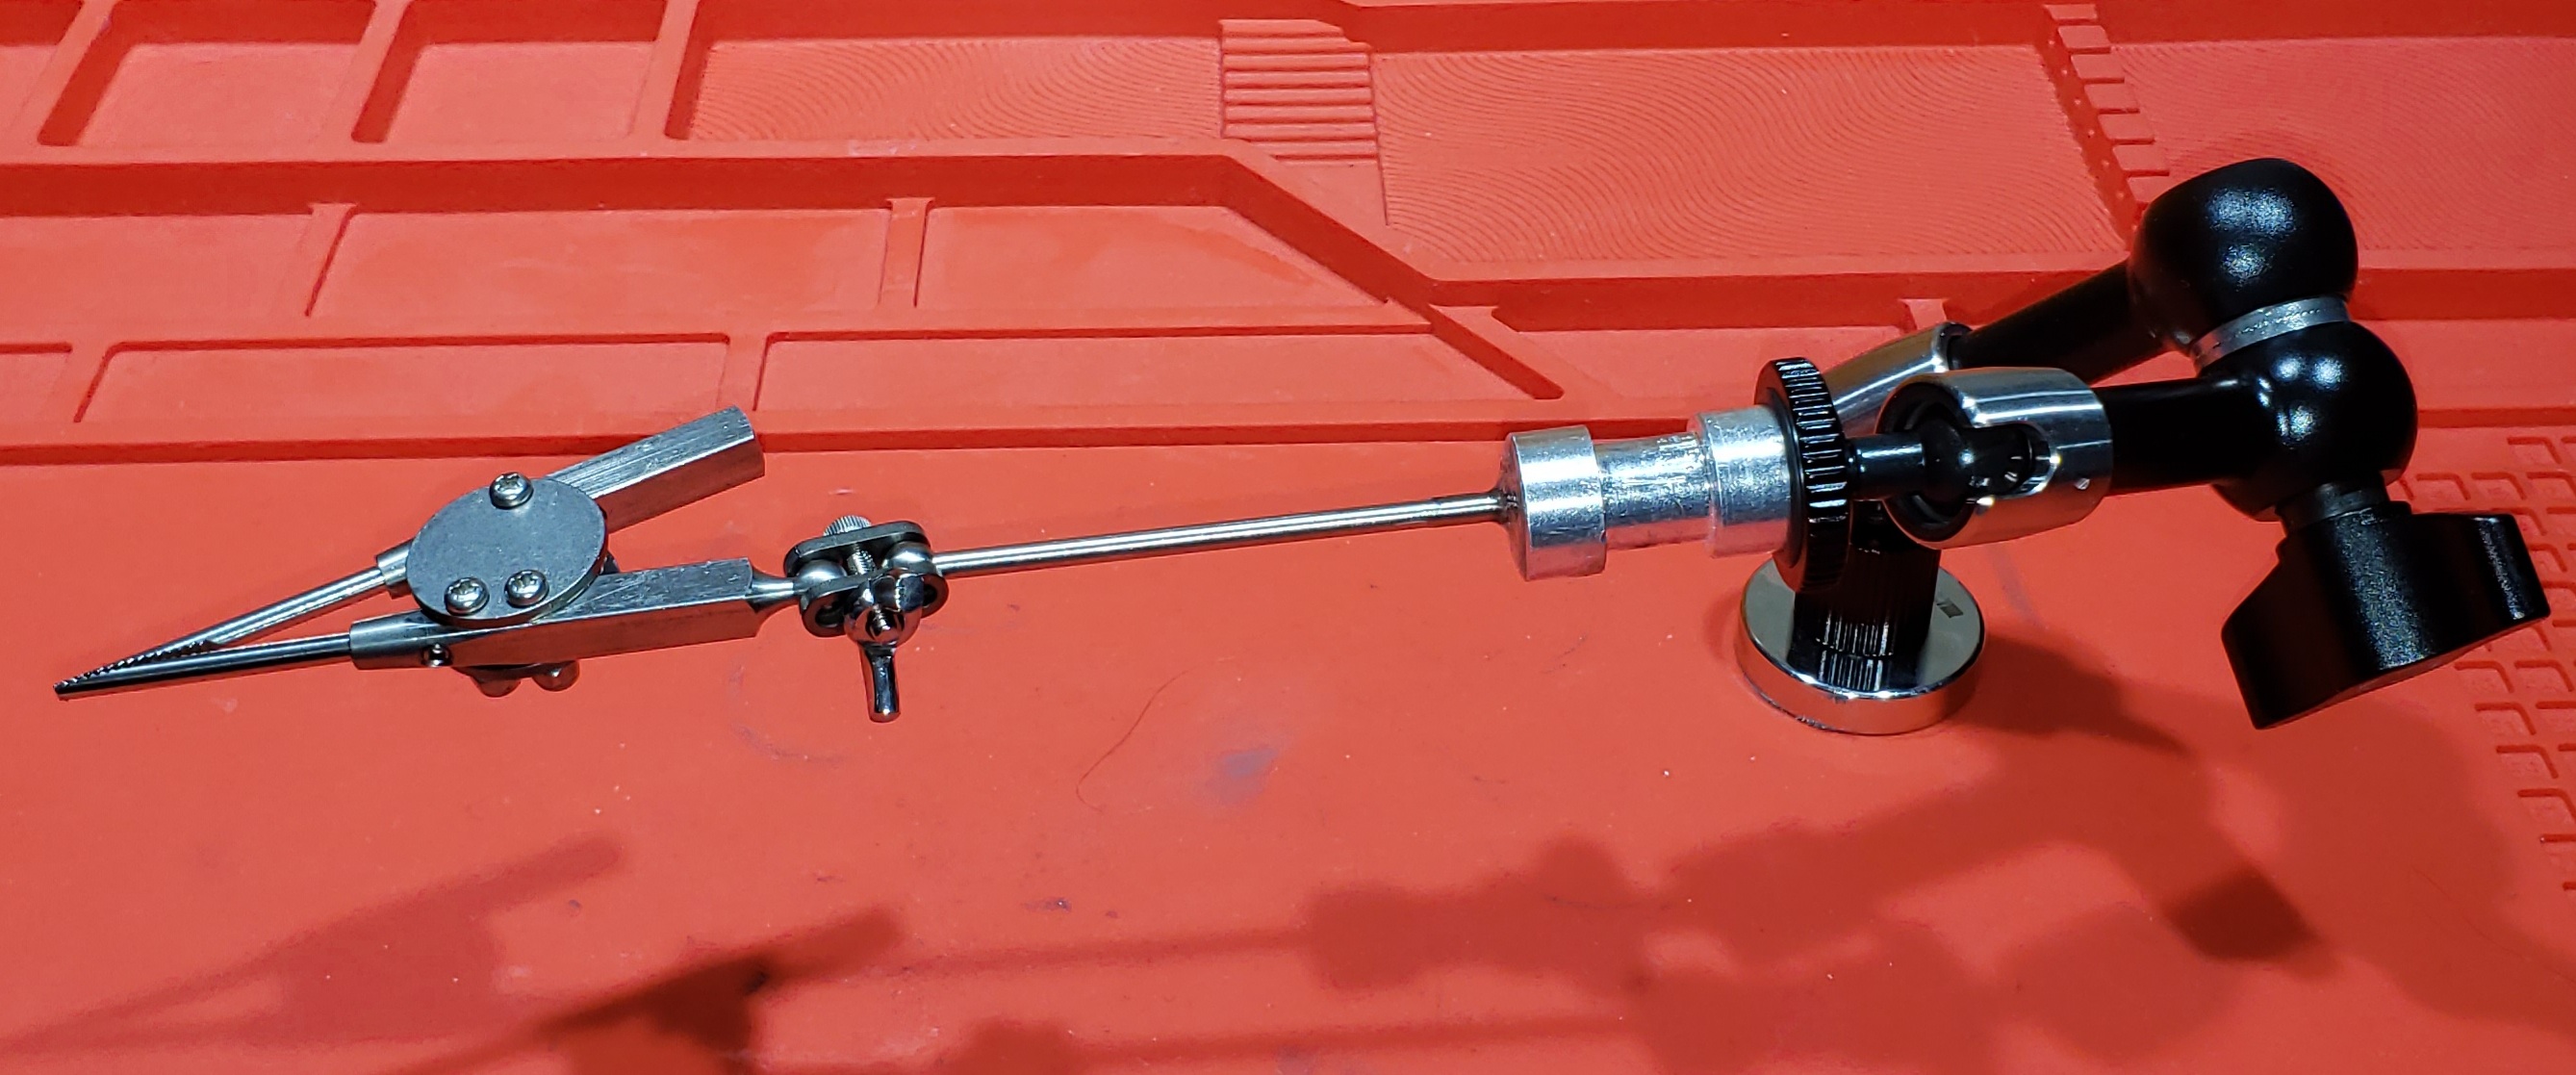
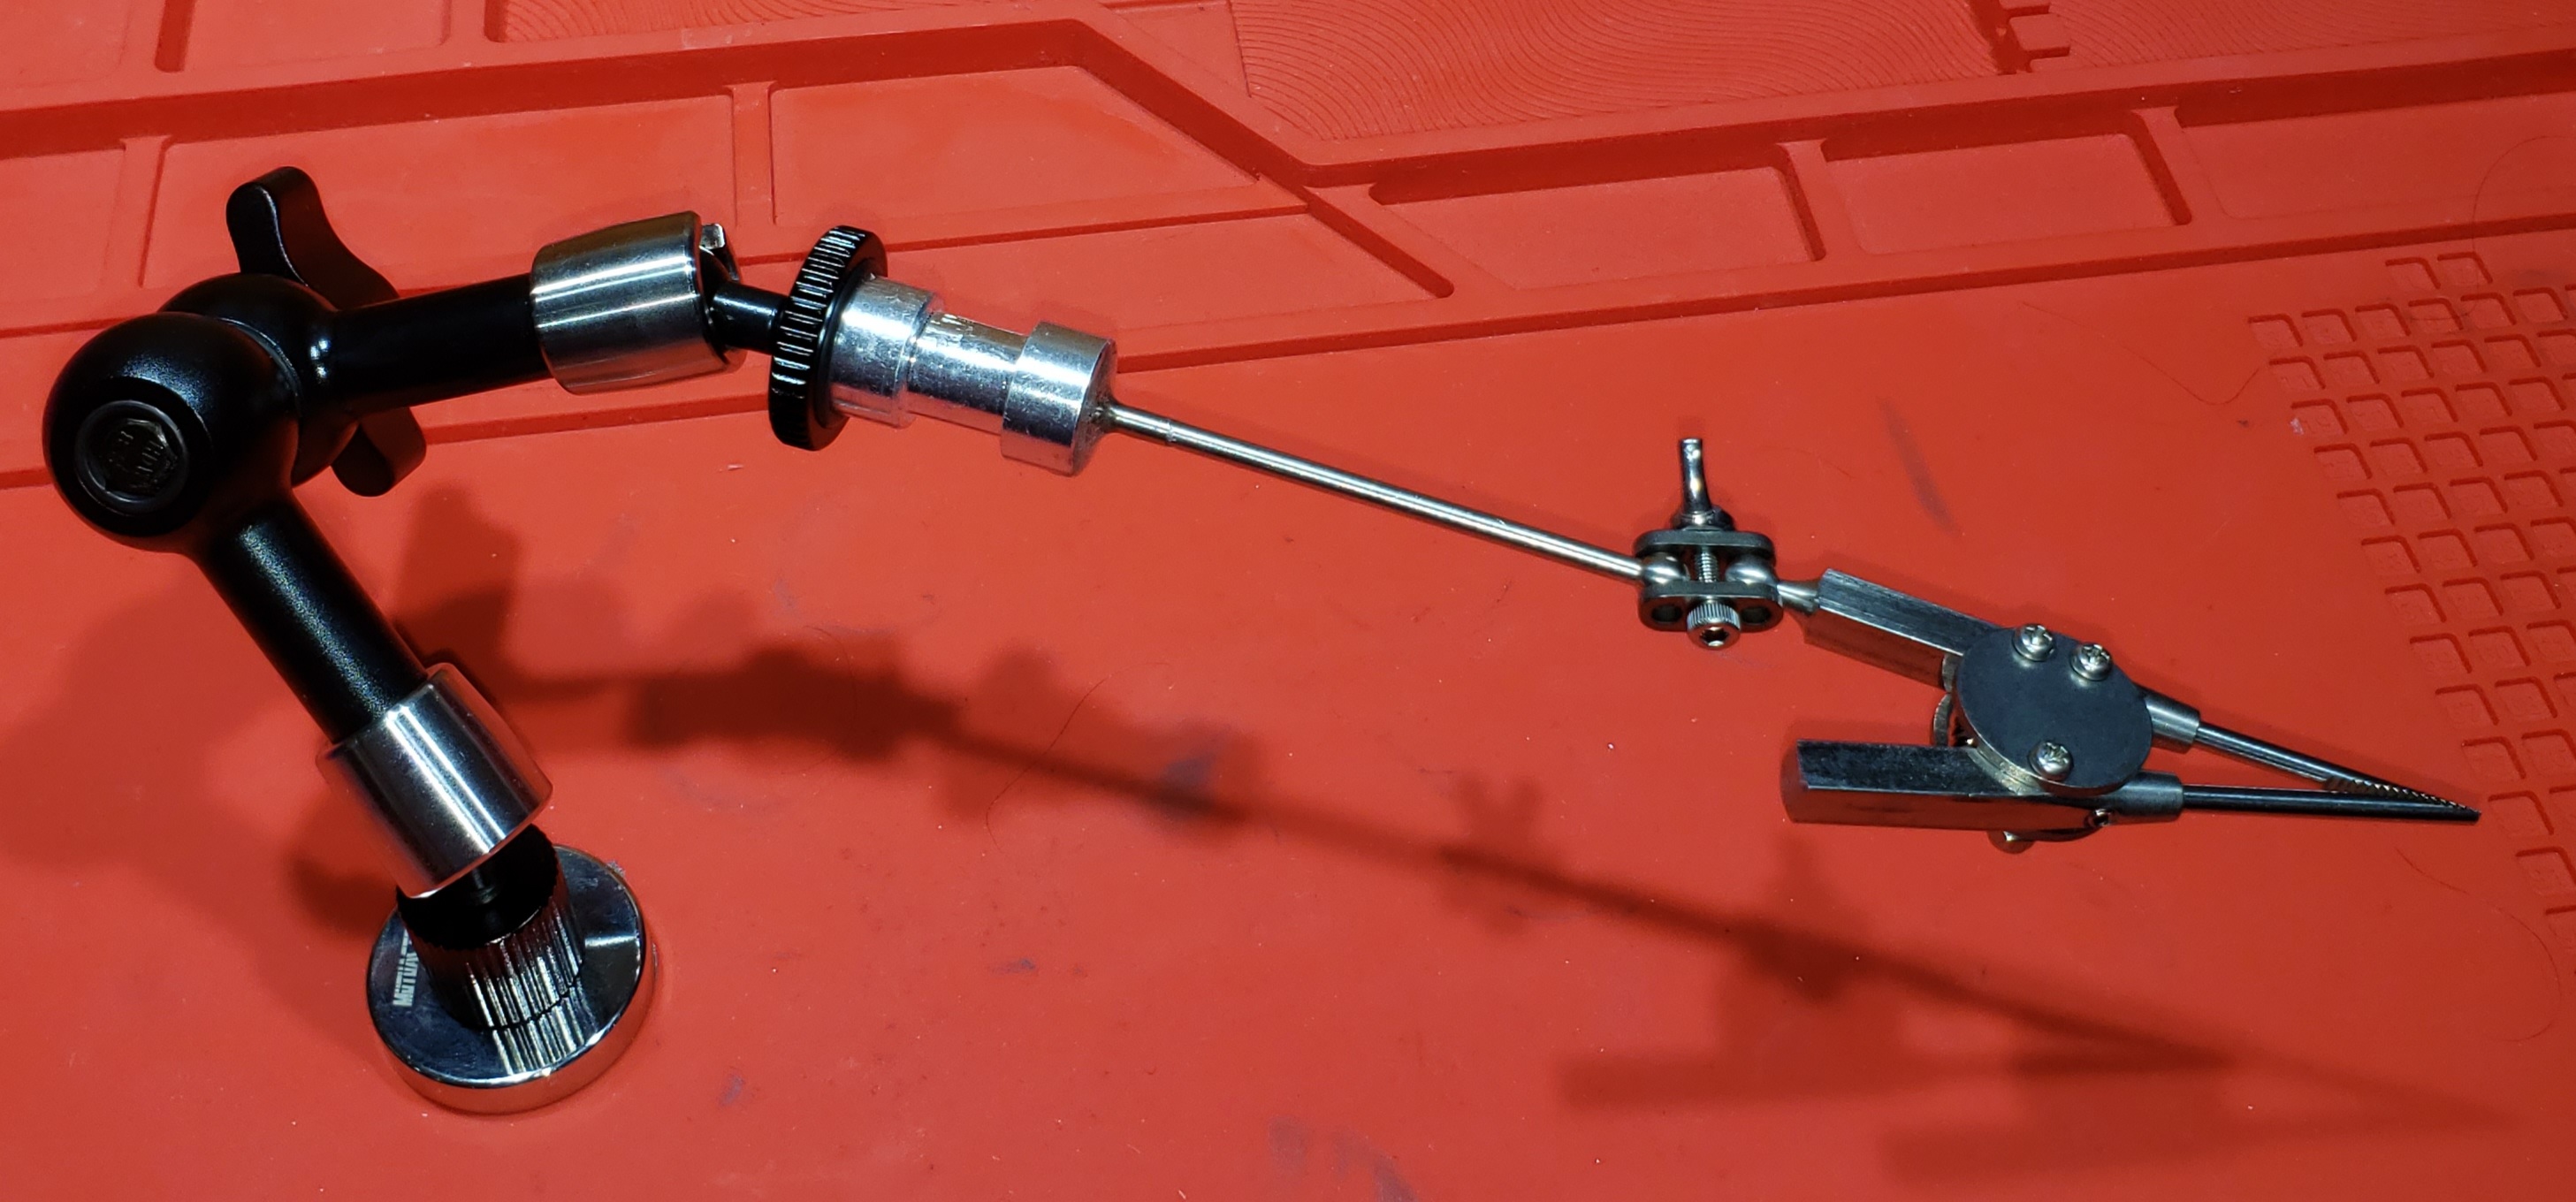
All helping hands solutions suffer from two opposing design goals. They need to be easy to position, but hold position rigidly. Somewhere on this design continuum most solutions seem to fail in my opinion. One needs pretty fine adjustable near the "hand", but pretty rigid stability overall. In other words, helping hands not only need arms but wrists. So I have made some helping hands by combining the "hand" parts of conventional helping hand solutions with the rigidly of photographic "magic arms". The two seem to really work well together allowing me to position the hand about where it needs to be, but leaving some flexibility in the "wrist" to do the final adjustment.
My first attempt was to use tweezers for "hands", two coolant tube sections for the "wrist", and a photographic magic arm for the "arm". I made two of these, and have been pretty happy with them. They have magnetic bases keeping them firmly attached to my metal work table. They have about a 12 inch reach.
While the tweezers are pretty good at holding most components, I found myself needing something with a bit more capacity for more awkward components. Thus the second set of arms. These used a smaller magnet base for these as I found the one I used before to be a bit of overkill. I used the same magic arm. Attached to the arm is a standard 1/4-3/8 photographic bolt converter into which I have epoxied the slender arm terminating in a ball. To this ball I have attached a jeweler's welding claw.
All of these helping hands live beside the Gerstner chest on my soldering station. Note the cigar box. The cigar box has large, steel washers attached to the underside of the lid so that the magnetic bases of the helping hands have something to stick to. The thickness of the wood makes the magnetic attraction just strong enough to hold them down, but not so strong they are annoying to lift up.
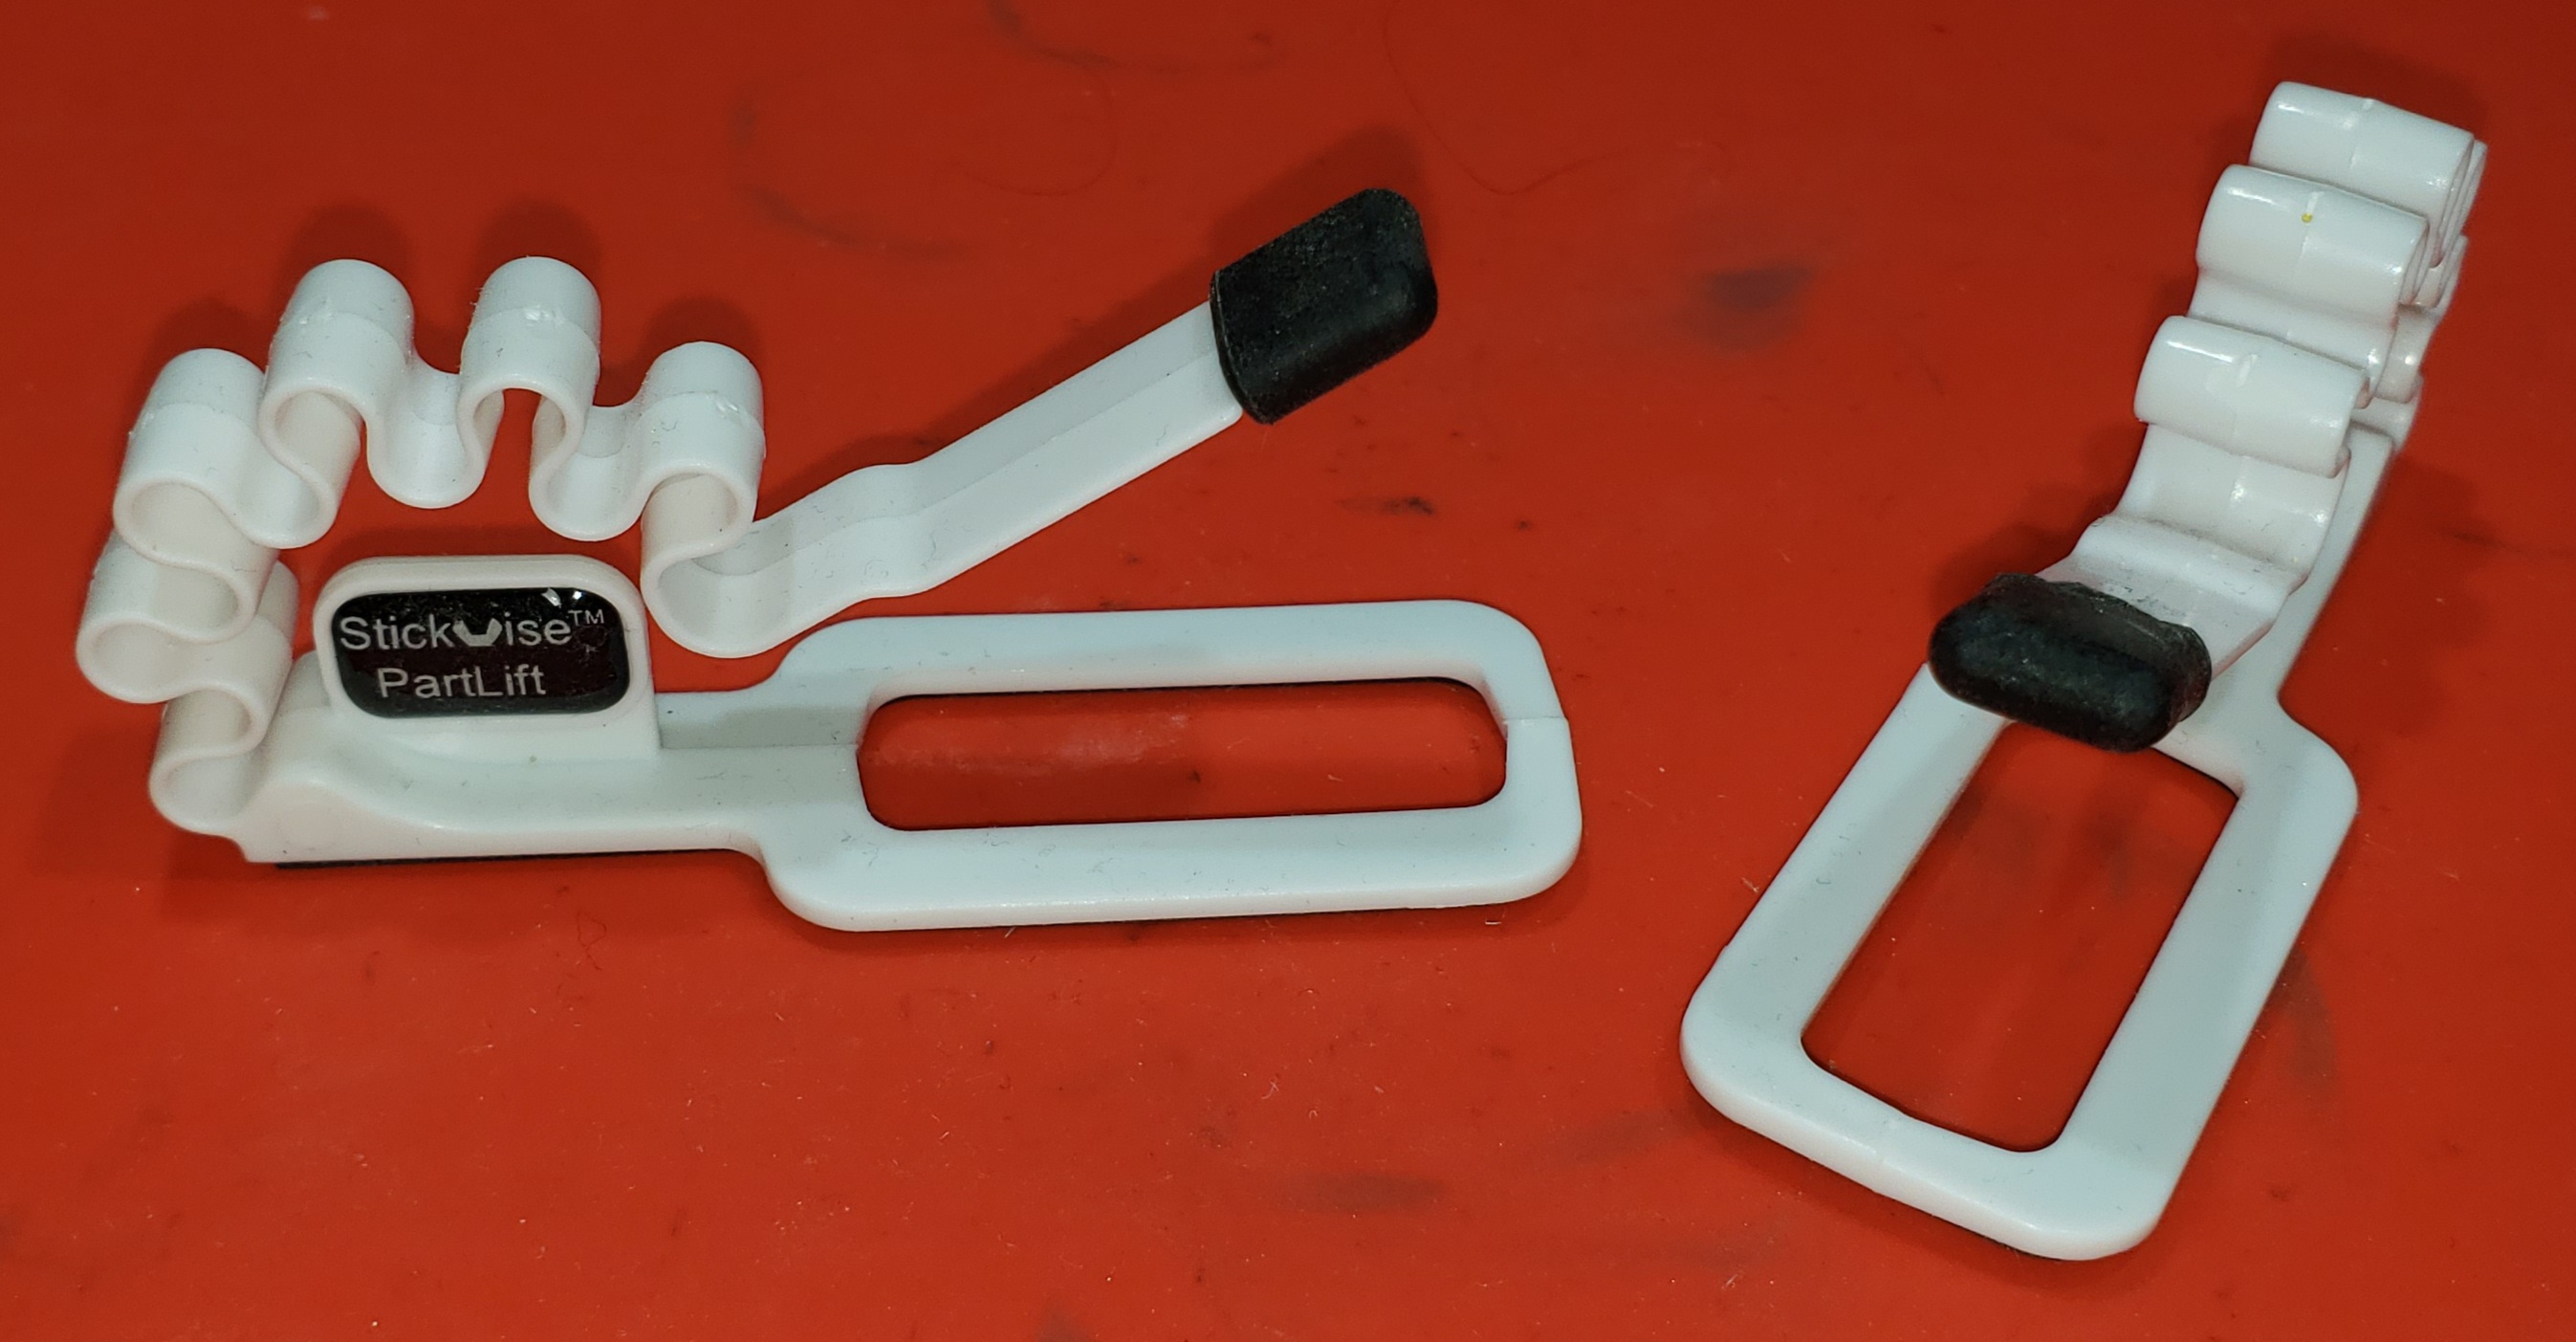
Not quite a "helping hand". Perhaps a "helping finger"? These little things are handy when you have a PCB horizontally about an inch or so above the table and need to hold a component to the underside. They work very well with PDIPs and sockets. They are a little fiddly for smaller stuff. Still, I find myself using them regularly. They live in the same drawer with the Stickvice.
15. Math Nerds interested in chaos circuits.
15.1. What do I need to get started?
You don't need much really.
- Solderless breadboard – seriously. You can get all the parts in through hole form.
- Jumper wire kit for the breadboard.
- Parts:
- A dozen operational amplifiers. The TI TL082 or LT1057 are good choices.
- Several analog multipliers. The TI MPY634 or AD633 are good choices.
- A through hole resistor kit, or just buy them as you need them.
- A through hole capacatator kit, or just buy them as you need them.
- A cheap, two channel power supply that can provide -15V & +15V at about 0.5 amps. Should be less than $50 US.
- An oscilloscope. I suggest the Analog Discovery 2 – about $300
- A multimeter is not strictly required, but can come in handy. If you got the Analog Discovery 2, then it can serve this fuction as well.
- A couple books to get you started. The "Concise Guide" is especially good for someone new to the subject.
15.2. Do I need fancy/expensive operational amplifiers?
The short answer is "no" – mostly.
Most chaos circuits based on analog computer principals don't require sophisticated operational amplifiers. In fact, you can usually get away with using the humble 741 amp. Occasionally you will need something better like the TI TL082 or LT1057.
That said, some circuits exploit some aspect of the amp or require much more precision. These cases are super rare, and the source material from which you are working will always point out when a special chip is needed.
15.3. Should I get an analog oscilloscope?
It is true that an old analog scope from e-bay will run rings around any modern digital scope for X-Y mode. The down sides:
- Can be harder to use.
- It can be a real challenge to keep them working – most of them are more than 40 years old, and contain parts that have expired (like electrolytic capacitors).
- They take a lot of space!
15.4. Should I get a high end multimeter?
Not unless you have another use for the meter. For chaos circuits you only need a couple or three digits of accuracy. If you stick with typical low current designs, your meter only requires a "Cat I" safety rating.
15.5. Why do you recommend the Analog Discovery 2?
Several reasons:
- Simple device that is super easy to use.
- Contains several instruments in one package:
- Oscilloscope
- Multimeter
- Signal generator
- The oscilloscope has "differential" inputs – very handy for chaos circuits!
- It is very easy to pull data from the application into your favorite math software.
15.6. How do I measure a non-ground referenced voltage with a regular oscilloscope?
You can use a differential oscilloscope probe, but the least expensive ones are usually over $100 US. In fact, you could get an Analog Discovery 2 for less than what many differential oscilloscope probes cost.
As you will normally be working with a circuit with operational amplifiers anyhow, you can build your own differential probe as part of your circuit. This can be done with a single chip called an "instrumentation amplifier" – like the TI INA121PA. These cost quite a bit more than a regular operational amplifier, so you might choose to make your own instrumentation amplifier from 3 regular operational amplifiers and 4 resistors. For this option I direct you to page 33 of "Elegant Circuits: Simple Chaotic Oscillators".
16. Stupid Bench Tricks
Here are a collection of simple things that have had a disproportionate impact on my Bench.
16.1. Debugging Digital Buses
Your SPI/I2C/CAN/GPIB bus is all wired up, and something is not working. Debugging this stuff frequently involves:
- Probing the bus
- Breaking the bus and injecting signals
- Breaking the bus and impersonating one of the devices
All of those things involve me digging around in a rat's nest of wires on my bench. Just finding the bus wires is hard, and then keeping them lined up for identification is impossible without help. It's sounds weird, but I have found hair clips to be a super handy way to keep random jumper wires lined up and identified:
The next task is to tap into the wires. When we find a fault, we might want to disconnect one side of the bus, and insert our bus controller into the network. For these tasks, I have these two super handy little thingamajigs:
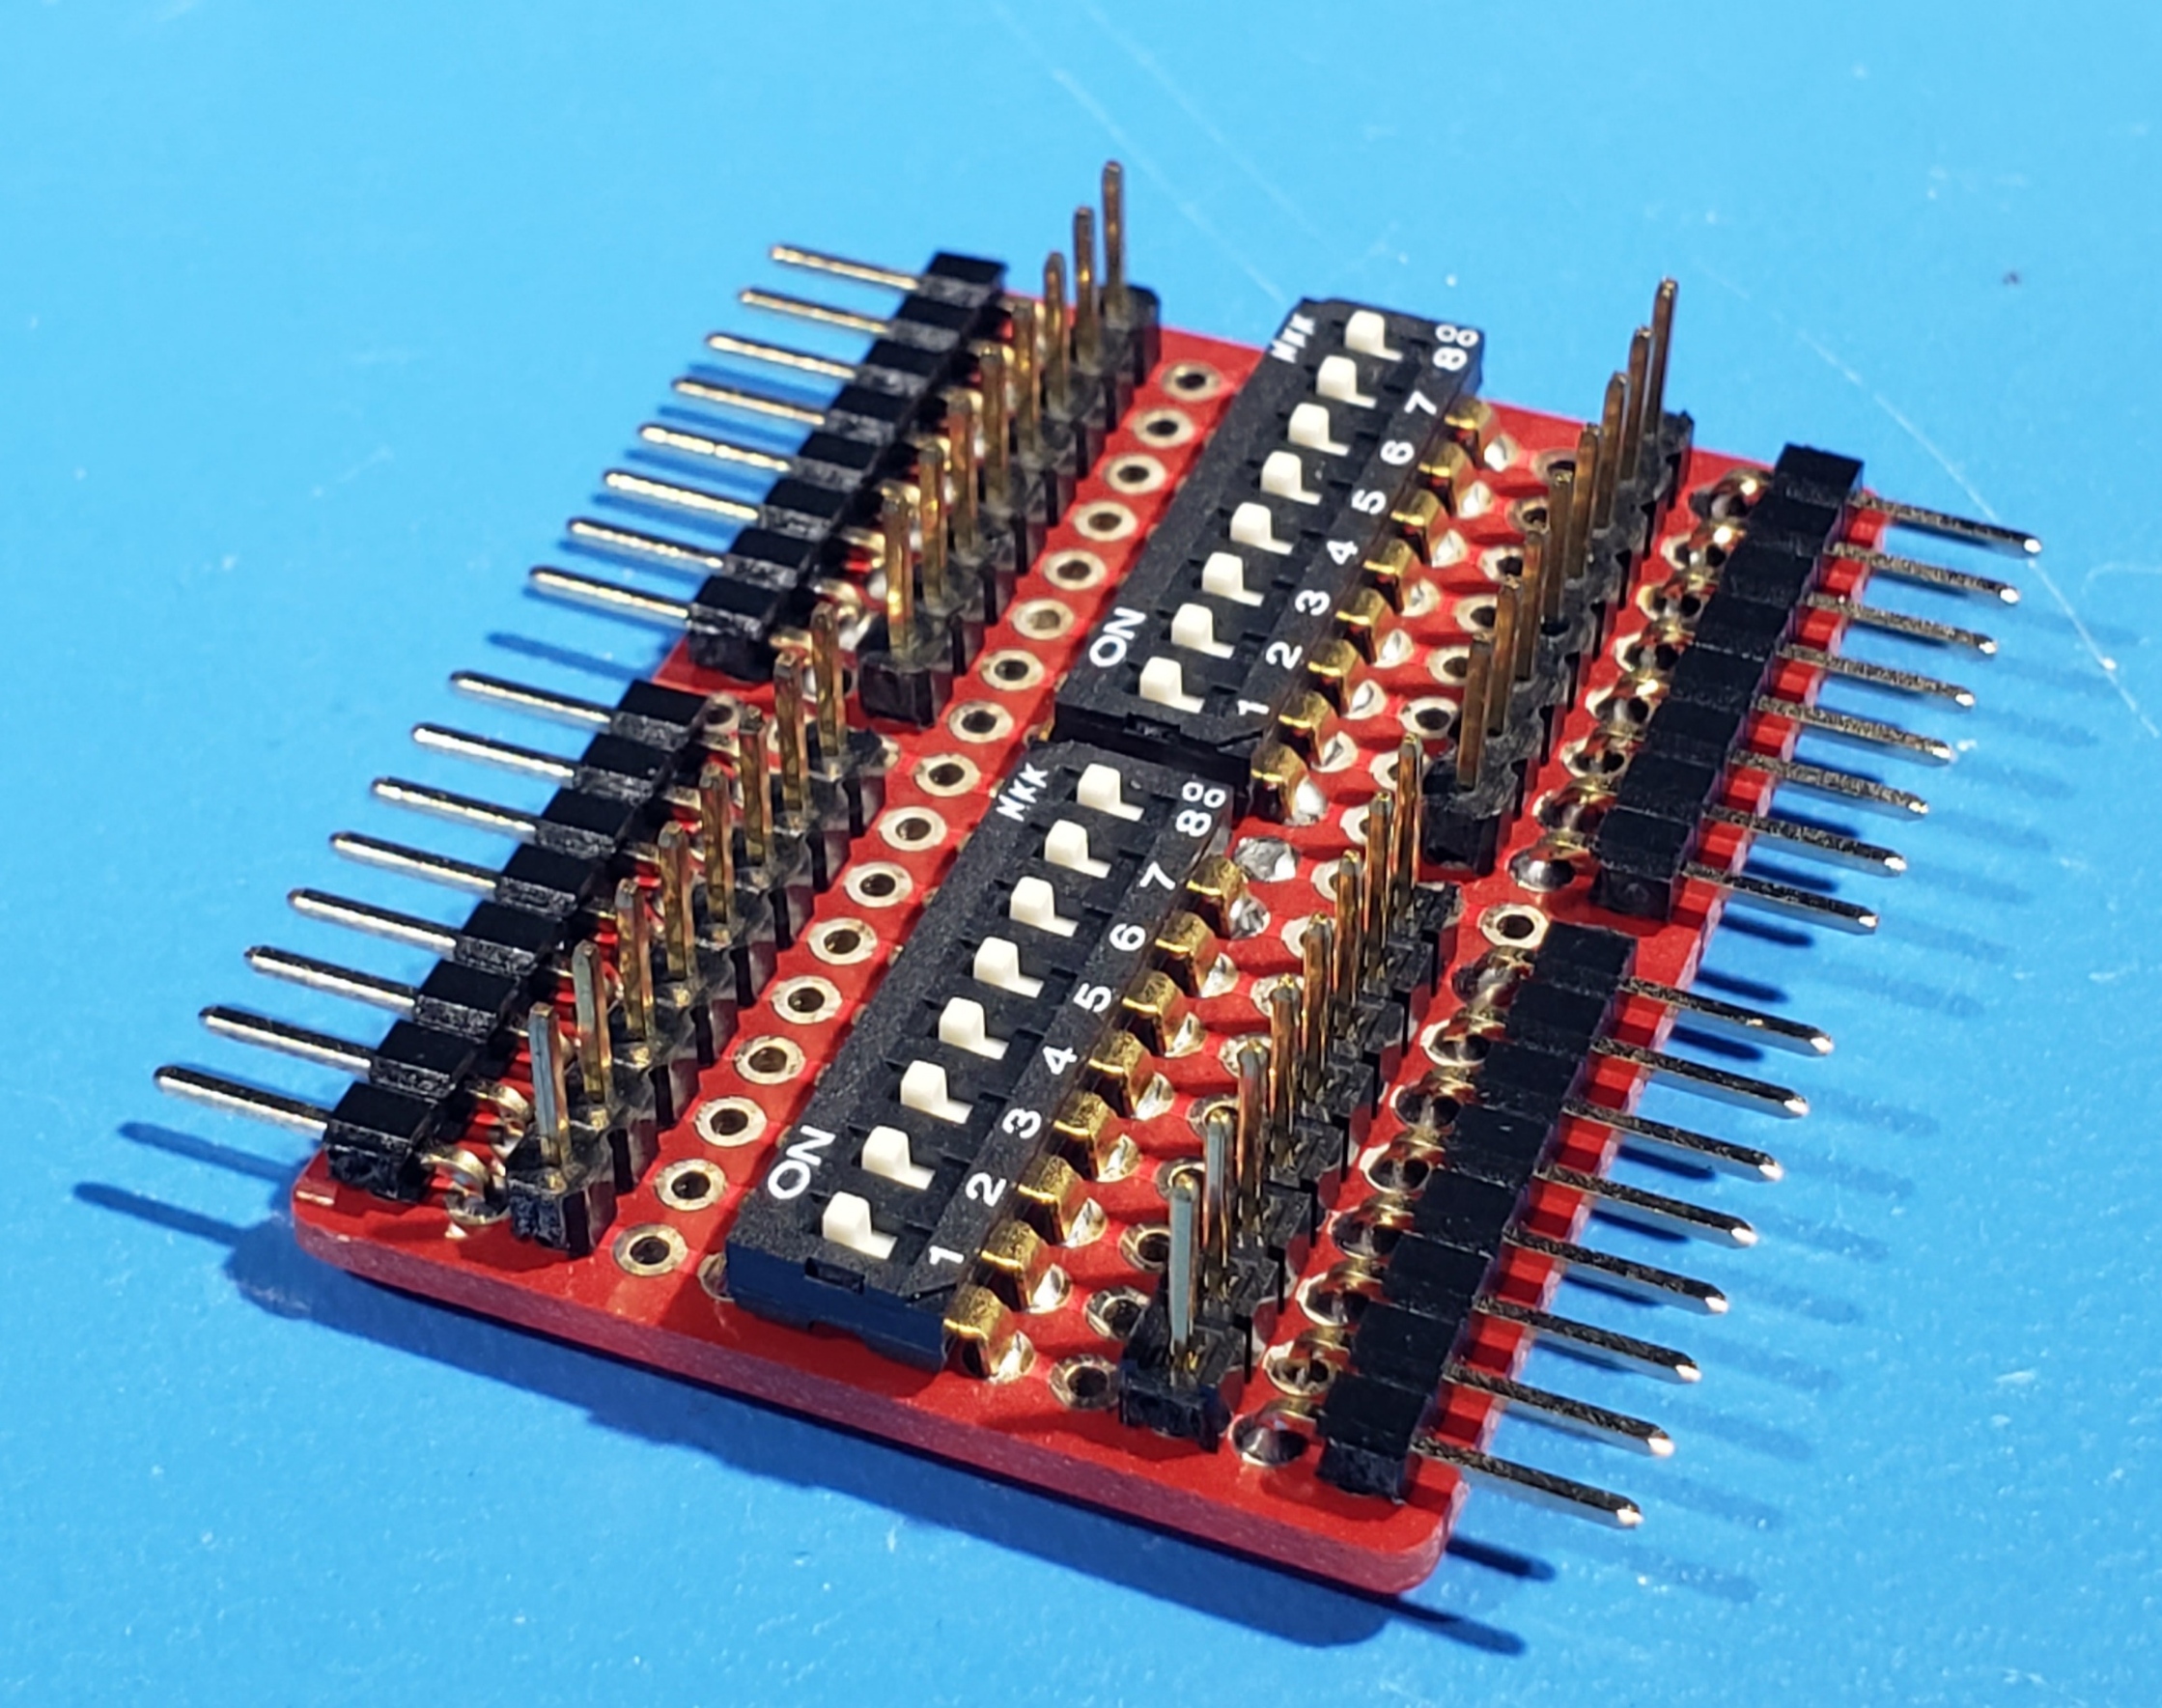
They both provide four connection points for each bus line. The on one the left is just two right angle headers soldered together. The one on the right has dip switches to disconnect individual lines – to make breaking the bus easy.
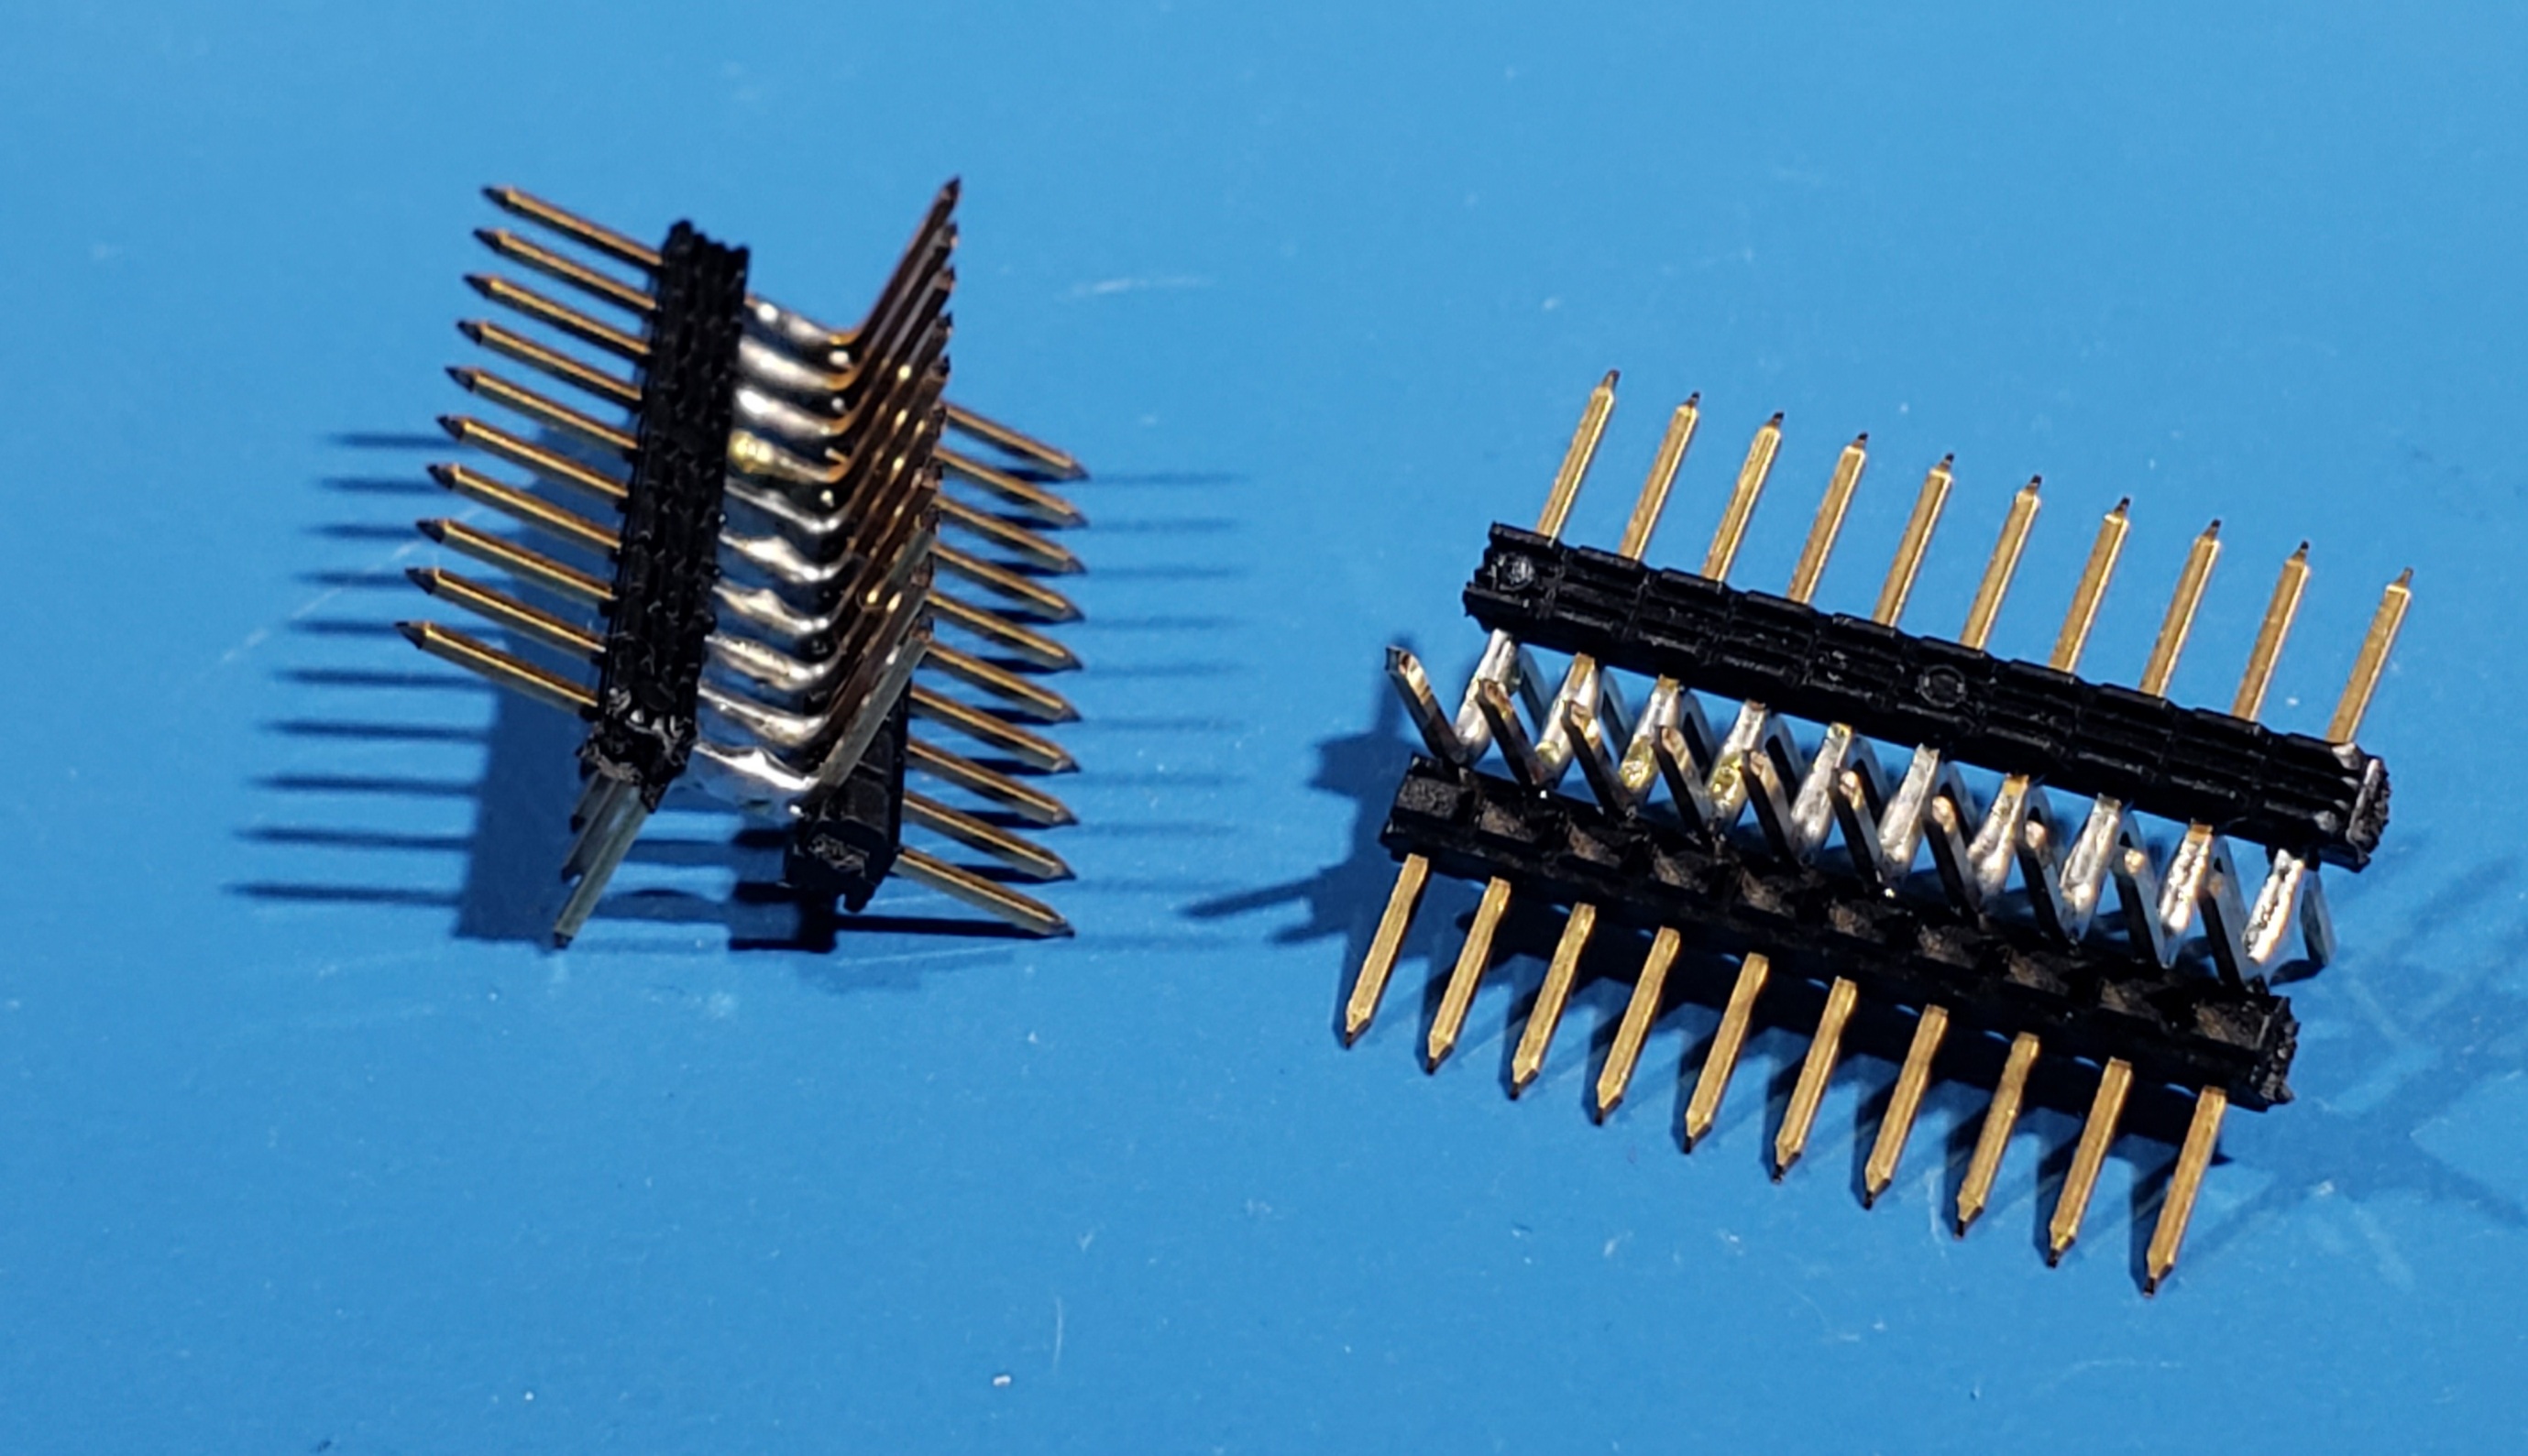
16.2. Never Enough Header Pins
EVMs never have enough ground and power pins! In the past I would just hang grabbers off of them, but sometimes they would fall off and I would waste my time trying to figure out why something wasn't working. So I
- Took a pin header
- Snapped off a length with five pins
- Pushed the center pin down so it only had a nub on the top
- Pushed the other pins up so they only had nubs on the bottom
- Stripped a bit of 30 gauge Kynar wire, and wrapped it around the short ends
- Soldered it all together – so now all the pins are electrically connected
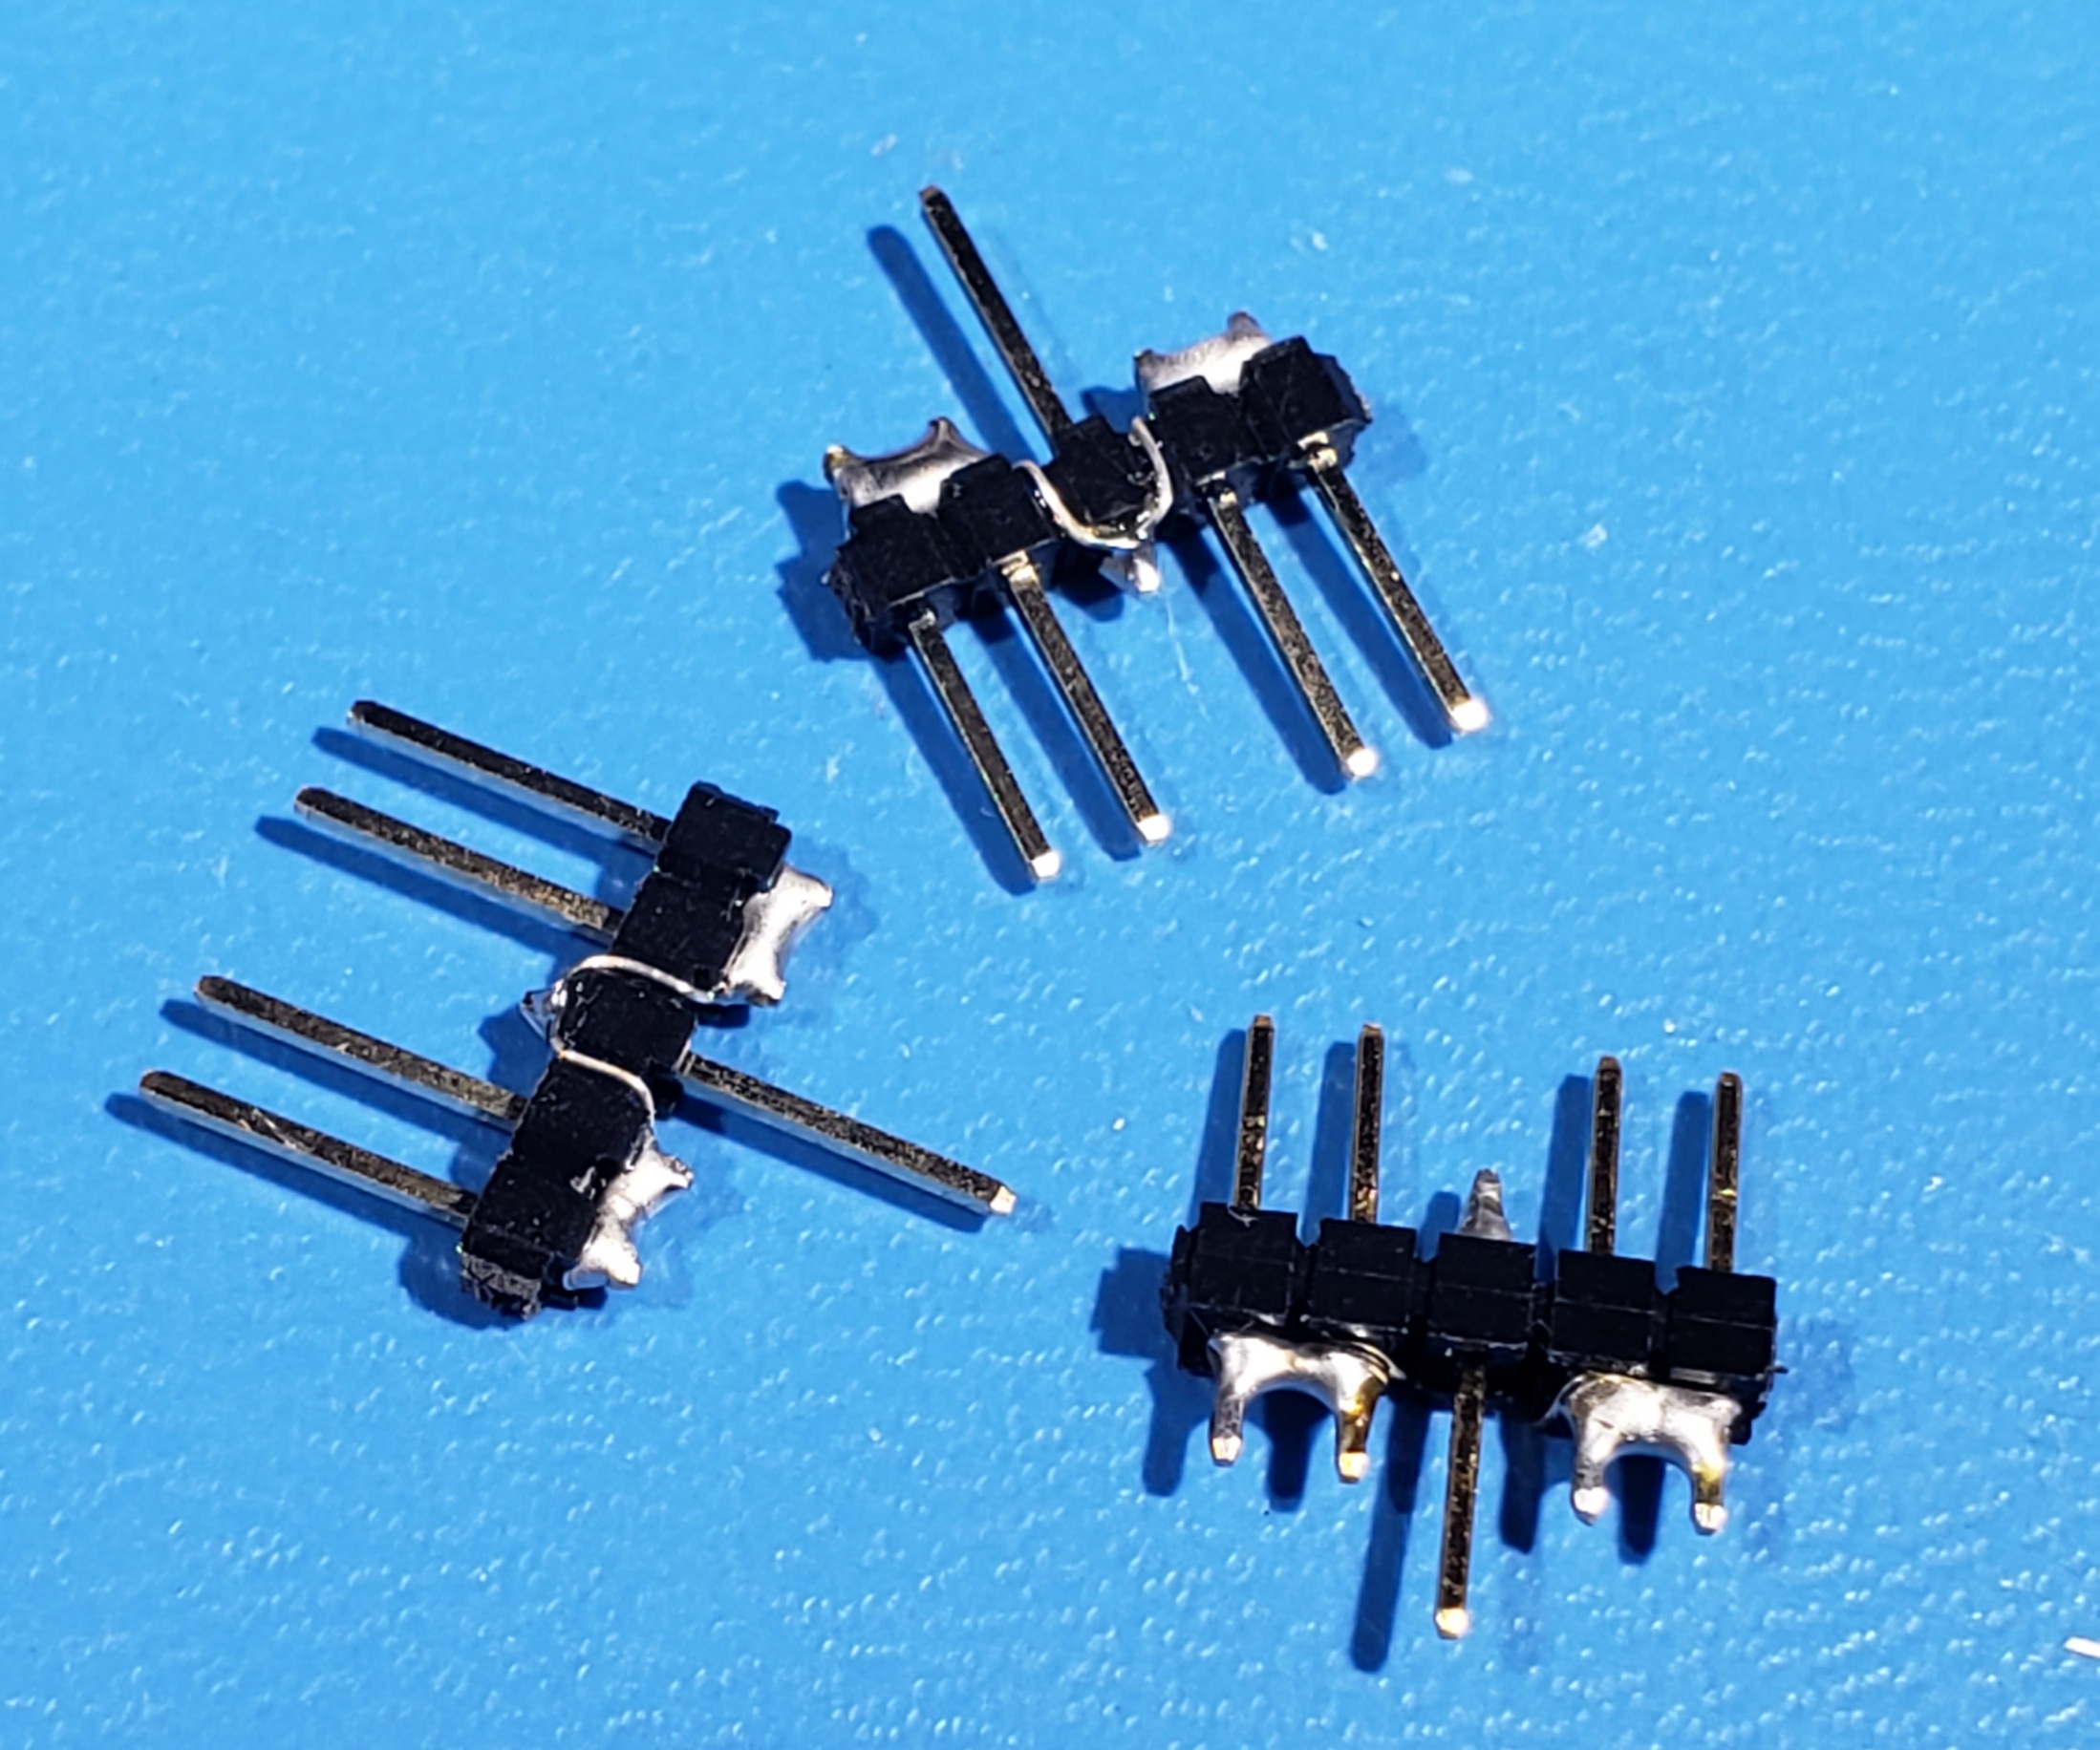

Now I can poke the center pin into a socket, and provide four square pin headers. Usually I use a small socket-socket jumper wire, as in the right photo, to attach it to a board.
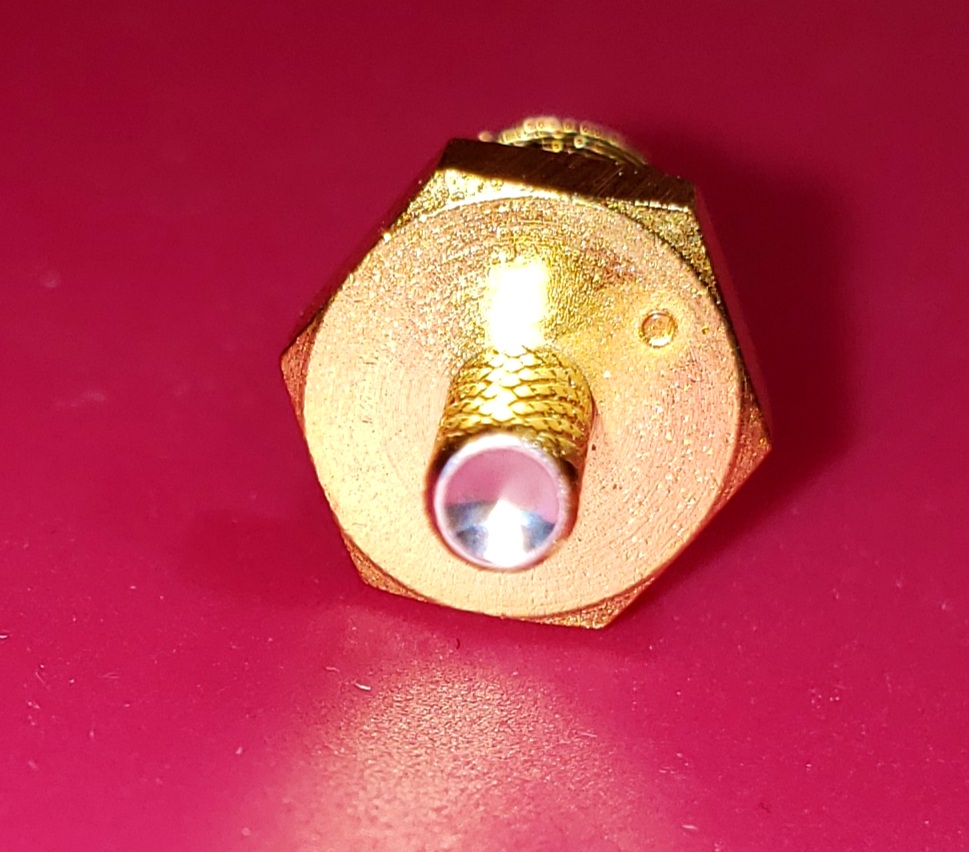
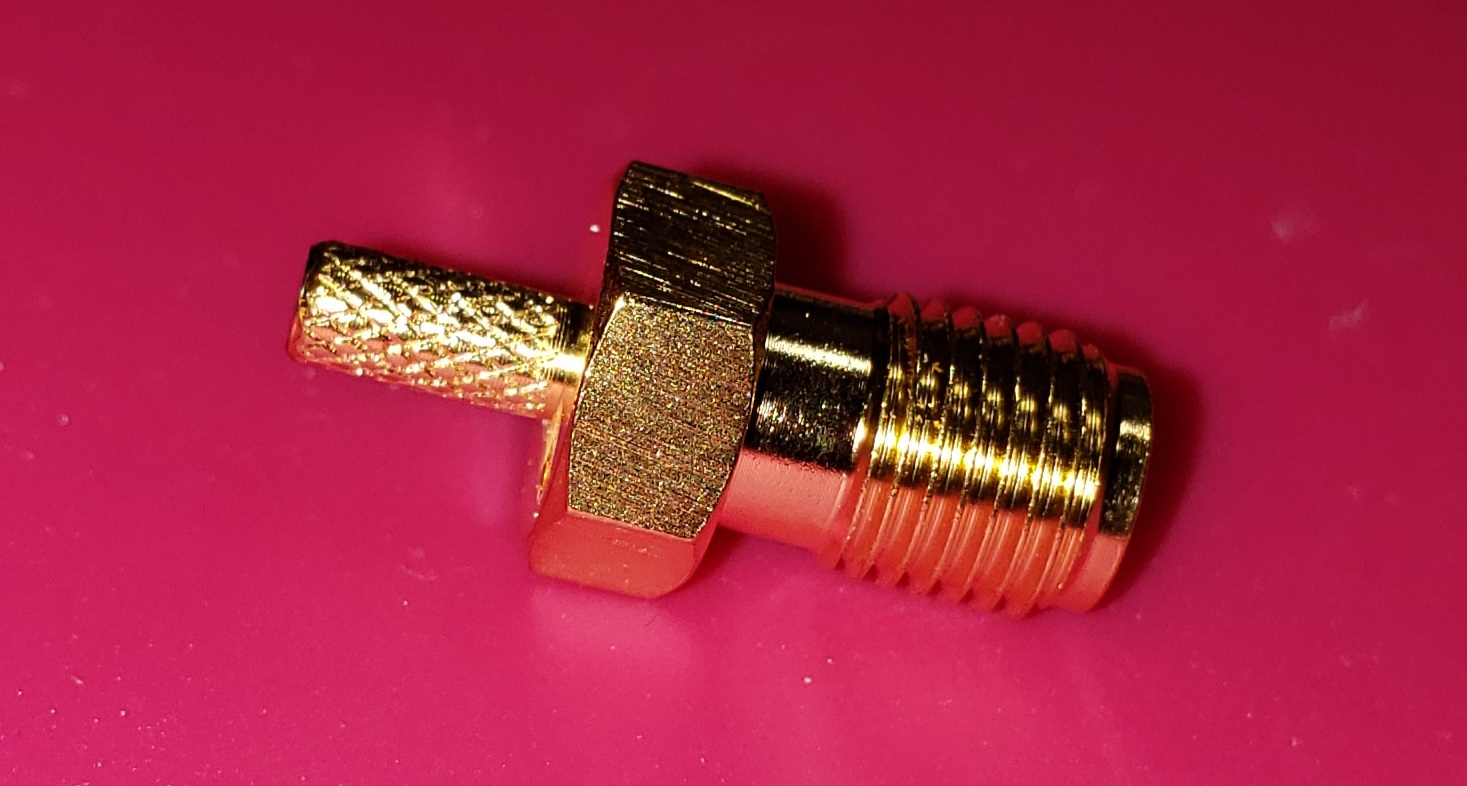
16.3. SMA Dust Collectors
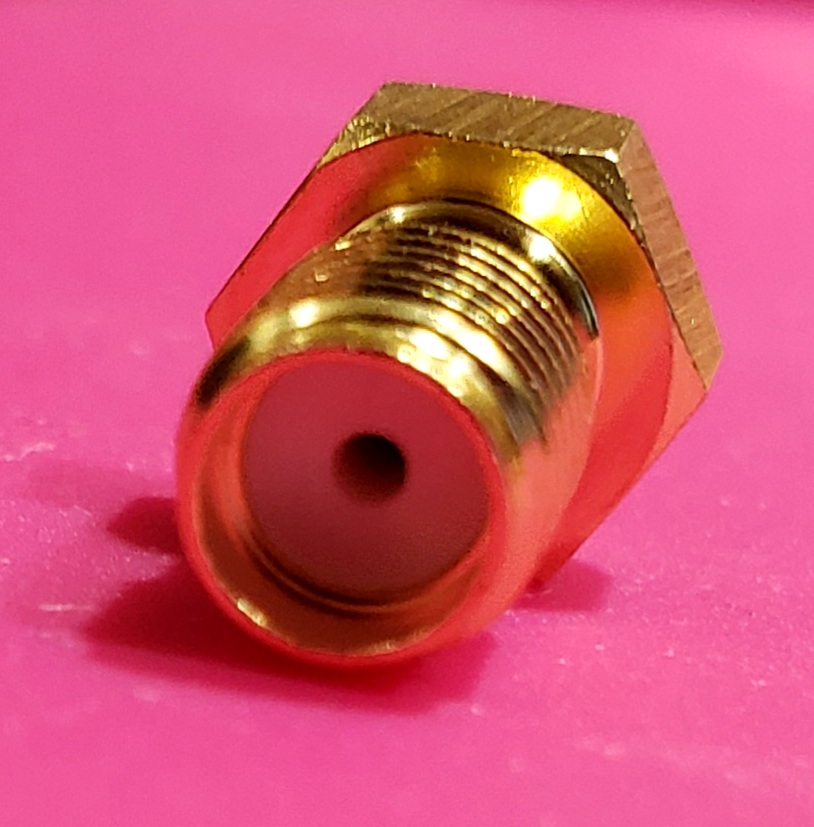
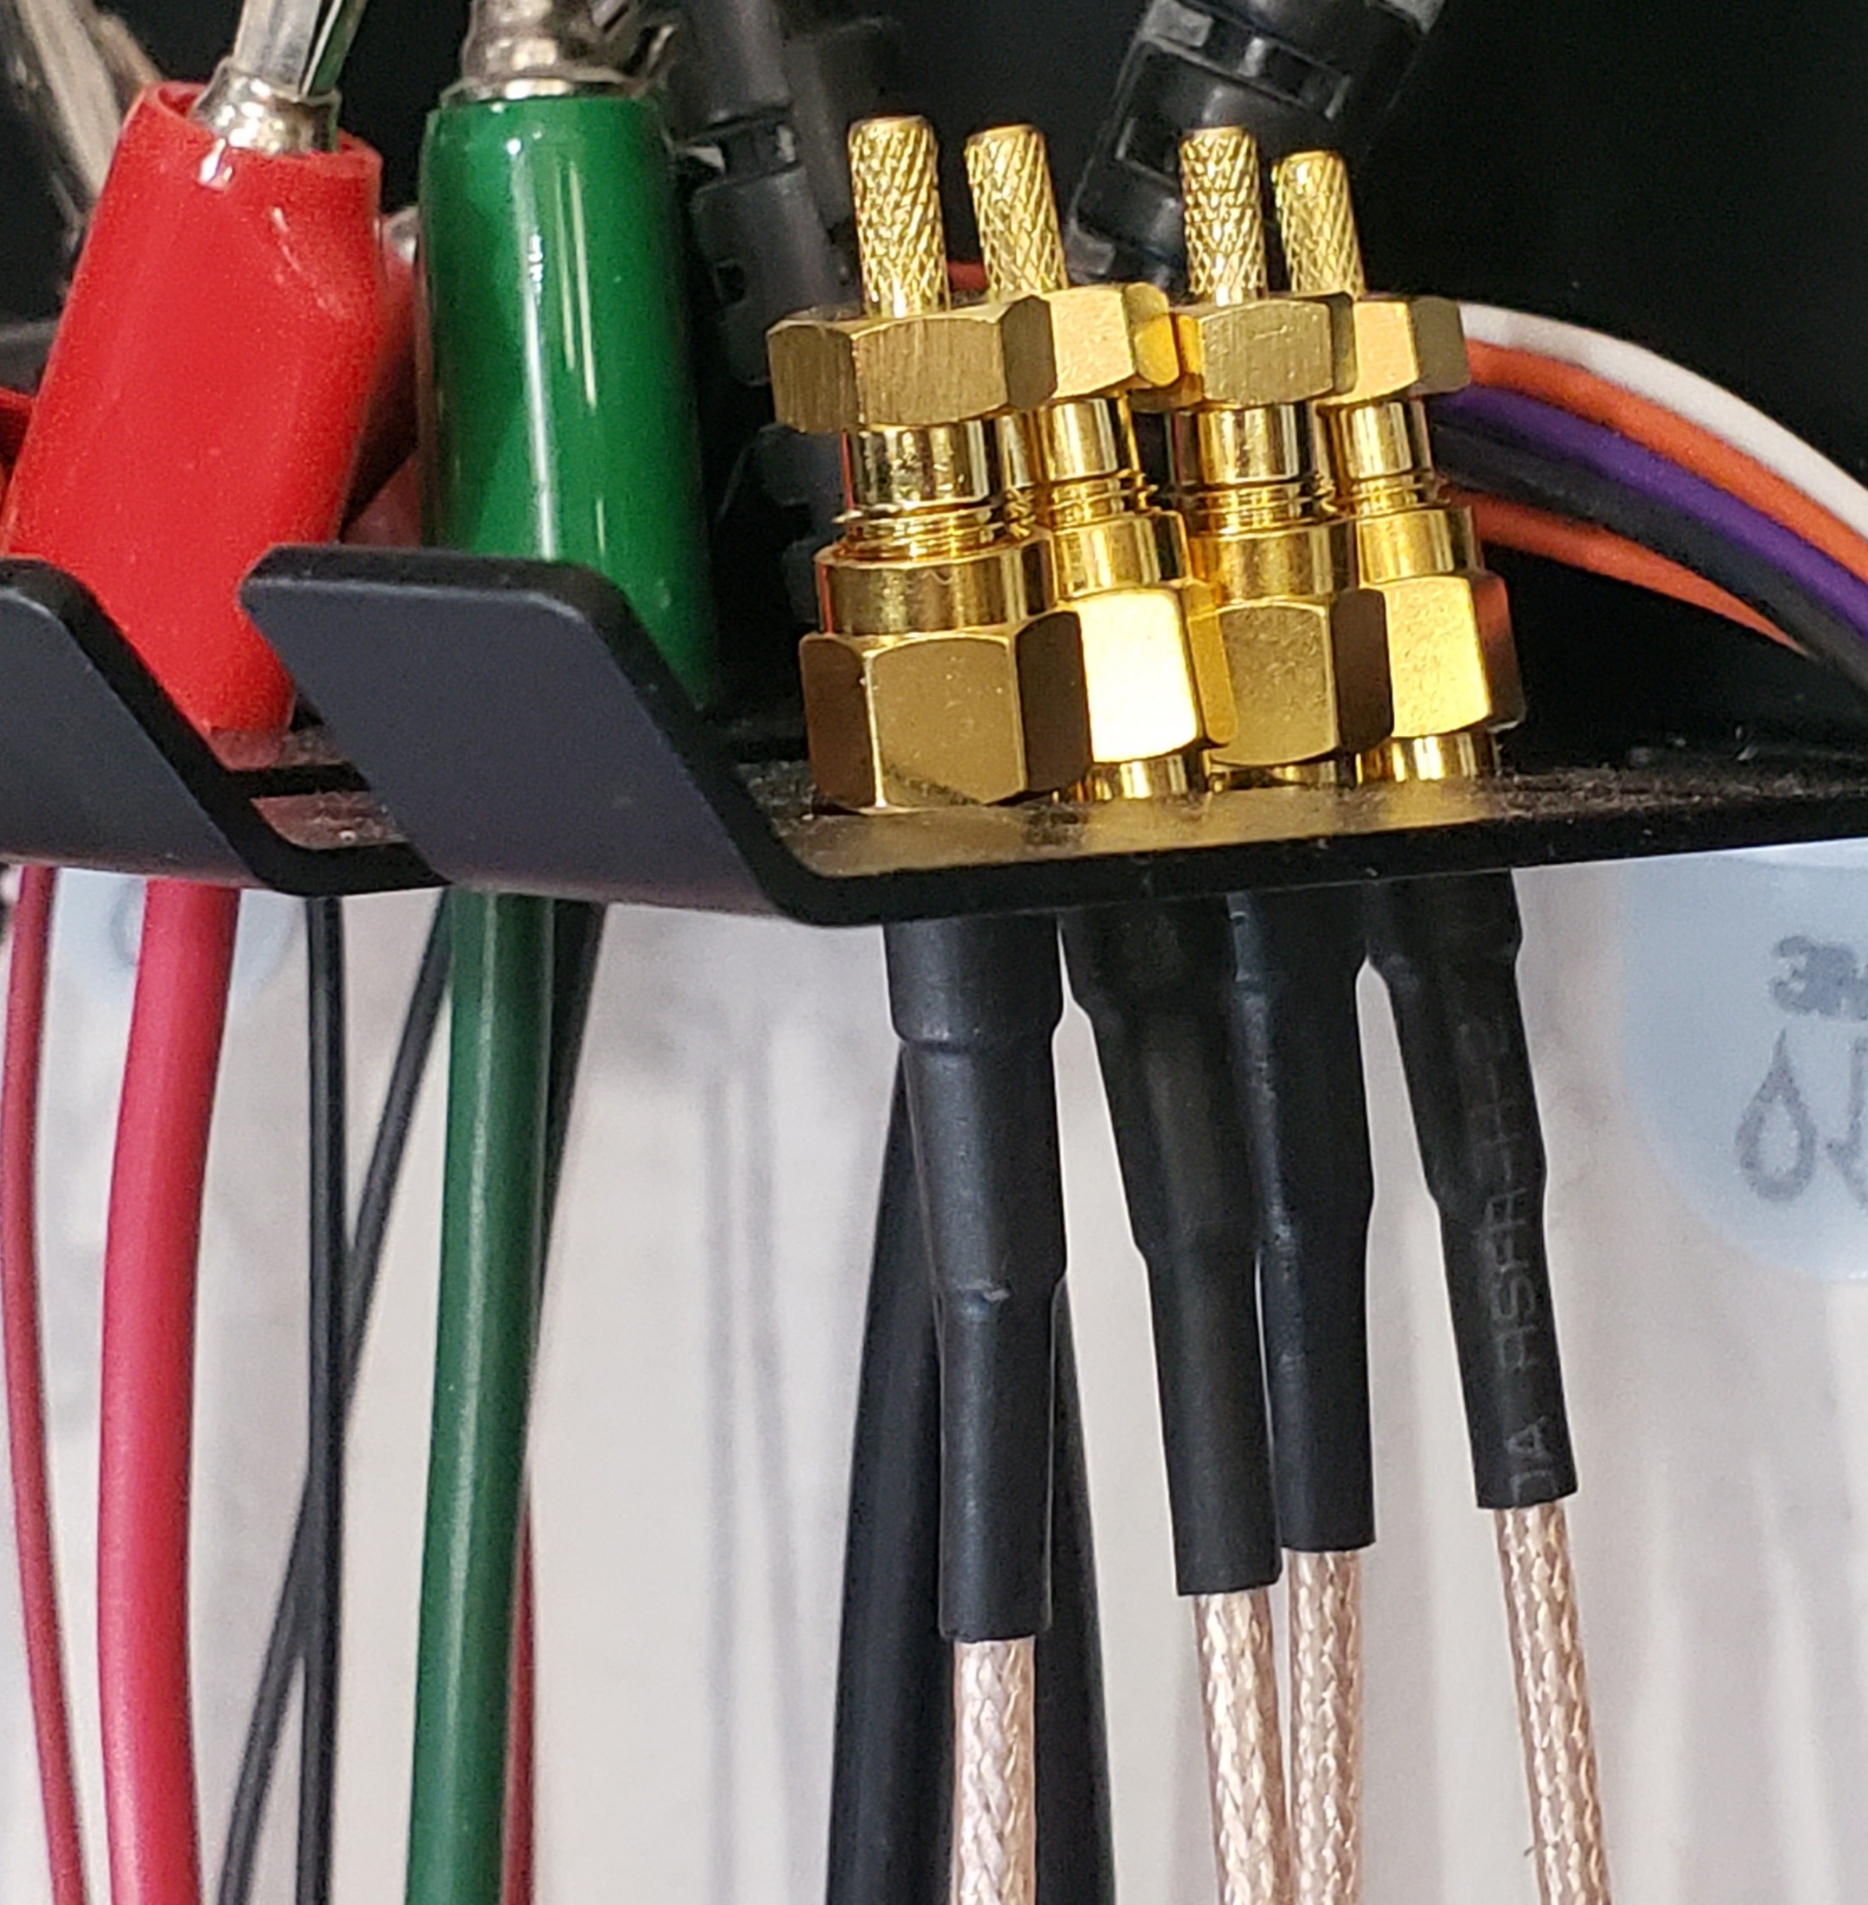
I hang SMA cables on a cable orginizer, and they tend to collect dust inside the houseings. I don't have the same issue with BNC cables. When looking for SMA dust caps, I was shocked to see them going for $15 US per cap! So I
- Got some SMA cable asymblies for about $1 per unit
- Pulled out the center pin
- Put a little solder plug in one side
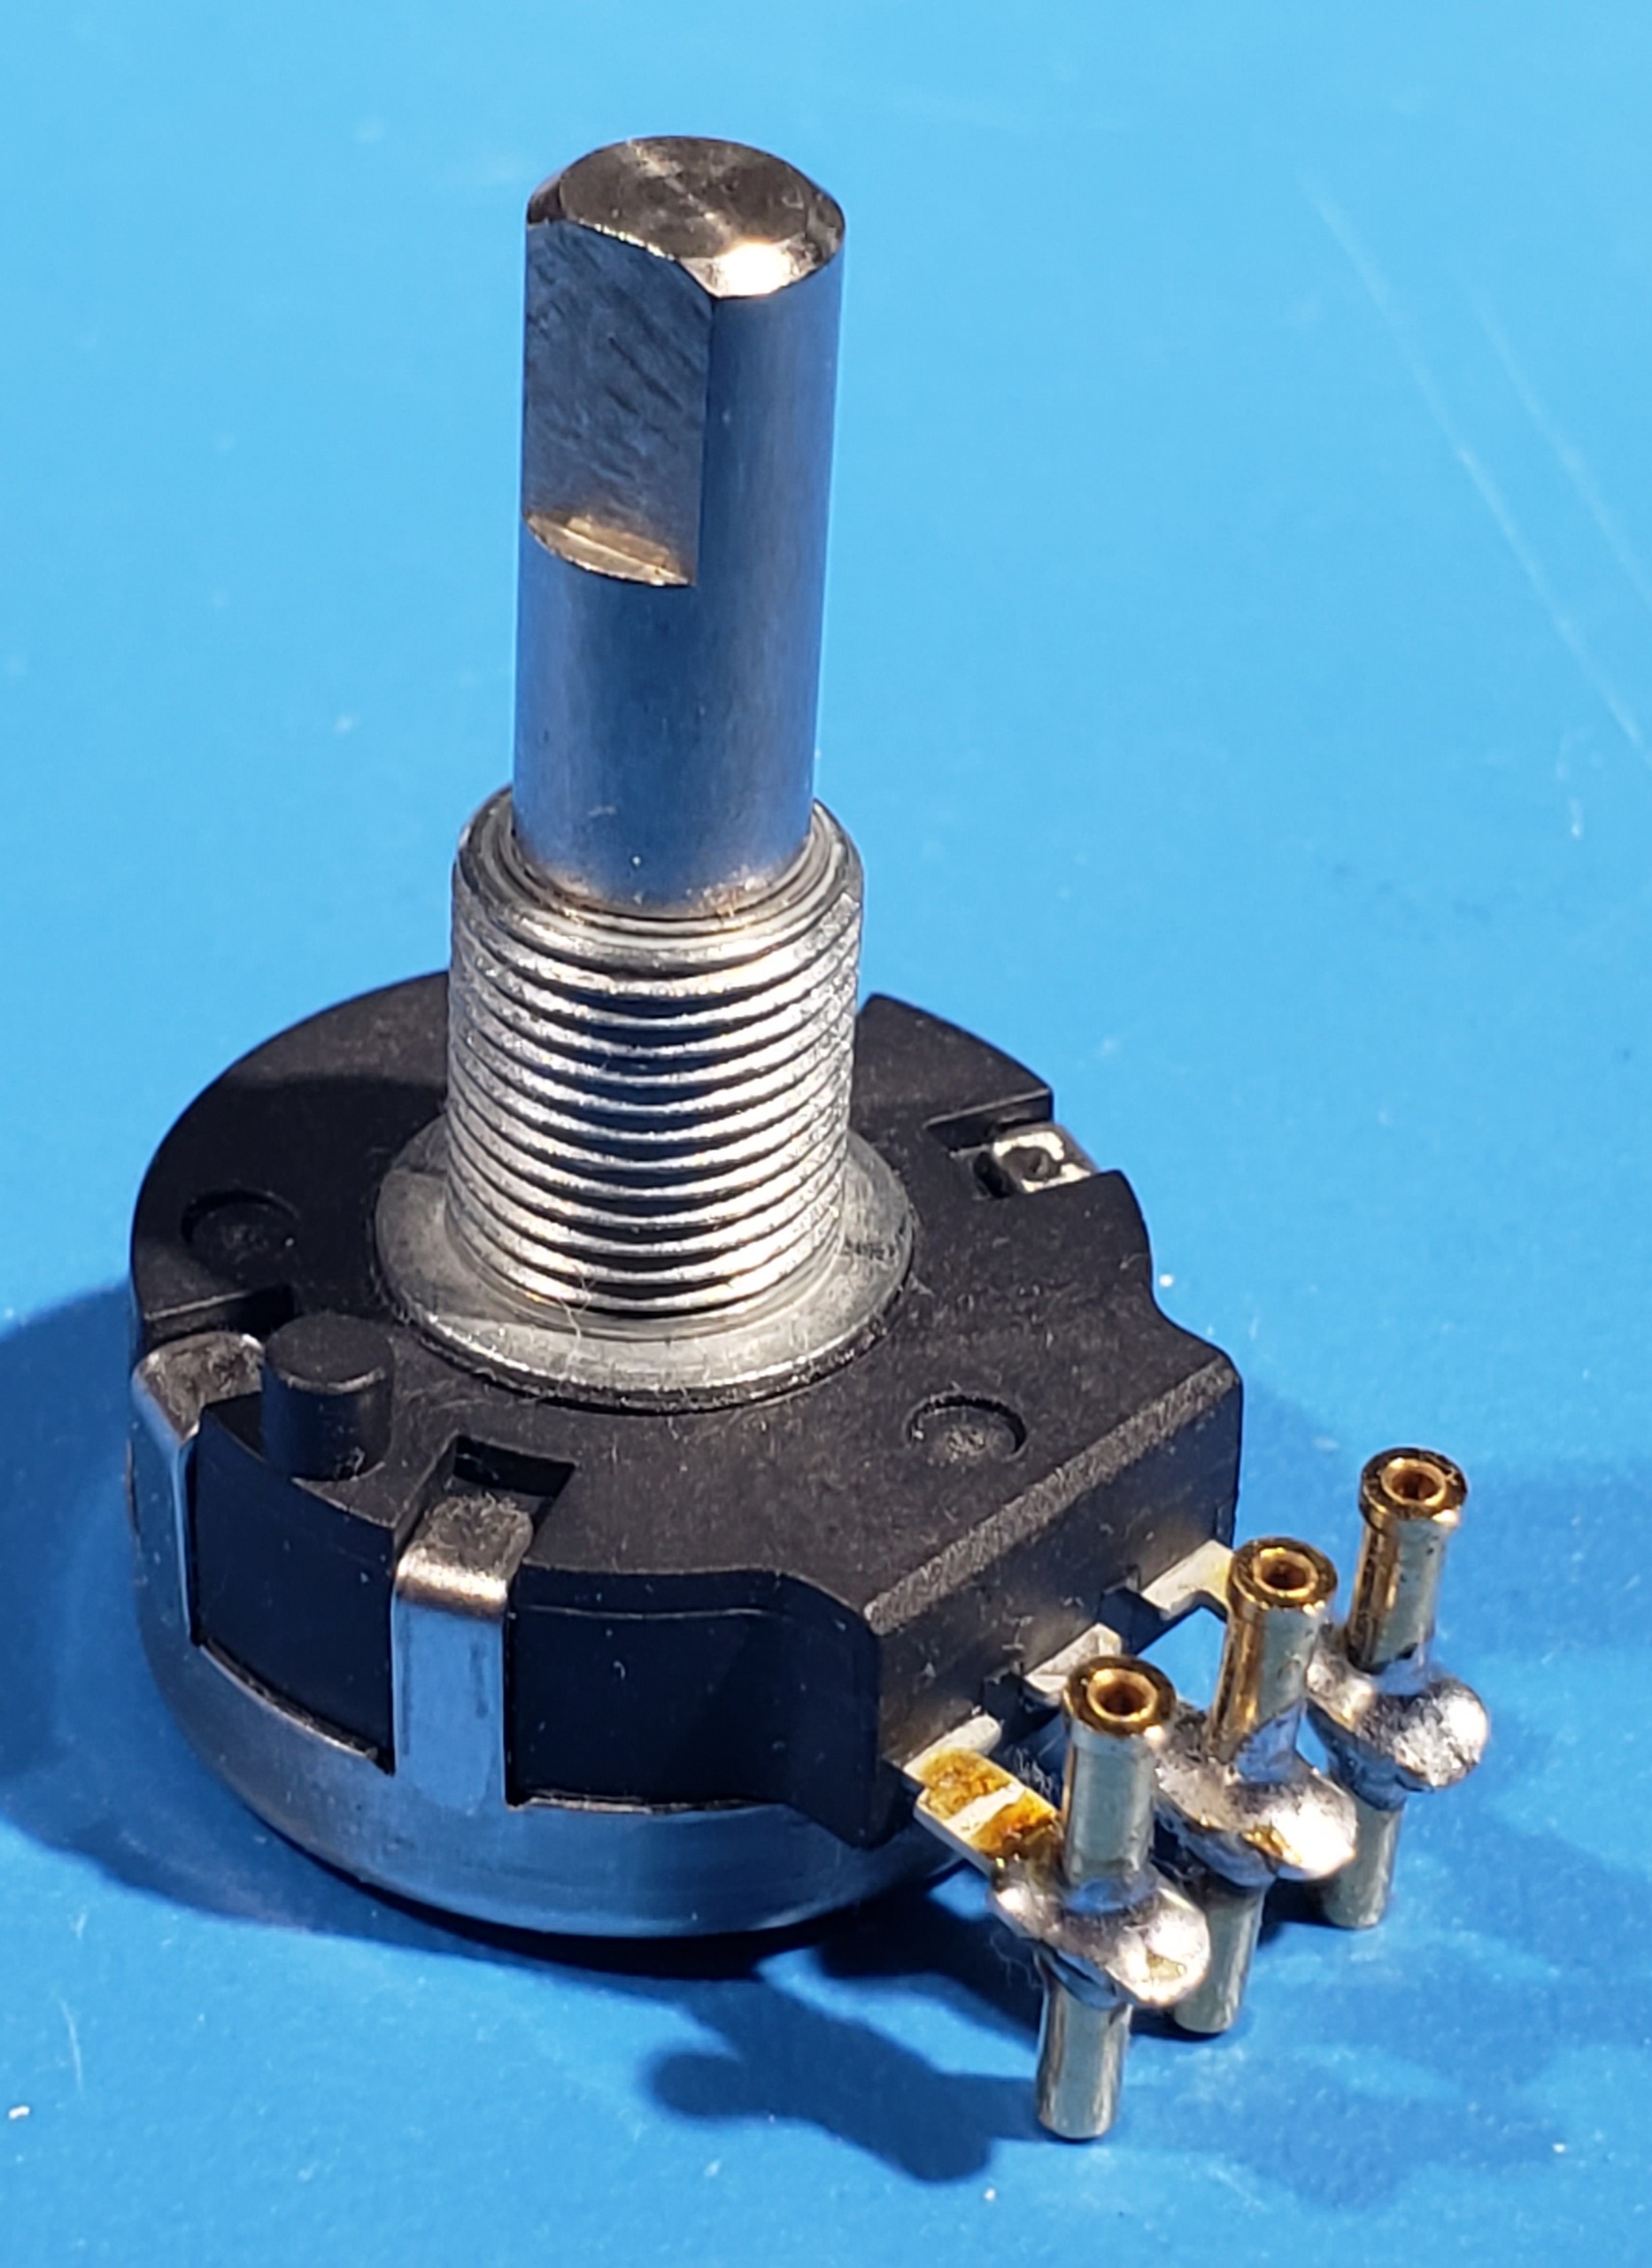
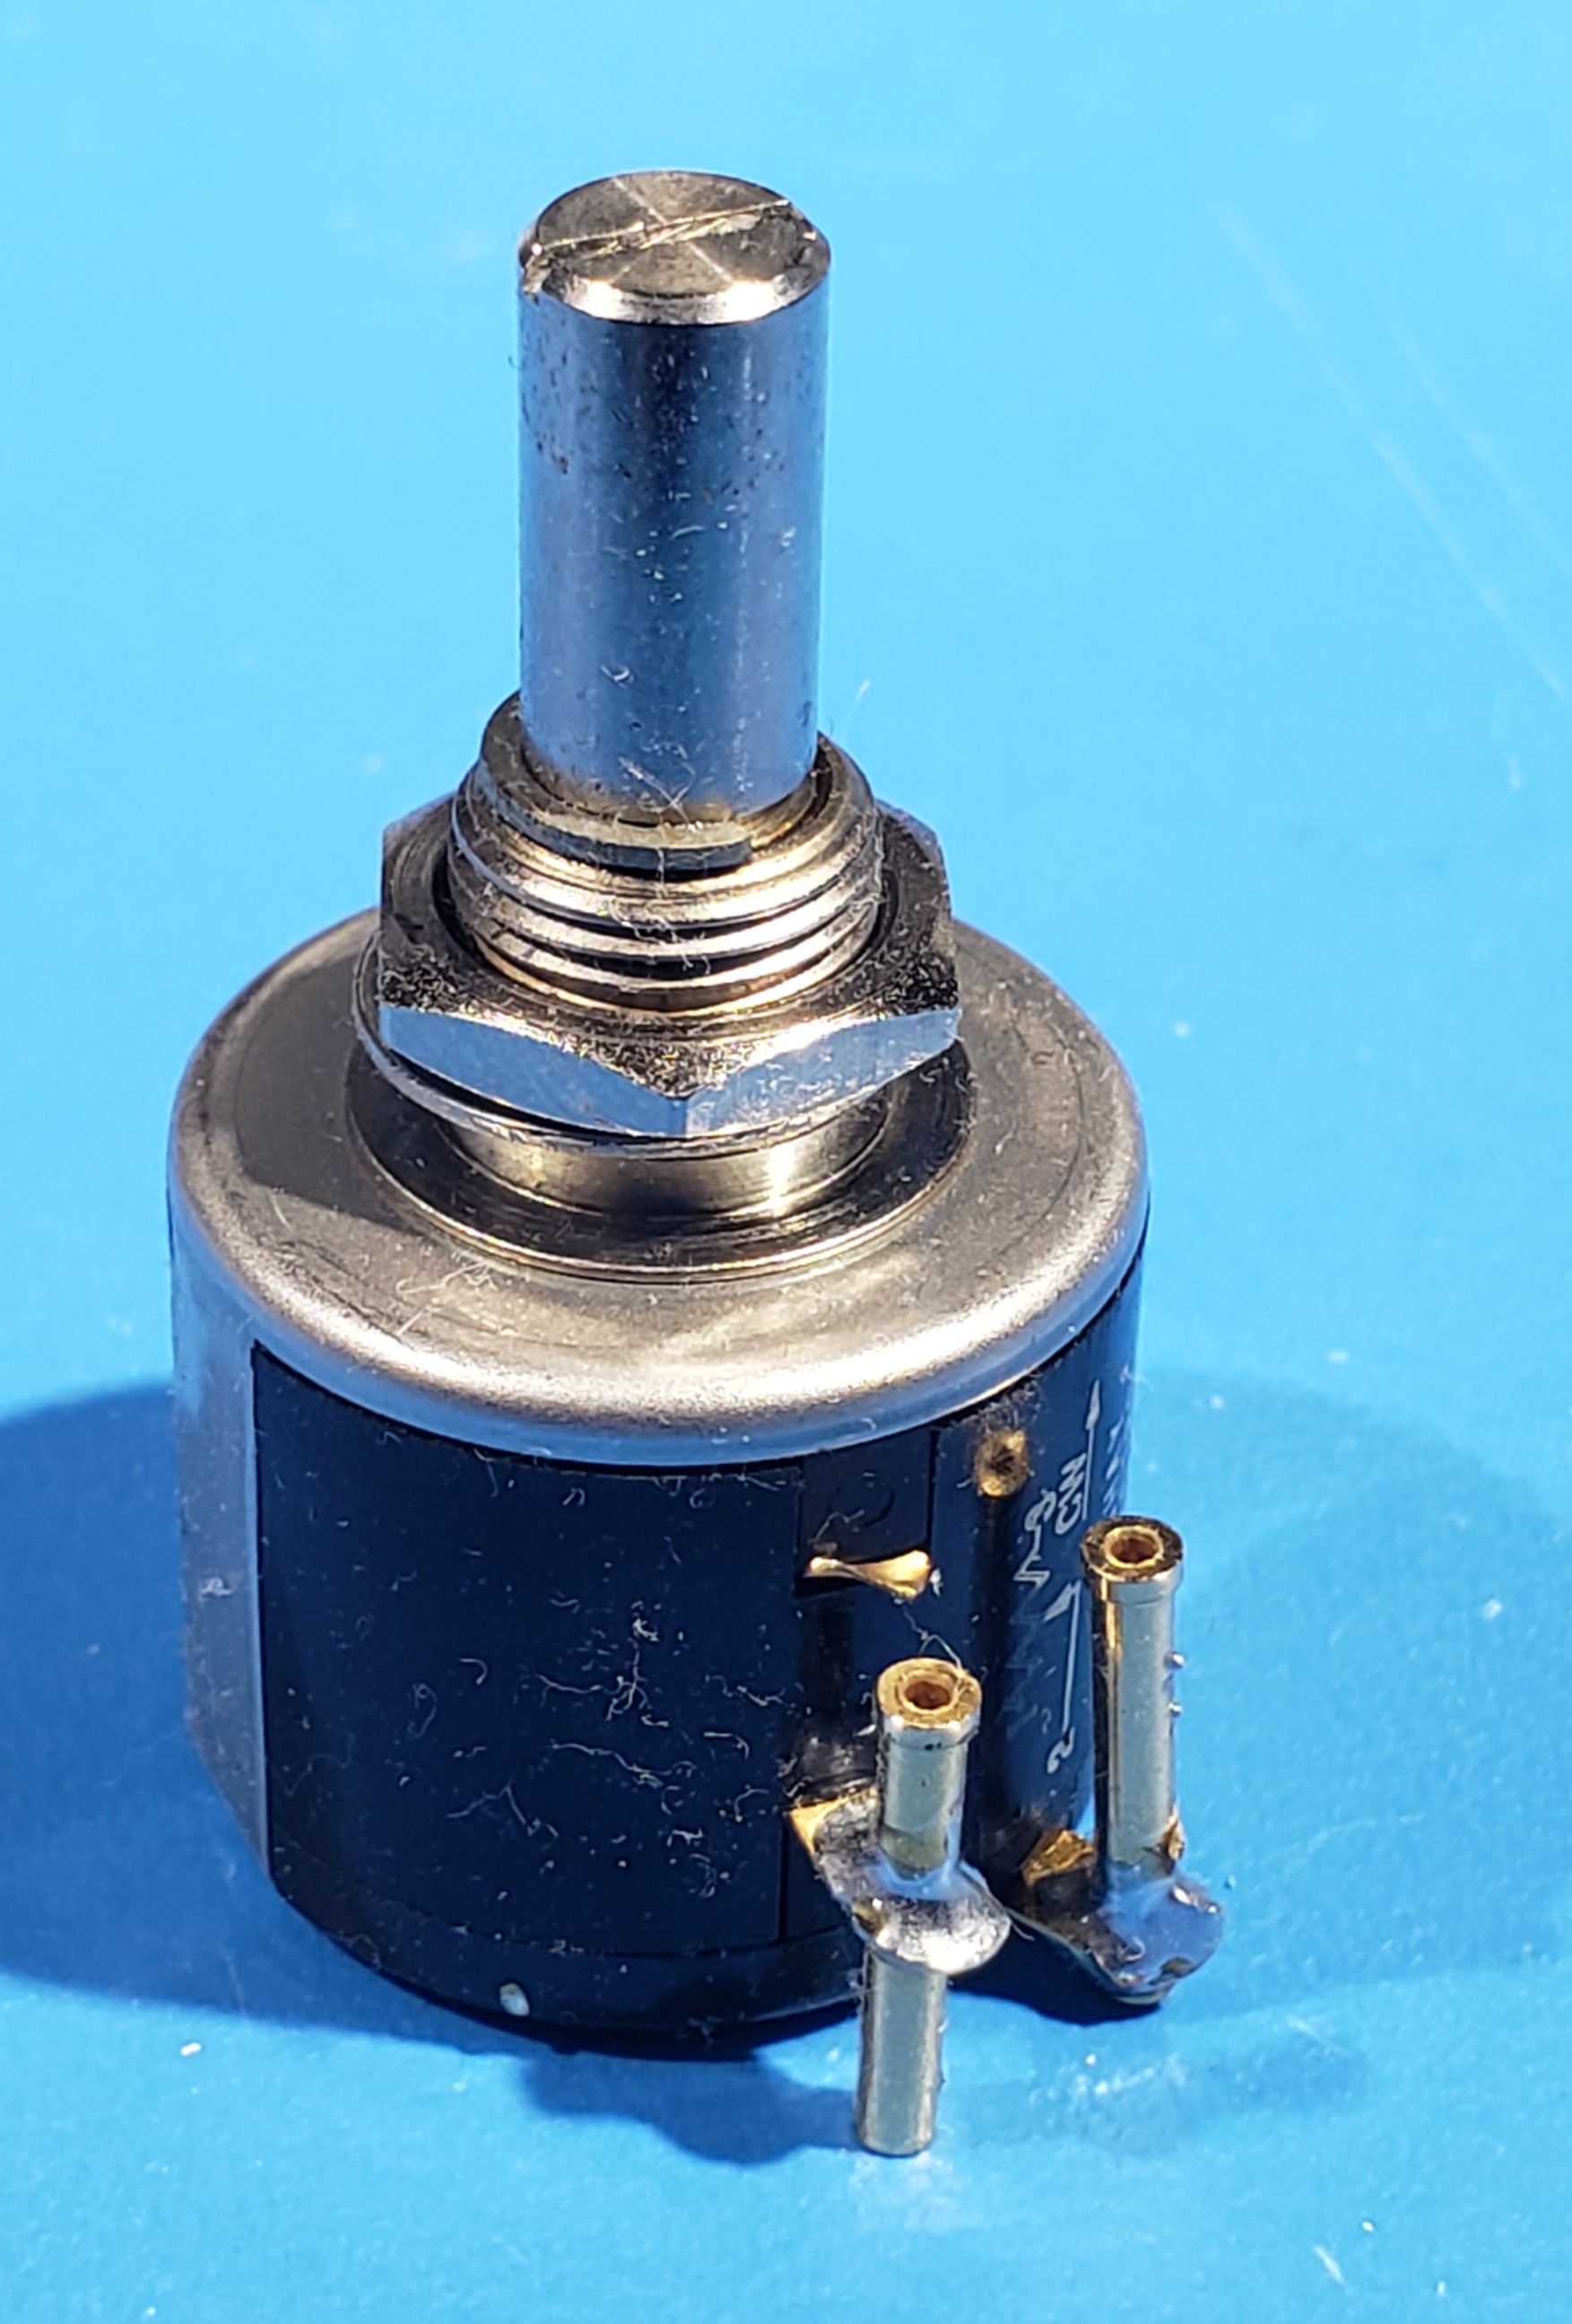
16.4. Potentiometers For Prototyping
Sometime ago I got rid of those junk, scratchy pots I had been using for years, and replaced them with nice, smooth pots from a surplus store. A couple of the old ones had wire leads with grabbers, one had banana jacks, and one had solid wires soldered on. For these new pots, I soldered single pin sockets onto the leads. This makes it much nicer to attach jumper wires to solderless breadboards or EVM headers.
16.5. Why do you have cupcakes on your bench?
Silicone baking cups make great little containers for small stuff on the bench – screws & hardware, IC & components, dust caps, etc. I have one with conductive foam at the bottom for components. They are chemically resistant and Epoxy won't stick to them, so they get used for things like used alcohol pads and epoxy applicators. They are also heat resistant, so you can toss hot soldering clips and the like into them without worry.
